Group Policy deny logon locally
Case 1: Group Policy’ “Allow log on locally” was not setup to allow users or domain users. To setup allow users or domain users to logon the computer or domain, you need to add the users or domain users to the “Allow log on locally”. Please follow these steps to add the users.
If you work on the domain controller, open Group policy management, then “group policy management”>”Forest:XXXX”>Domains>XXXX>Domain controllers>default domain controllers Policy, right click it, ” edit”.
1. Run gpedit.msc.
2. Expand Computer Configuration\Windows Settings\Security Settings\Local Policies
3. Click on User Rights Assignment
4. Ensure that “Allow log on locally” includes Administrators, Backup
Operators, Domain Users or Users.
Case 2: Group Policy’ “Deny log on locally” was setup to deny users or domain users. To setup allow users or domain users to logon the computer or domain locally, “Deny log on locally” should be empty or no users or domain users in the list. Please follow these steps to remove the users or domain users from the “Deny log on locally”.
1. Run gpedit.msc.
2. Expand Windows Settings\Security Settings\Local Policies
3. Click on User Rights Assignment
4. Ensure that “Deny log on locally” is empty.
Case 3: The local group policy allow user to logon. However, domain group policy which overrides local policy doesn’t allow users to logon locally. The resolution is modify the domain policy to allow users to logon locally. click start-administrative tools-group policy manager. Then click the forest:XXX.XXX-domains-XXX.XXX-Group policy Objects; select the right object which applys to you( for example, if you want to log on a DC, right click the “Default Domain Controllers Policy”).Then follow the Case 1, step 2.
Case 4: The domain policy allows domain users to logon locally, but the local policy doesn’t and the domain policy doesn’t apply to the computer. The fix is running gpupdate to force to update the domain policy.
Case 5: Norton Firewall blocks the communication between the client and domain controller. The solution is disabling Norton firewall or re-configuring it to allow to access the domain controller.
Could not delete Thumbnail:
Go to group policy editor:
User configuration > Administrative template > window component > Windows Explorer
Double Click ” turn off the display of thumbnails only display icons on network”, change to “enable”.
The Account Lockout policies
Account lockout duration
This policy setting determines the number of minutes that a locked-out account remains locked out before it is automatically unlocked. The available range is from 1 to 99,999 minutes. To specify that the account will be locked out until an administrator manually unlocks it, configure the value to 0. If the Account lockout threshold setting is defined, the Account lockout duration must be greater than or equal to the value for the Reset account lockout counter after setting.
Reset account lockout counter after
This policy setting determines the number of minutes that must elapse before the counter that tracks failed logon attempts and triggers account lockouts is reset to 0. This reset time must be less than or equal to the Account lockout duration setting configuration.
Eg. you set this time to 10 minutes, and threshold is 3 times, if you entered wrong password twice within 10 minutes, then 10 minutes later after the second try, you entered wrong password third time, but the system has reset the record to 0 and the third time input will be counted as first try for the system.
LDIFDE
property values for LDIFDE are: https://technet.microsoft.com/en-us/library/cc753858%28v=ws.10%29.aspx
Does not work
The Account policy must be defined in the Default Domain Policy or in a new policy that is linked to the root of the domain, the Account policy settings for the OU affect the local policy on any computers that are contained in the OU.
Security settings subnode: Software Restriction Policies
- Prevent users from using programs that don’t contribute to productivity
- Add a layer of security by preventing malware from running.
User configuration>policies>windows settings>security settings>Software restriction Policies.
Right click the folder, click New Software Restriction Policies. Then two folders( Security Levels, Additional Rules) and three policies( Enforcement, Designated File Types, Trusted Publishers)
How does it works: https://technet.microsoft.com/en-us/library/cc786941%28v=ws.10%29.aspx
The following policy can help prevent users from running malicious code:
- Default Security Level: Disallowed
- Apply software restriction policies to the following users: All users except administrators
- Path Rules:
- %WINDIR% Unrestricted
- %PROGRAMFILES% Unrestricted
This policy disallows all software on the users computer, except software that is installed in the Windows directory, Program Files directory, or their respective subfolders. The policy does not apply to administrators.
If all the programs a user needs are not installed in %WINDIR% or in %PROGRAMFILES%, or there are programs in those folders that the administrator does not want the user to run, the administrator can make additional exceptions as follows:
- Path Rules:
- %WINDIR%\regedit.exe: Disallowed
- %WINDIR%\system32\cmd.exe: Disallowed
- \\CORP_DC_??\scripts: Unrestricted
- %HKEY_LOCAL_MACHINE\SOFTWARE\ComputerAssociates \InoculateIT\6.0\Path\HOME%: Unrestricted
As a result of these exceptions, the following occurs:
- Both the command prompt (cmd.exe) and the registry editor (regedit.exe) are disallowed.
- An exception is created to allow login scripts to run on the users computer.
- The use of the question mark “?” wildcard allows the rule to match \\CORP_DC_01, \\CORP_DC_02, and others.
- A registry path rule is added that allows the anti-virus software on the computer to run.
Enable Last interactive logon information
Go to computer configuration, policies, administrative Templates, windows components, Windows logon Options;
Double click Display information about previous logons during user logon in the right pane. Enable it.
Deploy wireless configuration
Microsoft Windows XP first introduced the Wireless Zero Configuration (WZC) service. WZC is a wireless connection management utility that operates as a Windows service and interacts with the client hardware NIC drivers. WZC automatically determines which wireless network to connect to based on default settings and preferences set by the user. This tool had security weaknesses and limited functionality. In Microsoft Vista and Microsoft Windows 7, it was replaced with WLAN AutoConfig.
Policy for Windows Vista and Later
- Right click the Organizational Unit you want to apply to policy to and select Create a GPO in this domain, and Link it here…
- Note, the policy must be linked to the OU containing a group of machines you want to have WiFi access to or a parent of the OU.
- Enter in 802.1X WiFi Policy for the Name and click OK
- Right click your new GPO and click Edit
- Navigate to Computer Configuration->Policies->Windows Settings->Security Settings->Wireless Network (IEEE 802.11) Policies
- Right click and select Create A New Wireless Network Policy for Windows Vista and Later Releases
- Ensure the following settings are set for your Windows Vista and Later Releases policy
- General Tab
- Policy Name: My Wireless Policy for Vista and Later Clients
- Description: Vista and later wireless network for my company.
- Check Use Windows WLAN AutoConfig service for clients
- Here is a screenshot with the above settings
- Click the Add… button and select Infrastructure
- Connection Tab
- Profile Name: My Network
- Enter in your SSID (Wireless network name that gets broadcasted) and click the Add… button
- Check Connect Automatically when this network is in range
- Here is a screenshot of the above settings
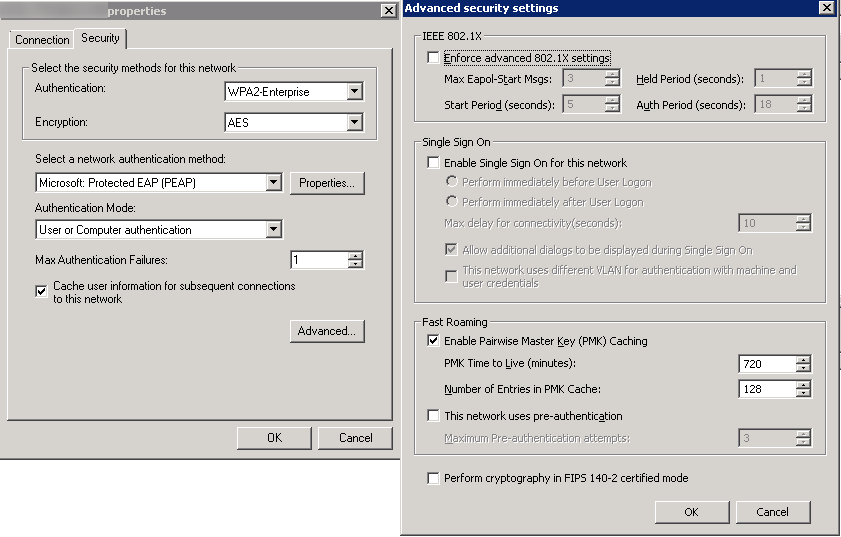
- Security Tab
- Authentication: WPA2-Enterprise
- Encryption: AES
- Select a network authentication method: Microsoft Protected EAP (PEAP)
- Authentication Mode: User or Computer authentication
- Max Authentication Failures: 1
- Check Cache user information for subsequent connections to this network
- Here is a screenshot of the above settings with the Advanced tab open as well
- Click OK
- Connection Tab
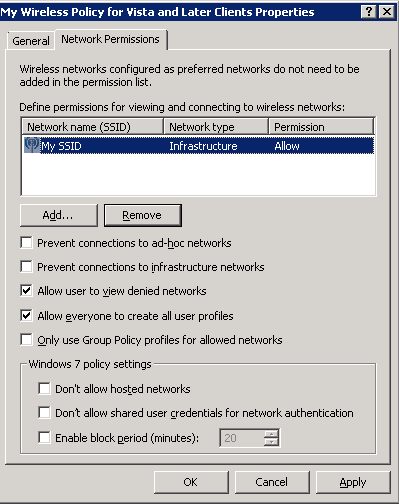
- Network Permissions Tab
- Enter your network into Define permissions for viewing and connection to wireless networks if it hasn’t been added already.
- Uncheck Prevent connections to ad-hoc networks
- Uncheck Prevent connections to infrastructure networks
- Check Allow user to view denied networks
- Check Allow everyone to create all user profiles
- Uncheck Only use Group Policy profiles for allowed networks
- Leave all Windows 7 policy settings unchecked
- Here is a screenshot with the above settings (note, you may change the settings above to be in accordance to your policy. Just ensure you don’t check Prevent connections to infrastructure networks).
- Click OK
- General Tab
For XP machines, Right click and select Create A New Windows XP Policy
- Ensure the following settings are set for your Windows XP Policy
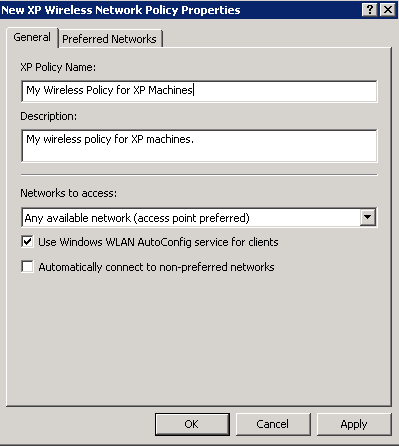
- General Tab
- XP Policy Name: My Wireless Policy for XP Machines
- Description: My wireless policy for XP machines.
- Networks to access: Any available network (access point preferred)
- Check Use Windows WLAN AutoConfig service for clients
- Uncheck Automatically connect to non-preferred networks
- Here is a screenshot of the above settings.
- Preferred Networks Tab
- Click the Add… button and select Infrastructure
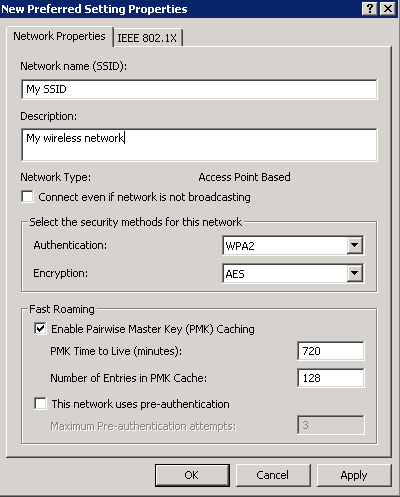
- Network Properties Tab
- Network name (SSID): My SSID
- Description: My wireless network
- Uncheck Connect even if network is not broadcasting
- Authentication: WPA2
- Encryption: AES
- Check Enable Pairwise Master Key (PMK) Caching
- Uncheck This network uses pre-authentication
- Here is a picture of the above settings
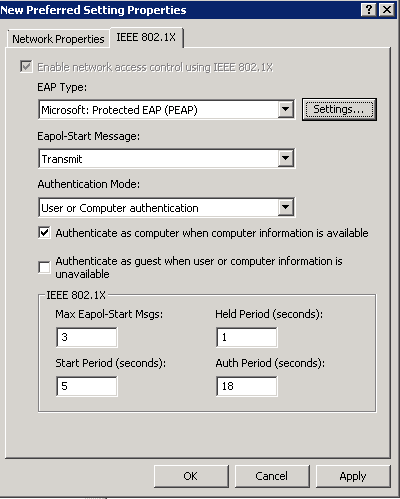
- IEEE 802.1X Tab
- EAP Type: Microsoft: Protected EAP (PEAP)
- Eapol-Start Message: Transmit
- Authentication Mode: User or Computer Authentication
- Check Authenticate as computer when computer information is available
- Uncheck Authente as guest when user or computer information is unavailable
- Screenshot of above settings
- Click OK
- Network Properties Tab
- Click the Add… button and select Infrastructure
- Click OK
- General Tab