Configure NAT
1. Static
If you have multiple Public IP addresses and want to do one-to-one mapping, this is the option.
r1(config)#ip nat inside source static local_ip global_ip- enter the interface mode and specify the inside interface:
r1(config-if)# ip nat inside - enter the outside interface mode:
r1(config-if)# ip nat outside - Verify:
check the active NAT translations,
show ip nat translations,
show ip nat statistics
Clear the statistics:
clear ip nat statistics
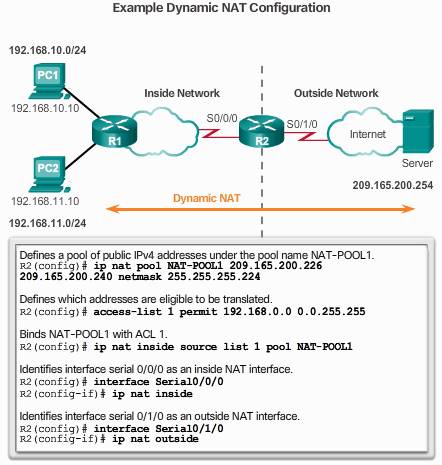
2. Dynamic
Step 1. define the Public IP address pool by:
r1(config)# ip nat pool pool_name start-ip end-ip {netmask netmask | prefix-length prefix-length}
Step 2. Configure a standard access list permitting the addresses that should be translated
r1(config)# access-list list_number permit source_address [source_wildcard]
The source address should be the private address.
Step 3. Bind the ACL to the pool:
r1(config)# ip nat inside source list list_number pool pool_name
Step 4. Identify which interfaces are inside, which interfaces are outside:
r1(config-if)# ip nat inside
r1(config-if)# ip nat outside
Verify the Dynamic NAT:
show ip nat translations: displays all static translations that have been configured and any dynamic translations that have been created by traffic.
show ip nat translations verbose: displays additional information.ip nat translation timeouttimeout-seconds: set the translation entries.- clear ip nat translation : clear dynamic entries before the timeout has expired, not static translations.
clear ip nat translation *: clear all the dynamic address translation entries from the NAT translation table.clear ip nat translation inside global-ip local-ip [outside local-ip global-ip]: clear a simple dynamic translation entry.clear ip nat translation protocol inside global-ip global-port local-ip local-port [outside local-ip local-port global-ip global-port]
3. PAT( Port address translation):
Address pool:
Step 1. define the Public IP address pool by:
r1(config)# ip nat pool pool_name start-ip end-ip {netmask netmask | prefix-length prefix-length}
Step 2. Configure a standard access list permitting the addresses that should be translated
r1(config)# access-list list_number permit source [source_wildcard]
Step 3. Bind the ACL to the pool:
r1(config)# ip nat inside source list list_number pool pool_name overload
or
r1(config)# ip nat inside source list list_number interface_name overload
Step 4. Identify which interfaces are inside, which interfaces are outside:
r1(config-if)# ip nat inside
r1(config-if)# ip nat outside
Example: http://www.firewall.cx/cisco-technical-knowledgebase/cisco-routers/260-cisco-router-nat-overload.html
Single address:
If only a single public IPv4 address is available, the overload configuration typically assigns the public address to the outside interface that connects to the ISP. All inside addresses are translated to the single IPv4 address when leaving the outside interface. So, just skip step 1 in the pool addresses, use step 2, 3, 4 to configure single address PAT or use interface name instead of pool name.
Single outside address translation example:
R1(config)#int Gi0/0
R1(config-if)#ip nat inside
R1(config-if)#int Gi0/1
R1(config-if)#ip nat outside
Next, we will define an access list that will include all private IP addresses we would like to translate:
R1(config)#access-list 1 permit 10.0.0.0 0.0.0.255
The access list defined above includes all IP addresses from the 10.0.0.0 – 10.0.0.255 range.
Now we need to enable NAT and refer to the ACL created in the previous step and to the interface whose IP address will be used for translations:
R1(config)#ip nat inside source list 1 interface Gi0/1 overload
Verify: commands needed are same as dynamic.
Port forwarding
NAT does not allow requests initiated from the outside. This situation can be resolved with manual intervention. Port forwarding can be configured to identify specific ports that can be forwarded to inside hosts.
Configuring: ip nat inside source static {tcp | udp} local-ip local-port global-ip global-port [extendable]
- TCP or UDP : Indicate if this is a TCP or UDP port number.
- local-ip(private address): this is the IPV4 address assigned to the host on the inside network.
- local-port: sets the local port from 1-65535, this is the port number the server is listening to .
- global-ip: this is the globally ip address of the inside host, this is the IP address the outside clients will use to reach the internal server.
- global-port: This is the port number the outside client will use to reach the internal server. The extendable option is applied automatically.
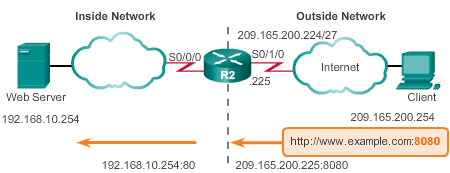
R2(config)#ip nat inside source static tcp 192.168.10.254 80 209.165.200.225 8080
- local-ip = 192.168.10.254
- local-port = 80
- global-ip = 209.165.200.225
- global-port = 8080
So the clients can use 209.165.200.225:8080 as the URL to browse the web page.
Port forwarding for a range of ports
For a SIP communication, you need to translate UDP port (8000 – 20000), to achieve this, we will use route-map.
CME VOIP service interface is 192.168.10.1
Public IP: 10.0.0.2
Create a Extended ACL:
ip access-list extended UDP_RTP
 permit udp any any range 8000 20000
 permit udp any any eq 5060
Map the ACL with a route map:
route-map SIP_NAT permit 10
 match ip address UDP_RTP
Create a Static NAT for this traffic:
ip nat inside source static 192.168.10.1 10.0.0.2 route-map SIP_NAT
Port forwarding with PAT
If you configured PAT on the gateway router, and later you need an extra IP address for a device, so it can be accessed via public network. So, first you can configure PAT. Then figure out the port need to be open, and configure port forwarding.
For example, I want to open 554, 37777, and 37778 for a NVR access. assume my public IP is 8.8.8.8
ip nat inside source static tcp 192.168.10.228 554 8.8.8.8 554 extendable
ip nat inside source static tcp 192.168.10.228 37777 8.8.8.8 37777 extendable
ip nat inside source static udp 192.168.10.228 37778 8.8.8.8 37778 extendable
Static NAT with public IP prefix
Let’s say your company running a email server and web server on your company network, which need to be accessible from public Internet, so you purchased a public IP 60.0.0.8/29, and use 60.0.0.10 for your web server, which is using private IP address 10.0.0.10; use 60.0.0.11 for your email server, which is using private IP address 10.0.0.11.
- The point to point connection between your NTU and ISP is 20.0.0.2/30 to 20.0.0.1/30.
- Private network on 10.0.0.10/24
The topology is shown below:
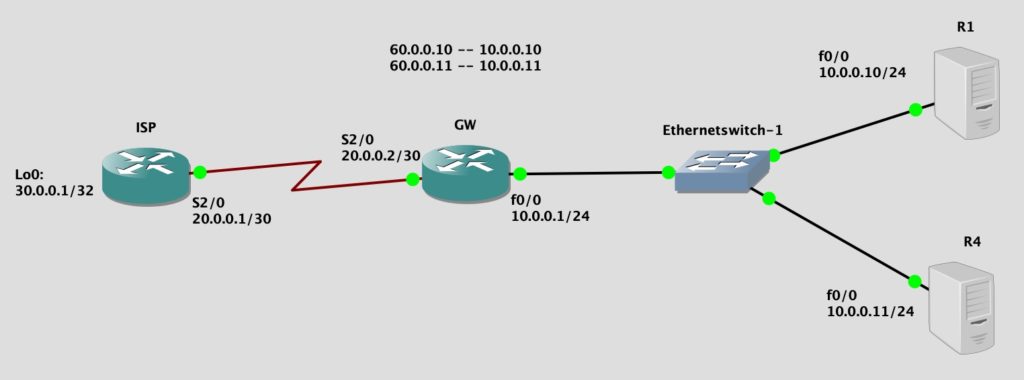
I will use R1 and R4 to mimic a server, so I will disable routing on these two routers for less confusion, and set the default gateway as 10.0.0.1. So the two router is only act as a host.
R1 config:
no ip routing
ip default-gateway 10.0.0.1

Interface f0/0

ip address 10.0.0.10 255.255.255.0
R4 config:
no ip routing
ip default-gateway 10.0.0.1
Interface f0/0

ip address 10.0.0.11 255.255.255.0
ISP router:
This part is usually configured by ISP provider, they will route the traffic targeting your public IP prefix to your gateway router.
interface Loopback0
 ip address 30.0.0.1 255.255.255.255

interface Serial2/0
 ip address 20.0.0.1 255.255.255.252

ip route 60.0.0.0 255.255.255.0 20.0.0.2
Now it’s time to configure the static NAT on our gateway router, this is really easy to configure but a bit of hard to understand. Notice that we will not assign any public IP to any interface as a PAT usually do, that public IP will be translated to a private IP straight way.
GW:
interface FastEthernet0/0

 ip address 10.0.0.1 255.255.255.0

 ip nat inside


interface Serial2/0

 ip address 20.0.0.2 255.255.255.252

 ip nat outside


ip nat inside source static 10.0.0.10 60.0.0.10

ip nat inside source static 10.0.0.11 60.0.0.11

ip route 0.0.0.0 0.0.0.0 20.0.0.1
That’s it! By now, the nat should work, we can verify it by show ip nat translation on the GW:
GW#show ip nat translations

Pro Inside global      Inside local       Outside local      Outside global

--- 60.0.0.10          10.0.0.10          ---                ---

--- 60.0.0.11          10.0.0.11          ---                ---
Then ping 30.0.0.1 and trace route from R1:
R1#ping 30.0.0.1

Type escape sequence to abort.

Sending 5, 100-byte ICMP Echos to 30.0.0.1, timeout is 2 seconds:

!!!!!

Success rate is 100 percent (5/5), round-trip min/avg/max = 104/308/1108 ms

R1#traceroute 30.0.0.1

Type escape sequence to abort.

Tracing the route to 30.0.0.1

  1 10.0.0.1 176 msec 112 msec 84 msec

  2 20.0.0.1 144 msec 108 msec 84 msec
Then ping and trace route web server and email server from ISP router:
ISP#ping 60.0.0.10

Type escape sequence to abort.

Sending 5, 100-byte ICMP Echos to 60.0.0.10, timeout is 2 seconds:

!!!!!

Success rate is 100 percent (5/5), round-trip min/avg/max = 16/37/100 ms

ISP#traceroute 60.0.0.10

Type escape sequence to abort.

Tracing the route to 60.0.0.10

VRF info: (vrf in name/id, vrf out name/id)

  1 20.0.0.2 44 msec 28 msec 44 msec

  2 60.0.0.10 16 msec 48 msec 32 msec

ISP#

ISP#

ISP#ping 60.0.0.11

Type escape sequence to abort.

Sending 5, 100-byte ICMP Echos to 60.0.0.11, timeout is 2 seconds:

.!!!!

Success rate is 80 percent (4/5), round-trip min/avg/max = 28/34/36 ms

ISP#traceroute 60.0.0.11

Type escape sequence to abort.

Tracing the route to 60.0.0.11

VRF info: (vrf in name/id, vrf out name/id)

  1 20.0.0.2 12 msec 20 msec 24 msec

  2 60.0.0.11 24 msec 44 msec 40 msec
For the best practice, you should apply ACL or firewall to protect your servers from attack which will not be discussed here.
SIP ALG
On Cisco devices, SIP-ALG is referred to as SIP Fixup and is enabled by default on both routers and Pix devices. Because this is a default setting, no indication of it being “on” or “off” is visible in the configuration.
To disable SIP Fixup, issue the no ip nat service sip commands:
no ip nat service sip tcp port 5060
no ip nat service sip udp port 5060
Troubleshooting NAT
Debug:
- debug ip nat command to verify the operation of the NAT feature by displaying information about every packet that is translated by the router.
- debug ip nat detailed command generates more overhead than the debug ip nat command, but it can provide the detail that may be needed to troubleshoot the NAT problem. Always turn off debugging when finished.
- * (asterisk) – The asterisk next to NAT indicates that the translation is occurring in the fast-switched path. The first packet in a conversation is always process-switched, which is slower. The remaining packets go through the fast-switched path if a cache entry exists.
- s= – This symbol refers to the source IP address.
- a.b.c.d—>w.x.y.z – This value indicates that source address a.b.c.d is translated to w.x.y.z.
- d= – This symbol refers to the destination IP address.
- [xxxx] – The value in brackets is the IP identification number.
- Stop debuging: no debug all or undebug all commands. Verify that the debugs have been turned off using the command show debug.Remember that the commands no logging console and terminal no monitor only prevent the output
- %Pool mypool in use, cannot destroy : If you issue command like “no ip nat pool mypool 192.168.1.0 198.168.1.10 netmask 255.255.255.248”, and you get the error respond %Pool mypool in use, cannot destroy. better to clear all the translation by command
clear ip nat translation *, or shutdown command on the interface which is involved in the NAT if the clear translation does not work.
Problem
Problem every morning, the whole company could not connect to network or really slow on some connections, error saying DNS probe issue. This was resolved by reboot the router, but the next day same issue come back again. Checked the logging by show logging, found massive below message:
%IOSXE-4-PLATFORM: SIP1: cpp_cp: QFP:0.0 Thread:001 TS:00000083008681515659 %NAT-4-DEFAULT_MAX_ENTRIES: default maximum entries value 131072 exceeded; frame dropped
The router will keep NAT entries in the translation table for a configurable length of time. For TCP connections, the default timeout period is 86,400 seconds, or 24 hours. Because UDP is not connection based, the default timeout period is much shorter—only 300 seconds, or 5 minutes. The router will remove translation table entries for DNS queries after only 60 seconds.