Configuring Network Access Protection
Not every threat to your network can be stopped. After users gain authorized access to your network, if they decide to upload a virus or spyware, there’s not much you can do to stop them. However, blocking access to computers that have no protection from viruses and spyware, such as remote users’ laptops, can help prevent the spread of these threats.
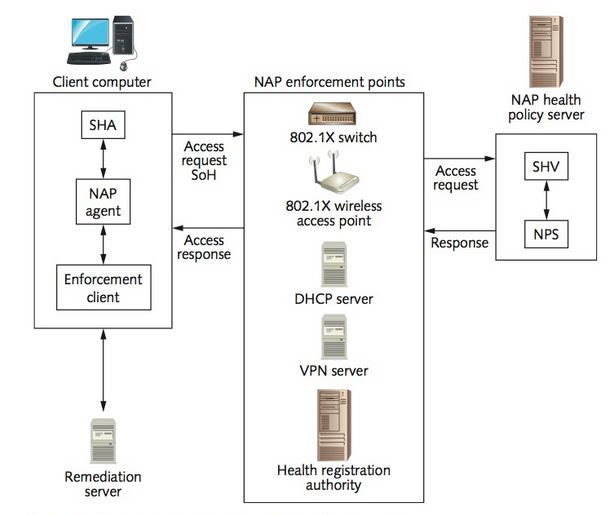
Network Access Protection (NAP) provides an infrastructure for checking client computers attempting to access the network to make sure they comply with health policies. For the purposes of NAP, “health” refers to computer settings, such as whether antivirus and anti-spyware software are up to date and whether recent security updates have been installed. Clients that aren’t in compliance can be refused access or routed to restricted areas of the network where they have access to resources needed to bring them into compliance, such as an update server.
Computers requesting access to the network are called NAP clients.
System health checks are done via system health agents (SHAs) running on the client. An SHA monitors the client to determine whether specified security measures are in place.
The SHA creates a statement of health (SoH) that shows the client’s current health status. Multiple SHAs can be installed on a client computer. The NAP agent collects multiple SoHs from the SHAs and creates a single system statement of health (SSOH) from them. An NAP enforcement client requests network access for the client, using a specific NAP enforcement method, and communicates the response to other NAP components.
There are enforcement clients for these network technologies:
• Remote access—Enforces health policies for VPN connection attempts from clients running Windows Vista or later through an NAP-enabled VPN server.
• Dynamic Host Configuration Protocol—Gives noncompliant computers a different DHCP configuration that limits their access to the network and resources to servers that can help bring them into compliance. The drawback of this method is that it can be bypassed by using static IP addresses on the client computer.
• Internet Protocol Security—Uses a public key infrastructure to issue health certificates to computers meeting defined health standards. Only a compliant computer can initiate communication with IPsec-secured resources on the network. This method is the most secure way to ensure compliance.
• Extensible Authentication Protocol—Enforces health policies when a remote client running Windows 7 or later attempts to connect via a VPN, 802.1x network switches, and 802.1x wireless access points.
• Wireless EAP over LAN (EAPOL)—Enforces health policies for 802.1.x wireless connection attempts from clients running Windows XP SP3 or later.
• Remote Desktop gateway enforcement—Applies to Remote Desktop clients attempting to access the network.
The server running the NPS role validates NAP clients. This server is often called the NAP Health Policy server and uses a System Health Validator (SHV) to verify the statement of health made by the corresponding SHA on the client. Each SHV is paired with a client SHA.
Updates that can bring a noncompliant client computer into compliance are hosted on a remediation server. Taking action to bring a system into compliance with a health policy, such as updating virus definition files, is called “remediation.”
The corresponding SHA, SHV, policy server, and remediation server work together to bring a client into compliance. (Remediation servers are an optional component.) Health policies are the rules the SHV has defined, and they’re enforced as part of a network policy. If a client computer is deemed non- compliant, a statement of health response (SOHR) is sent to SHAs with instructions on how to bring the client into compliance.
The connection process for a simple NAP configuration is as follows:
1. An NAP client attempts to connect to the network. Each of its SHAs generates an SoH.
2. The NAP agent on the NAP client combines these SoHs into a system statement of health and sends it to the enforcement clients to request validation.
3. The NAP Health Policy server evaluates the SSOH against its SHVs and health requirements policies to determine whether to grant access.
4. The NAP Health Policy server then sends a system state of health response (SSoHR) back to the NAP client.
5. Compliant computers are allowed to connect by the enforcement points. Noncompliant computers are denied access or connected to a remediation network, which is a group of remediation servers.
When clients connect by using the IPsec enforcement method, compliance is verified through a health certificate. The certificate is obtained from a CA by the Health Registration Authority server and then provided to the client.
System Health Validators
After NAP has been installed, you need to configure and enable SHVs. As mentioned, each SHV corresponds to an SHA on the client computers. By default, an SHV is already installed in Windows Server 2012/R2: Windows Security Health Validator (WSHV). This SHV is paired with the Windows Security Health Agent (WSHA), which can be enabled on clients running Windows XP SP3, Windows Vista, or later. WSHA builds its SoH based on monitoring applications’ status through Windows Security Center (for example, Windows Firewall).
Some security settings, such as enabling Windows Firewall, can be performed automatically by the system, which is called “auto-remediation.”
The WSHV handles security settings that are controlled through Windows Security Center:
• Firewall settings—Require a firewall that’s enabled for all network connections. If the client has no firewall or one that isn’t compatible with Windows Security Center, it’s denied full access to the network. If you have enabled auto-remediation in the network policy, Windows Firewall is turned on.
• Antivirus settings—Require that antivirus software be installed, running, and up to date. There’s no auto-remediation option for these settings. If the conditions aren’t met, the client has limited access until antivirus software is running and up to date.
• Spyware protection settings—Require that antispyware software be installed, running, and up to date. If the client isn’t running antispyware software and if auto-remediation is set, Windows Defender is turned on. (This option isn’t available in Windows XP.)
• Automatic updates settings—Require automatic updating to be enabled. If auto-remediation is set, the WSHA turns on automatic updates.
• Security updates settings—Require installing all available security updates. You can specify the minimum severity level required for updates: Low and above, Moderate and above, Important and above, and Critical only.
You can specify in the SHV how long users have to check for updates before they’re deemed noncompliant. The default is 22 hours, and the maximum time allowed is 72 hours.
Configure the default system health validator.
1. Open the Network Policy Server console, if necessary. Expand the Network Access Protection node in the left pane, and then expand System Health Validators and Windows Security Health Validator. Click the Settings node, and then double-click Default Configuration in the right pane.
2. In the left pane are two nodes, one for Windows 8/Windows 7/Windows Vista and the other for Windows XP. If necessary, click Windows 8/Windows 7/Windows Vista.
3. The right pane shows the settings that can be included in the policy. If necessary, click the check boxes for all entries in the Firewall Settings, Antivirus Settings, and Spyware Protection Settings sections.
You might need to scroll down to see the Automatic Updates Settings and Security Updates Settings sections. Click the Automatic updating is enabled check box. Leave the default security update settings, and click OK.
Health Policies and Enforcement Methods
With NAP installed and an SHV configured, you need health policies to apply the restrictions. Creating a health policy also creates a network policy and a connection request policy. As explained previously in “Configuring NPS Policies,” a connection request policy specifies where the request is authenticated, and the network policy specifies the access an authenticated access client has.
Create health policies for compliant and noncompliant clients.
1. open the Network Policy Server console, if necessary.
2. Expand Policies in the left pane. Right-click Health Policies and click New to open the Create New Health Policy dialog box. Type Compliant in the Policy name text box, and leave the default Client passes all SHV checks option. In the “SHVs used in this health policy” list box, click the Windows Security Health Validator check box, and click OK.3. Right-click Health Policies and click New again. Enter Noncompliant in the Policy name text box, click Client fails one or more SHV checks, click the Windows Security Health Validator check box, and click OK.
Now that the basic configuration for NAP is in place, you need to configure enforcement. The enforcement client on the user’s computer communicates with an enforcement point (the client’s connection to the network) to coordinate the process of validating the client’s health. The enforcement point communicates with the NAP health policy server to determine whether the access client should be given access, refused access, or given limited access. An enforcement point is related to the enforcement method being used.
The available enforcement methods are as follows:
• DHCP enforcement—This method has the advantage of being the simplest to deploy. Enforcement is done when an access client requests an IP address via DHCP. This enforce- ment method has the disadvantage of being circumvented by the use of static IP addresses.
• VPN enforcement—Enforcement with this method is done by the VPN server when an access client attempts to connect through a VPN connection.
• IPsec enforcement—This method is the most secure and the most complex to deploy. Health certificates are issued to an access client when it’s compliant, and these certificates allow access to the network.
• 802.1x wired and wireless enforcement—Enforcement is done by an 802.1x authenticating switch (such as a Cisco switch) or an 802.1x-compliant wireless access point.
• Terminal Services gateway enforcement—Enforcement is done on the Terminal Services gateway server when an access client attempts to connect by using Terminal Services or Remote Desktop.
Enforcement methods can be combined for even stronger security, but doing so increases the complexity of an NAP deployment. The least complex, but still flexible, enforcement method is DHCP. With DHCP enforcement, you can specify scopes where NAP is enforced. This feature is useful when you’re setting up NAP in a production environment because you can limit where it’s applied to just a few IP addresses, giving you a chance to test policies without affecting the entire network. In addition, DHCP enforcement enables you to direct noncompliant access clients to a specific part of the network for remediation.
NAP VPN enforcement restricts access for remote VPN clients that aren’t compliant with network health policies. This method affects only clients connecting through a VPN. To use it, you must configure the VPN server acting as the enforcement point to use PEAP authentication.
To configure VPN enforcement, follow these steps in the Network Policy Server console:
1. Expand the NPS (Local) node in the left pane. In the center pane, click Configure NAP.
2. In the Select Network Connection Method For Use with NAP window, click Virtual Private Network (VPN) in the drop-down list, enter a name for the enforcement method policy, and then click Next.
3. In the Specify NAP Enforcement Servers Running VPN Server window, select the VPN server, and click Next.
4. In the Configure User Groups and Machine Groups window, you can specify Active Directory groups of users or machines to narrow down who the policy applies to. Leaving this option blank makes the policy apply to all VPN connections. Click Next.
5. In the Configure an Authentication Method window, leave the default option Secure Password (PEAP-MS-CHAP v2) selected. If you use smart cards on your network, you could also click the Smart Card or other certificate (EAP-TLS) option. Click Next.
6. In the Specify a NAP Remediation Server Group and URL window, you can add a group of servers, including WSUS and antivirus management servers. Click Next.
7. In the Define NAP Health Policy window, the Windows Security Health Validator and “Enable auto-remediation of client computers” check boxes are selected. You can also choose whether to allow access to NAP-ineligible clients. Then click Next.
8. The final window shows the names of the policies being created. Click Finish.
Remediation Server Groups and Networks
In a basic NAP configuration, if client computer health issues go beyond what auto-remediation can handle, there are two choices: Allow access to the network, or deny access to the network. Allowing an unhealthy computer in your network is risky. If, for example, its antivirus software isn’t up to date, it could carry a virus into the main network. At the same time, users can’t be productive if they aren’t allowed access to the network.
The solution is to isolate noncompliant computers from the rest of the network and give them the tools needed to achieve compliance. With DHCP enforcement or VPN enforcement, you can create a remediation network and restrict noncompliant computers’ access to only those servers. To design a remediation network, first you should determine what servers to use in it. The following servers can be network members that can supply the needed resources for remediation:
• Antivirus signature servers—Many major third-party antivirus software vendors have update utilities that can be installed and configured to work with NAP. This server allows a noncompliant computer to download and install the latest antivirus signatures to get back into compliance.
• Windows Server Update Services server—Installing WSUS on a server makes it possible to control what updates are required and make them available for download and installation on noncompliant computers.
• System Center component server—A server running System Center Configuration Manager can host software updates to get a client computer compliant.
In addition, a client computer might need other resources to make the network connections for performing the remediation. The following servers should be considered additional remedia- tion network members:
• Domain controllers—Noncompliant computers still need to authenticate, download group policies, and get their domain profile settings. If they can’t access a domain controller, they might not be able to access the resources they need to get compliant.
• DNS servers—Without DNS, noncompliant computers can’t resolve hostnames and might not be able to access remediation servers or outside servers, such as Windows Update.
• DHCP servers—Noncompliant computers might need to renew a DHCP lease while they’re becoming compliant. They also need to change their IP profiles after they become compliant to access the main network.
• Help servers—You can set a help page URL when configuring a remediation server group that gives users instructions for bringing their computers into compliance.
To create or update a remediation server group or to add or modify the help page URL, follow this procedure:
1. Open the Network Policy Server console, and in the left pane, expand Policies and then Network Policies.
2. Select the policy you want to modify and double-click it.
3. Click the Settings tab. Select the NAP Enforcement method, and enable the “Allow limited access” option. Click the Configure button.
4. In the Remediation Servers and Troubleshooting URL window, you can enter a remediation server group by clicking the New Group button or change an existing one by selecting it in the drop-down list. You can also add or modify the help page URL. Click OK when you’re finished.
NAP Client Configuration
For NAP to function after the servers are configured, the client computers must be configured. There are three options for configuring clients; two are done on the client, and one is done in the Group Policy tool:
• The NAP Client Configuration console gives you a graphical interface for configuring the local system and saving the configuration file to be used on other clients.
• You can enter netsh commands to configure the local system and save the configuration file to be used on other clients.
• You can use the Group Policy Management console and the Group Policy Management Editor to specify that NAP-capable domain member clients have the NAP client settings updated when group policies are refreshed.
Unless there are reasons for configuring each NAP client separately, enabling Windows Security Center and the NAP agent with group policies is simpler and more efficient.
configure a group policy that enables NAP on any NAP-capable domain client:
1. Open Group Policy Management
2. In the left pane, expand the tree until you see the Default Domain Policy node. Right-click Default Domain Policy and click Edit.3. Expand Computer Configuration, Policies, Administrative Templates, Windows Components, and Security Center.
4. Double-click Turn on Security Center (Domain PCs only), click Enabled, and then click OK.5. Expand Computer Configuration, Policies, Windows Settings, Security Settings, and System Services.
6. Scroll down and double-click Network Access Protection Agent. Click the Define this policy setting check box, and for the service startup mode, click Automatic. Click OK, and then close the Group Policy Management Editor.7. Open an elevated command prompt, type gpupdate, and press Enter. Log on to NPS server as Administrator. Verify the policy configuration by opening a command prompt window, and then typing
netsh nap client show stateand pressing Enter.
Command
For Vendors using AP as RADIUS clients, you may find command will be easier to add these APs into RADIUS client list.
New-NpsRadiusClient -Address "10.0.0.200" -Name "WirelessAP" -SharedSecret "9vq7822hFsJ8rm"
Troubleshooting
Authentication logging: Go to Event viewer on NPS server, under Windows Logs > Security > Filter Current Log… .
Windows Security Event log on the NPS Server for NPS events corresponding to rejected (event ID 6273) or accepted (event ID 6272) connection attempts.