GPO inheritance
By default , GPO inheritance is enabled and settings linked to a parent object are applied to all child objects within a domain.
Note that: child domain are not subject to GPO inheritance. Eg. GPO settings on cool.com are not inherited by objects in the au.cool.com domain.
- Blocking inheritance: Parent policies do not apply to child, can be applied on a domain or an OU. To do this, right click the child domain or OU, click “block inheritance”.
- Enforcing inheritance: The enforced GPO has the strongest precedence of all GPOs in its scope.The GPO’s settings are applied to all child objects, even if a GPO with conflicting settings is linked to a container at a deeper level.
When two GPOs have the enforced option set, the GPO linked to the container highest in the AD hierarchy takes precedence. - GPO filtering: two types of GPO filtering security filtering and windows management instrumentation (WMI) filtering
- Security Filtering: Using permission to restrict objects from accessing a GPO. If you want to apply the GPO to a user group or computer, they must have Read and Apply Group Policy permissions. Authenticated users are granted these permissions and applies to both logged on users and computers.
1. Apply the GPO to specific users or groups: click the GPO in the Group policy objects folder and click the Scope tab in the right pane. Use the security Filtering dialog box to add the new group to this GPO. Then the GPO only applies to these groups.
2. Add exception groups to a GPO: click the GPO in the Group policy objects folder and click the Delegation tab in the right pane. You can see the complete list of ACEs for the GPO.
The basic idea to set exception groups is deprive the read permission from the user group, so the GPO can not apply the user group anymore. To do this, click Add button on the bottom left, then add the user or group name to which you want give the exception. then click the “Advanced…” bottom on the bottom right. choose the user name or group in the top box, then check the box bellow “deny” after “read” , click ok. - WMI filtering: This technology is gathering management information based on hardware platform, OS version, available disk space and so on.
- Security Filtering: Using permission to restrict objects from accessing a GPO. If you want to apply the GPO to a user group or computer, they must have Read and Apply Group Policy permissions. Authenticated users are granted these permissions and applies to both logged on users and computers.
- Loopback policy processing : ( in windows 2008, called “User group policy loopback processing mode” in windows 2012 called “configure User group policy loopback processing mode”Because computer boots first, so computer policy is applied first, then user logs on the computer, so user settings take precedence because of the GPOs applying to the user are applied last.
However, if you want the public computer to stay locked down no matter who access it, you can use loopback policy processing.
Two modes:
- Replace: All of the user’s setting will be completely replaced.
- Merge: Any user GPO settings that do not conflict with the computer GPO settings still apply. Any user GPO settings that conflict with the computer GPO settings will be overwritten.
Group Policy Objects (GPO) is a set of rules for Users and Computers, thus the policies for computers will be applied to computers and the policies for users will be applied to users. This article applies to Windows Server scenarios.
Let’s assume that you have two organizational units in your domain:
- OU-TSSERVERS
- OU-SUPPORT
In OU-TSSERVERS units, there are computer accounts, and in the OU-SUPPORT units there are users accounts.
In OU-TSSERVER, you created and configured a new GPO. So, there are policies for:
- Computer Configuration
- User Configuration
In OU-SUPPORT, you created and configured a new GPO. So, there are policies for:
- Computer Configuration
- User Configuration
When a user belonging to OU-SUPPORT logs on a server that belongs to the OU-TSSERVER, what happens?
Applies:
- Computer Configuration -> The configuration created in GPO linked to OU-TSSERVER.
- User Configuration -> The configuration created in GPO linked to OU-SUPPORT.
This is the default setting.
Now we are finally going to learn about User Group Policy Loopback Processing Mode.
When configuring the policy Loopback Processing Mode, you can choose two different options, Replace and Merge.
Replace ModeWhen you define the “User Group Loopback processing Mode“, to “Replace” on the GPO linked to the OU-TSSERVER.
Applies:
- Computer Configuration -> The configuration created in GPO linked to OU-TSSERVER.
- User Configuration -> The configuration created in GPO linked to OU-TSSERVER. (This is the difference in Replace Mode.)
Merge ModeWhen you define the “User Group Loopback processing Mode“, to “Merge” on the GPO linked to the OU-TSSERVER.
Applies:
- Computer Configuration -> The configuration created in GPO linked to OU-TSSERVER.
- User Configuration -> The configuration created in GPO linked to OU-TSSERVER.And
- User Configuration -> The configuration created in GPO linked to OU-SUPPORT. (This is the difference in Merge Mode.)
NOTE: In case of conflict, the users policies from OU-TSSERVERS have precedence. Because the computer’s GPOs are processed after the user’s GPOs, they have precedence if any of the settings conflict.
Why is this configuration important to me?Use this configuration if you have users in your domain whose folders are redirected through policy, but you don’t want that redirect to occur when users log on through Terminal Services.
You need to enable this policy setting using the Replace mode on GPO linked to OU, where the Terminal Server’s computer accounts are (without folder redirection enabled). When users log on to Terminal Servers, the policy folder redirection is not applied.
To enable “Loopback processing Mode”Using Group Policy Management Console, edit the GPO you desire, expand Computer Configuration\Policies\Administrative Templates\System\Group Policy,
and then double-click User Group Policy Loopback Processing Mode.Then select the appropriate option (Replace or Merge).
Note that: Block inheritance is set on an oU or Domain, enforced option is set on a GPO.
Fine-grained Account policies (also called fine-grained password policies, PSO)
The Account policy must be defined in the Default Domain Policy or in a new policy that is linked to the root of the domain, the Account policy settings for the OU affect the local policy on any computers that are contained in the OU. So this is lack of flexibility in version prior to windows 2008. Before 2008, only way to impose more stringent or less stringent password policies on certain users in a domain was to create another domain and move user there.
With fine-grained account policies, admin can create baseline password and account lockout policies for the domain.
PSOs are created with Active Directory Administrative Center (ADAC), ADSI Edit, or PowerShell cmdlets.
ADSI Edit
[ Requirements: Windows 2008 server, functional level at windows 2008 ]
Administrative Tools – ADSI Edit
Actions -> Connect
DC=domain,DC=com
CN=System
CN=Password Settings Container
Right click select new -> object
You’ll be presented with a set of options which are explained below.
Common-Name – Friendly name to identify the policy
Password Settings Precedence – Think of metrics, if a user is in two groups the policy with the lower precedence will win
Password reversible encryption status – No need for this in our example and generally bad for security true/false
Password History Length – How many passwords does a user have to use before being allowed to return to the first
Password Complexity Status – Password Complexity true/false
Minimum Password Length – Minimum Password Length
Minimum Password Age – Minimum time before the password can be changed. This is set in Days:Hours:Minutes:Seconds, so for 1 day you would use 1:00:00:00
Maximum Password Age – Maximum time a password can be used This is set in Days:Hours:Minutes:Seconds, so for 90 days you would use 90:00:00:00
Lockout Threshold – How many times the password can be entered incorrectly before the account is locked out
Observation Window – The time in which incorrect passwords are logged, for example if we set 5 above, and 00:00:20:00 for this, if more than 5 incorrect passwords are typed within a 20 minute period the account will get locked out
Lockout Duration – If the account is locked out, the duration in which it stays locked out. This is set in Days:Hours:Minutes:Seconds, so for 1 hour you would use 00:01:00:00
Select ‘More Attributes’
Select a property to view: change to ‘PSO Applies to’ ( or msDS-PSOAppliesTo)
In Edit Attribute, add the distinguished names of users or global security groups that the PSO is to be applied to, and then click Add.
Type a DistinguishedName here, Get the DN (distinguished name) from ADUC (active directory users and computers). You will need to select advanced features in the view menu at the top. Double click on the group or user this PSO will apply to, select the attribute editor tab and find the distinguishedName attribute a small distance down. Copy and paste this into the edit attribute box in ADSI edit.This will be a string similar to “cn=Jim Smith,ou=West,dc=mydomain,dc=com” , in some cases, the distinguishedName is not in the attribute editor.
We can test if the policy has been applied by resetting a password for a user in ADUC or by typing dsget user DN -effectivepso , if dsget succeeded is returned without anything else displayed you went wrong somewhere as this means the default domain password policy is still in effect.
eg.
dsget user "CN=jim,OU=developer,DC=test,DC=com"
For example, if you want to set a shorter password which does not meet the complexity requirement, you must first set a complex one, then follow the steps above, and change the Minimum Password length to a small number, Password Complexity Status to false. After this, you can change the use’s password to a less complex one.
PSO must have attributes:
| Attribute name | Description | Acceptable value range | Example value |
|---|---|---|---|
| msDS-PasswordSettingsPrecedence | Password Settings Precedence | Greater than 0 | 10 |
| msDS-PasswordReversible
EncryptionEnabled |
Password reversible encryption status for user accounts | FALSE / TRUE (Recommended: FALSE) | FALSE |
| msDS-PasswordHistoryLength | Password History Length for user accounts | 0 through 1024 | 24 |
| msDS-PasswordComplexityEnabled | Password complexity status for user accounts | FALSE / TRUE (Recommended: TRUE) | TRUE |
| msDS-MinimumPasswordLength | Minimum Password Length for user accounts | 0 through 255 | 8 |
| msDS-MinimumPasswordAge | Minimum Password Age for user accounts |
|
1:00:00:00 (1 day) |
| msDS-MaximumPasswordAge | Maximum Password Age for user accounts |
|
42:00:00:00 (42 days) |
| msDS-LockoutThreshold | Lockout threshold for lockout of user accounts | 0 through 65535 | 10 |
| msDS-LockoutObservationWindow | Observation Window for lockout of user accounts |
|
0:00:30:00 (30 minutes) |
| msDS-LockoutDuration | Lockout duration for locked out user accounts |
|
0:00:30:00 (30 minutes) |
| msDS-PSOAppliesTo | Links to objects that this password settings object applies to (forward link) | 0 or more DNs of users or global security groups | “CN=u1,CN=Users,DC=DC1,
DC=contoso,DC=com” |
ADAC
[ new in Windows Server 2012/R2 ]
Using ADAC to create PSOs is the most convenient method. With PSOs, you can specify any settings under the Password Policy and the Account Lockout Policy nodes but not the Kerberos Policy node. You can create more than one PSO and configure different settings and assign them to different sets of users. If more than one PSO applies to a user (for example, two PSOs are assigned to two different groups, and some users are members of both groups), the PSO with the highest precedence value is applied to that user.
The basic steps for creating and using a PSO are as follows:
1. Open ADAC, and expand the domain node. Double-click System, and then double-click Password Settings Container. In the Tasks pane, click New, and then click Password Settings.
2. In the Create Password Settings dialog box, give the PSO a name and precedence. The precedence is an integer value assigned to resolve conflicts if more than one PSO applies to a user. The lowest number has the highest priority.
3. Configure password and account lockout policy settings.
4. Assign the PSO to one or more users or groups by adding user or group in the Directly Applies To section.
Security templates
3 tools for working with security templates:
- Security templates snap-in
- Security configuration and Analysis snap-in. Windows does not supply a preconfigured MMC, so we have to add this snap-in to an MMC.
- Secedit.ese
The initial security settings are in %systemroot%\security\templates\DC security.inf
5 possible results
- An X in a red circle indicates a mismatch
- A check mark in green indicates a match –
- A question mark in a white circle indicates that the policy wasn’t defined or the user doesn’t have permission to access the policy –
- An exclamation point in a white circle indicates that the policy doesn’t exist on that computer –
- No indicator indicates that the policy wasn’t defined in the template
GPO Management Delegation
The possible permissions for GPO delegation depend on whether you’re working with the GPO or the target the GPO is linked to. Eight possible permissions can be applied to GPOs and the container objects they’re linked to through delegation:
On Group Policy Objects folder
- Create GPOs—This permission applies only to the Group Policy Objects folder where you can find all GPOs in the GPMC. When you click the Group Policy Objects folder and click the Delegation tab in the right pane, you can view, add, and remove security principals who are allowed to create GPOs in the domain. By default, Domain Admins, Group Policy Creator Owners, and the System special identity have this permission.
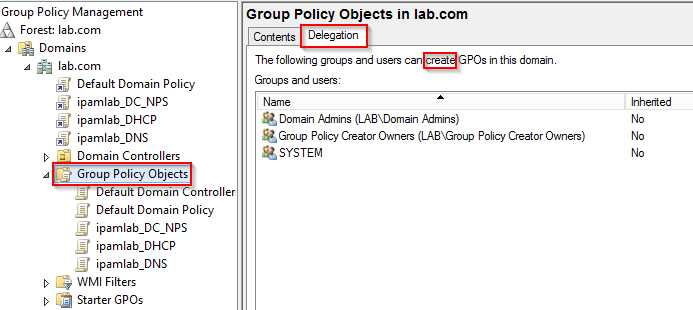
figure 1
On site, domain and OU
- Link GPOs—This permission can be set on sites, domains, and OUs and determines who can link or unlink a GPO to or from the container. Administrators, Domain Admins, Enterprise Admins, and the System special identity are granted this permission by default.
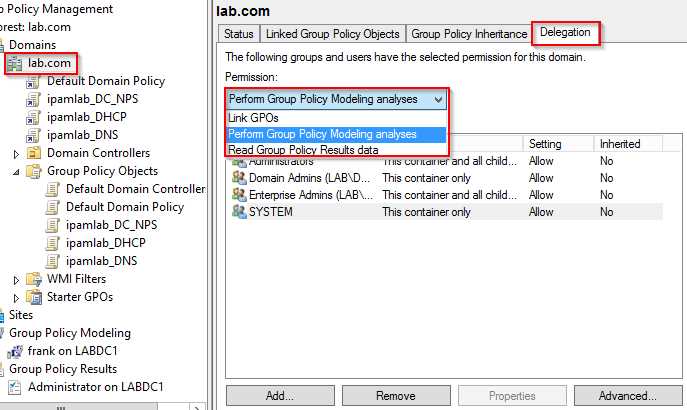
figure 2 - Perform Group Policy Modeling analyses—See figure 2, This permission is set on domains and OUs and determines who can run the GPO Modeling Wizard (discussed in “Group Policy Results and Modeling” earlier in this chapter) on the specified container. The default users are the same as for the Link GPOs permission.
- Read Group Policy Results data—See figure 2, This permission is set on domains and OUs and determines who can run the Group Policy Results Wizard (discussed in “Group Policy Results and Modeling” earlier in this chapter) on users and/or computers. The default users are the same as for the Link GPOs permission.
On GPO
- Read—This permission is set on GPOs; users with this permission can view settings and back up a GPO. By default, the Enterprise Domain Controllers universal group has this permission for all GPOs.
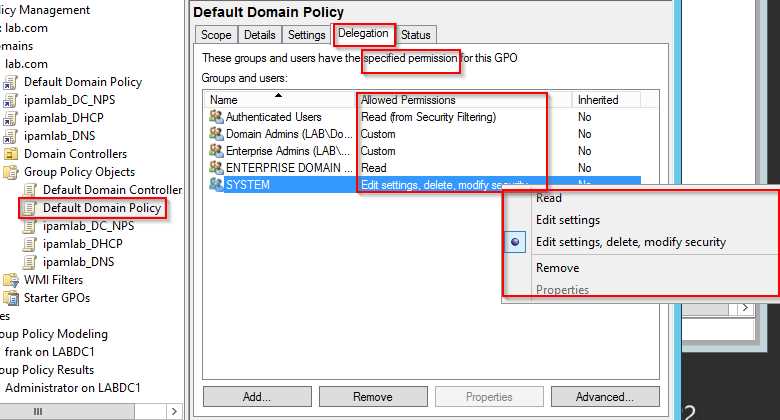
- Read (from Security Filtering)—This permission is used in group policy filtering. By default, the Authenticated Users group has this permission for all GPOs. It includes both the Read and Apply Group Policy permission and is generally set in the Scope tab of a GPO’s Proper- ties dialog box.
- Edit settings, delete, modify security—This permission is set on GPOs and determines who can edit, change status on, back up, delete, and change security on a GPO. By default, Domain Admins, Enterprise Admins, and the System special identity are granted this permission.
- Edit Settings—With this permission, security principals can change existing settings, import settings, and enable or disable a GPO. No users are granted this permission by default.
To configure delegation on a GPO, click the GPO in the GPMC and click the Delegation tab. You can add users and groups from the Delegation tab or click the Advanced button to add specific Allow and Deny permissions. The Advanced button opens the familiar DACL you have used to configure file and folder permissions.
Verify the settings on the client
Type the command rsop.msc. This will show the resultant set of policies, group policies that are applied to this client.
Let’s say you changed the firewall setting for a bunch of devices via group policy, you can verify by going to the client machine, type command rsop.msc, Expand Administrative Templates and click on Extra Registry Settings. On the right side pane you will find that the policies that we created are applied on the machine.
GPO powershell cmdlet
PowerShell cmdlets for managing GPOs
| Cmdlet | Function | Example |
| Backup-GPO | Backs up one GPO or all the GPOs in a domain | Backup-GPO -All -Path C:\BackupGPOs |
| Copy-GPO | Copies the settings from an existing GPO and creates a new GPO with these settings | Copy-GPO -SourceName GPO1 -TargetName NewGPO1 |
| Get-GPO | Gets information about one GPO or all GPOs in the domain | Get-GPO -All |
| Get-GPResultantSetOfPolicy | Gets the RSoP information for a user, computer, or both and saves it to a file | Get-GPResultantSetOfPolicy -ReportType xml -Path C:\GPReports\RSoPReport.xml |
| Import-GPO | Imports settings from a backed-up GPO to an existing GPO | Import-GPO -BackupGPOName GPO1 -TargetName GPO2 -Path C:\BackupGPOs |
| New-GPLink | Links a GPO to a site, domain, or OU | New-GPLink -Name GPO1 -Target “ou=Desktops,dc=411Dom1,dc=Local” |
| New-GPO | Creates a GPO | New-GPO -Name GPO5 |
| Remove-GPLink | Deletes a GPO link | Remove-GPLink -Name GPO1 -Target “ou=Desktops,dc=411Dom1,dc=Local” |
| Remove-GPO | Deletes a GPO | Remove-GPO -Name GPO5 |
| Rename-GPO | Renames a GPO | Rename-GPO -Name TestGPO -TargetName ScriptsGPO |
| Restore-GPO | Restores one GPO or all GPOs in the domain from GPO backup files | Restore-GPO -Name GPO1 -Path C:\BackupGPOs |
| Set-GPLink | Sets GPO link properties, such as enabled, disabled, enforced, and precedence order | Set-GPLink -Name GPO1 -Target “ou=Desktops,dc=411Dom1,dc=Local” -Enforced Yes |
| Set-GPPermission | Sets permissions for a security principal to a GPO or to all GPOs | Set-GPPermission -Name GPO1 -TargetName “Domain Users” -TargetType Group -PermissionLevel GpoRead |
| Get-Command -module GroupPolicy | Displays a list of all group policy–related cmdlets |