File server Resource Manager
The File Server Resource Manager (FSRM) role service has services and management tools for monitoring storage space, managing quotas, controlling the types of files users can store on a server, creating storage reports, and classifying and managing files.
Modifying Quota Templates and Monitoring Quota Use
There are two ways to modify a quota: editing the quota or editing the template the quota was generated from. In the FSRM console, you can click Quotas under Quota Management and double-click a quota in the middle pane to edit its properties. When you do so, the template the quota was created from remains unchanged, but the changes affect the quota applied to the folder or volume you’re editing. If you change the quota limit or notification threshold and cause the threshold to be exceeded, no notifications are created for existing files. Only attempts to add new files that exceed the threshold generate a notification.
When you edit a quota template, the changes can be applied to all, some, or none of the quotas created from this template. When you save template changes, the dialog box will pop up with the following settings:
• Apply template only to derived quotas that match the original template—The changes are applied only to quotas that haven’t been changed manually since the template was applied.
• Apply template to all derived quotas—The template is applied to all quotas generated by the template, even if the quota was changed manually.
• Do not apply template to derived quotas—No changes are made to existing quotas.
File screening:
Right click “File Screens” under File screening management, choose “Create File Screen”, choose ” Define custom file screen properties”
- Active screening prevents users from saving unauthorized files,
- passive screening simply monitors and notifies when unauthorized files are saved.
Right click File Screens, choose Create File Screen Exceptions: Exceptions can be defined to allow special cases (such as a video presentation that needs to be in a central location).
For example, audio and video files have been blocked, but the Human Resources Department
needs to show a training video to employees. To create a file screen exception, follow these steps:
1. In the left pane of the File Server Resource Manager console, right-click File Screens and click Create File Screen Exception to open the Create File Screen Exception dialog box.
2. Enter the exception path in the text box. The exception applies to the folder you specify and all its subfolders. Then select the file groups to exclude from screening. If necessary, you can create a new file group by clicking Create. When you’re finished, click OK to close the dialog box.
File Groups
A file group is a list of the types of files that define a file screen. For example, in Activity 3-7, you chose the Compressed Files file group to create a file screen. FSRM includes predefined file groups that should meet most needs, but you might need to create custom file groups or create exceptions to your file screens. To create custom file groups, expand File Screening Management in the left pane of the File Server Resource Manager console, and click File Groups. In the center pane, you see a list of predefined file groups.
Classification management
In the past, the only way to classify a file was to organize files with descriptive filenames and folder names. With indexing, files can be searched based on file content, but finding certain words in a file doesn’t tell you whether the file contains sensitive information or is related to a particular vendor or customer. File classification by file naming or folder storage is often left up to users, which can result in inconsistencies and errors. FSRM’s file classification feature helps you develop a consistent, reliable classification system for file management tasks. File classification management involves three basic steps:
To use file classification, you perform the following steps:
1. Define classification properties and values, which you can assign to files by running classification rules.
2. Create, update, and run classification rules, which are based assigning a single predefined property and value to files within a specified directory based on installed classification plug-ins.
3. When running a classification rule, reevaluate files that are already classified. You can choose to overwrite existing classification values, or add the value to properties that support multiple values. You can also use classification rules to declassify files that are not in the classification criterion anymore.
Classifying Files
File classification management is a fairly new feature, introduced in Windows Server 2008 R2.
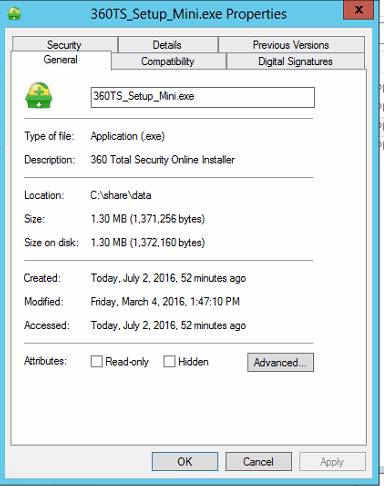
Before, in the file Properties window, there is no classification tab.
Now we can add a customized metadata here to classify our data according to our need.
To begin classifying files, you need to create classification properties that are applied by using classification rules. A classification property is a file attribute containing a value that’s used to categorize the data in a file or an aspect of the file, such as its location or creation time.
Windows has predefined classification properties called “resource properties”, which can fulfill our most common need and locate in ADAC > Dynamic Access Control > Resource properties..
To enable the properties: in ADAC ( active directory administrative Centre) or set-adresourceproperty .
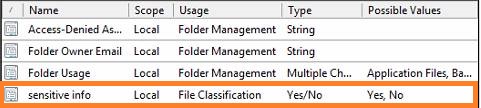
For example, you want to classify all files containing sensitive information so that they can be flagged for special handling. You start by creating a classification property in the FSRM console by expanding the Classification Management node, clicking Classification Properties, and clicking Create Local Property in the Actions pane to open the Create Local Classification Property dialog box .(note that this only applies to local files)
In this dialog box, you give the property a name and description and then select a property type from the eight available types. If you want to flag a file based only on whether it contains certain information, for instance, you use the Yes/ No property type.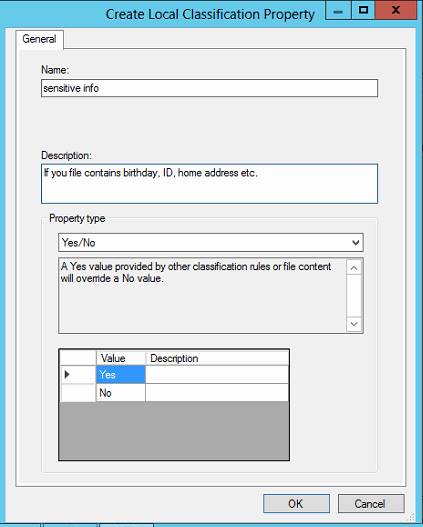
more info check here: https://technet.microsoft.com/en-us/library/dd759215(v=ws.11).aspx
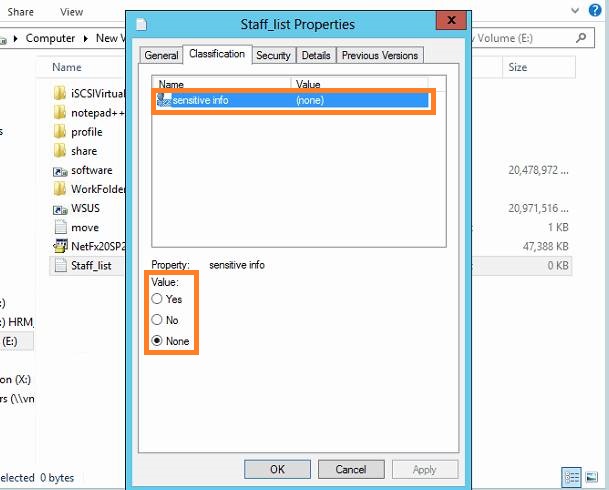
Next, you create a classification rule to set the property in files containing sensitive data. Users can access the property in the Classification tab of a file’s Properties dialog box and set the property manually. For example, a user who creates a text file containing birthday can right-click the text file in File Explorer and click Properties, and then click the Classification tab.
You can also create classification rules that set classification properties automatically.
To do so, expand the Classification Management node in the FSRM console, click Classification Rules, and click Create Classification Rule in the Actions pane to open the Create Classification Rule dialog box. In this dialog box, you enter the rule name and an optional description.
Next, click the Scope tab and specify the folders the rule should apply to and, if necessary, the types of files.
You can add folder in two ways, just for this time, or add some folders which belong to one kind( Application files, Backup, group files, user files).
To add just for this time, click the Add… button in the right bottom conner.
To add a kind of folders:
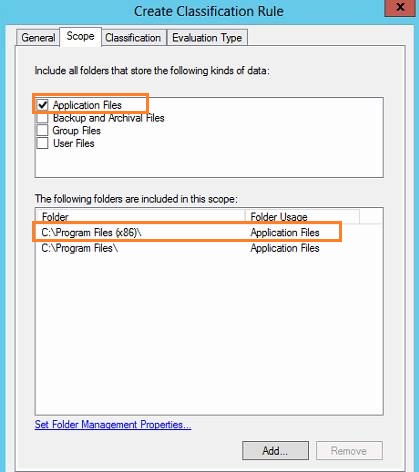
Here are four kinds of data: application files, Backup and Archival files, group Files, and User files. To define the kinds of data include which folders, you can click the “Set Folder Management Properties…” which is in the left bottom corner. Then click the Add… button, input a path or Browse to the path (I added C:\Program Files and C:\Program Files (x86) as Application Files in my case) you want to define, in the Value frame, check the kind to which you want to define the folder. Then click Ok and Close.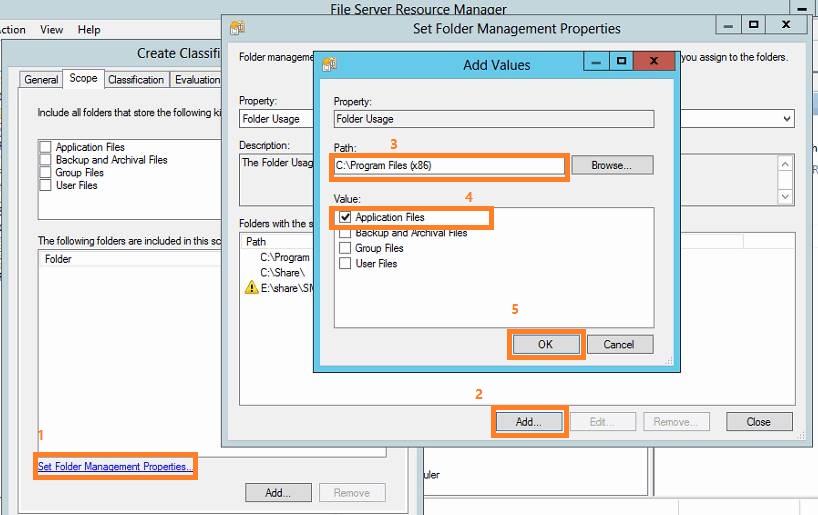
Now if you check the application Files, the C:\Program Files and C:\Program Files (x86) will be added to the “The follwing folders are included in this scope:” frame.
When you click the Classification tab and specify the classification parameters to configure how FSRM should recognize the type of data you’re looking for. In this example, you’re looking for date of birth, which have the pattern DD-DD-DDDD (with D representing a digit).
In the Classification tab, click Configure to open the Classification Parameters dialog box where you can set strings or regular expressions used to search for data in files.
In this example, the regular expression ^\d{2}-\d{2}-\d{4}$ is used; the \d indicates a digit, the number in braces indicates how many digits, and the ^ and $ symbols indicate the beginning and ending of the expression. This regular expression matches an DOB.{2}
Note, If you create multiple expressions for the same rule, all expressions must match for the rule to assign the property to the file.
After creating the classification rule, you can run it manually or schedule it to run periodically. If you run it manually, a report is created showing how many property matches were found and how many files were affected.
In the Evaluation Type tab : Re-evaluate existing property values let you overwritten existing property if the property already exists.
Data classification – 10 top tips
(http://www.computerweekly.com/feature/Data-classification-why-it-is-important-and-how-to-do-it)
1. Think twice about tagging and categorising everything – the costs are high
2. Consider the confidentiality and security of the data to be classified
3. Consider its integrity, as low-quality data cannot be trusted
4. Look at its availability – high availability needs resilient storage and networking
5. Use an effective metadata strategy to tag the data well
6. Get the support of the management and employees who will use the system
7. Use data cleansing technology to remove redundant, obsolete or trivial content
8. Carry out an information audit, to gain an accurate view of the nature of the data
9. Carry out classification design based on the data audit results
10. Monitor and maintain the data classification system over time, tweaking as necessary
File management task
Five properties are used to define files to be processed by a file management task:
- creation time
- modification time
- last accessed time
- filename pattern
- classification property.
Three types of actions can be performed on files matching the selected properties:
• File expiration(Archive file)—A file expiration task moves matching files to a folder you specify. You can base the expiration on any of the five properties mentioned in the preceding paragraph, but the last accessed time is usually selected if this task is actually being used for file expiration. Alternatively, you can use this action to move files that meet the criteria to an encrypted or a compressed folder, among other possibilities.
When a file expiration task is run, a new directory is created within the expiration directory, grouped by the server name on which the task was run.
The new directory name is based on the name of the file management task and the time it was run. When an expired file is found it is moved into the new directory, while preserving its original directory structure.
To create a file expiration task
- Click the File Management Tasks node.
- Right-click File Management Tasks, and then click Create File Management Task (or click Create File Management Task in the Actions pane). This opens the Create File Management Task dialog box.
- On the General tab, enter the following information:
- Name. Enter a name for the new task.
- Description. Enter an optional descriptive label for this task.
- Scope. Add the directories that this task should operate on by using the Add button. Optionally, directories can be removed from the list using the Remove button. The file management task will apply to all folders and their subfolders in this list.
- On the Action tab, enter the following information:
- Type. Select File Expiration from the drop-down box.
- Expiration Directory. Select a directory where files will be expired to.
Warning Do not select a directory that is within the scope of the task, as defined in the previous step. Doing so could cause an iterative loop that could lead to system instability and data loss. - Optionally, on the Notification tab, click Add to send e-mail notifications, log an event, or run a command or script a specified minimum number of days before the task performs an action on a file.
- In the Number of days before task is executed to send notification combo box, type or select a value to specify the minimum number of days prior to a file being acted on that a notification will be sent.
Note
Notifications are sent only when a task is run. If the specified minimum number of days to send a notification does not coincide with a scheduled task, the notification will be sent on the day of the previous scheduled task. - To configure e-mail notifications, click the E-mail Message tab and enter the following information:
- To notify administrators when a threshold is reached, select the Send e-mail to the following administrators check box, and then enter the names of the administrative accounts that will receive the notifications. Use the format account@domain, and use semicolons to separate multiple accounts.
- To send e-mail to the person whose files are about to expire, select the Send e-mail to the user whose files are about to expire check box.
- To configure the message, edit the default subject line and message body that are provided. The text that is in brackets inserts variable information about the quota event that caused the notification. For example, the [Source File Owner] variable inserts the name of the user whose file is about to expire. To insert additional variables in the text, click Insert Variable.
- To attach a list of the files that are about to expire, click Attach to the e-mail list of files on which action will be performed, and type or select a value for Maximum number of files in the list.
- To configure additional headers (including From, Cc, Bcc, and Reply-to), click Additional E-mail Headers.
- To log an event, click the Event Log tab and select the Send warning to event log check box, and then edit the default log entry.
- To run a command or script, click the Command tab and select the Run this command or script check box. Then type the command, or click Browse to search for the location where the script is stored. You can also enter command arguments, select a working directory for the command or script, or modify the command security setting.
- Optionally, use the Report tab to generate one or more logs or storage reports.
- To generate logs, select the Generate log check box and then select one or more available logs.
- To generate reports, select the Generate a report check box and then select one or more available report formats.
- To e-mail generated logs or storage reports, select the Send reports to the following administrators check box and type one or more administrative e-mail recipients using the format account@domain. Use a semicolon to separate multiple addresses.
The report is saved in the default location for incident reports, which you can modify in the File Server Resource Manager Options dialog box. - Optionally, use the Condition tab to run this task only on files that match a defined set of conditions. The following settings are available:
- Property conditions. Click Add to create a new condition based on the file’s classification. This will open the Property Condition dialog box, which allows you to select a property, an operator to perform on the property, and the value to compare the property against. After clicking OK, you can then create additional conditions, or edit or remove an existing condition.
- Days since file was last modified. Click the check box and then enter a number of days into the spin box. This will result in the file management task only being applied to files that have not been modified for more than the specified number of days.
- Days since file was last accessed. Click the check box and then enter a number of days into the spin box. If the server is configured to track timestamps for when files were last accessed, this will result in the file management task only being applied to files that have not been accessed for more than the specified number of days. If the server is not configured to track accessed times, this condition will be ineffective.
- Days since file was created. Click the check box and then enter a number of days into the spin box. This will result in the task only being applied to files that were created at least the specified number of days ago.
- Effective starting. Set a date when this file management task should start processing files. This option is useful for delaying the task until you have had a chance to notify users or make other preparations in advance.
- On the Schedule tab, click Create Schedule, and then in the Schedule dialog box, click New. This displays a default schedule set for 9:00 A.M. daily, but you can modify the default schedule. When you have finished configuring the schedule, click OK.
- Click OK.
• RMS encryption—The Rights Management Services (RMS) server role is required for this option. RMS and RMS encryption are beyond the scope of this book, but if you’re using RMS in your network, you can encrypt files meeting the specified criteria automatically.
• Custom—You create a custom task that runs a program or script when a file matches the criteria. For example, the file expiration action might not suit your needs for all types of files. You might want to delete matching files, for instance, instead of moving them to a folder.
classification based encryption for office documents
One of the good usage of the classification is invoke Active Directory Rights Management Services (AD RMS) protection for sensitive documents based on the classification property.
https://docs.microsoft.com/en-us/windows-server/identity/solution-guides/scenario–classification-based-encryption-for-office-documents