Purpose of this Project
We will let the mobile devices (Laptop, windows tablet) be able to logon in the wireless network automatically via certificate based authentication before user login, so mobile devices can pull the computer GPO, such as MSI deployment, printer deployment on Computer object, etc. And after user login, it will switch to user certificate based authentication, and allow proxy to audit and apply policies on the devices. The answer is Certificate based authentication (EAP-TLS).
Unfortunately this is not that straight forward since there are a couple of requirement for the server and client certificate. You can configure this with this tutorial, but you would need a solid understanding of how NPS works, how CA works, in case of troubleshooting required, as there are so many steps and this project may fail if any one of them not configured correctly.
Part 1. Plan the infrastructure
You can put them all in one server, but the best practices is you will need three servers, AD DS, AD CS, NPS.
- Get three servers ready and note down the names.
- Install AD DS. Follow this https://blogs.technet.microsoft.com/canitpro/2017/02/22/step-by-step-setting-up-active-directory-in-windows-server-2016/
- Create a AD group Wireless-Cert-Access for Wireless Cert Authentication access.
- Create a OU called Mobile devices in Active Directory Users and Computers.
- AD CS and NPS server need to be domain joined.
- Create a shared Key for the RADIUS client and Server to share.
Part 2. CA preparation
We recommend certificate auto-enrollment as it provides numbers of advantages:
- The AD CS certification authority (CA) automatically enrolls a server certificate to all of your NPS and Remote Access servers.
- All computers in the domain automatically receive your CA certificate, which is installed in the Trusted Root Certification Authorities store on every domain member computer. Because of this, all computers in the domain trust the certificates that are issued by your CA. This trust allows your authentication servers to prove their identities to each other and engage in secure communications.
- Scalability. After deploying your Enterprise Root CA with this guide, you can expand your public key infrastructure (PKI) by adding Enterprise subordinate CAs.
- Simplicity. You specify the servers that enroll server certificates by using Active Directory group accounts and group membership.
Step 1 Install AD CS
https://docs.microsoft.com/en-us/windows-server/networking/core-network-guide/cncg/server-certs/install-the-certification-authority
- Log on as a member of both the Enterprise Admins group and the root domain’s Domain Admins group.
- In Server Manager, click Manage, and then click Add Roles and Features. The Add Roles and Features Wizard opens.
- In Before You Begin, click Next.
- In Select Installation Type, ensure that Role-Based or feature-based installation is selected, and then click Next.
- In Select destination server, ensure that Select a server from the server pool is selected. In Server Pool, ensure that the local computer is selected. Click Next.
- In Select Server Roles, in Roles, select Active Directory Certificate Services. When you are prompted to add required features, click Add Features, and then click Next.
- In Select features, click Next.
- In Active Directory Certificate Services, read the provided information, and then click Next.
- In Confirm installation selections, click Install. Do not close the wizard during the installation process.When installation is complete, click Configure Active Directory Certificate Services on the destination server. The AD CS Configuration wizard opens. Read the credentials information and, if needed, provide the credentials for an account that is a member of the Enterprise Admins group. Click Next.
- In Role Services, click Certification Authority, and then click Next.
- On the Setup Type page, verify that Enterprise CA is selected, and then click Next.
- On the Specify the type of the CA page, verify that Root CA is selected, and then click Next.
- On the Specify the type of the private key page, verify that Create a new private key is selected, and then click Next.
- On the Cryptography for CA page, keep the default settings for CSP (RSA#Microsoft Software Key Storage Provider) and hash algorithm (SHA2), and determine the best key character length for your deployment. Large key character lengths provide optimal security; however, they can impact server performance and might not be compatible with legacy applications. It is recommended that you keep the default setting of 2048. Click Next.
Server Authentication certificates: CAs must begin issuing new certificates using only the SHA-2 algorithm after January 1, 2016. Windows will no longer trust certificates signed with SHA-1 after January 1, 2017. - On the CA Name page, keep the suggested common name for the CA or change the name according to your requirements. Ensure that you are certain the CA name is compatible with your naming conventions and purposes, because you cannot change the CA name after you have installed AD CS. Click Next.
- On the Validity Period page, in Specify the validity period, type the number and select a time value (Years, Months, Weeks, or Days). The default setting of five years is recommended. Click Next.
- On the CA Database page, in Specify the database locations, specify the folder location for the certificate database and the certificate database log. If you specify locations other than the default locations, ensure that the folders are secured with access control lists (ACLs) that prevent unauthorized users or computers from accessing the CA database and log files. Click Next.
-
In Confirmation, click Configure to apply your selections, and then click Close.
Step 2. Configure Certificate template for server
Servers that are running the Network Policy Server (NPS) service that are members of the RAS and IAS Servers group. You can configure this in the active directory Users and computers.
Membership in both the Enterprise Admins and the root domain’s Domain Admins group is the minimum required to complete this procedure.
To configure the Server certificate template
- On CA1, in Server Manager, click Tools, and then click Certification Authority. The Certification Authority Microsoft Management Console (MMC) opens.
- In the MMC, double-click the CA name, right-click Certificate Templates, and then click Manage.
- The Certificate Templates console opens. All of the certificate templates are displayed in the details pane.
- In the details pane, click the RAS and IAS Server template.
- Click the Action menu, and then click Duplicate Template. The template Properties dialog box opens.
- Click the Security tab.
- On the Security tab, in Group or user names, click RAS and IAS servers. under Choose which cryptographic providers can be used for reequests: tick Requests must use one of following providers: then tick Microsoft Enhanced RSA and AES cryptographic Provider.
- On Request Handling tab, tick Allow private key to be exported.
- On the Cryptography tab, type the minimum key size: 2048.
- Under Subject Name tab, tick Build from this Active Directory information, under Subject name format: select DNS name. under Include this information in alternate subject name: DNS name.
- In Permissions for RAS and IAS servers, under Allow, ensure that Enroll is selected, and then select the Autoenroll check box. Click OK, and close the Certificate Templates MMC.
- In the Certification Authority MMC, click Certificate Templates. On the Action menu, point to New, and then click Certificate Template to Issue. The Enable Certificate Templates dialog box opens.
- In Enable Certificate Templates, click the name of the certificate template that you just configured, and then click OK. For example, if you did not change the default certificate template name, click Copy of RAS and IAS Server, and then click OK.
Note, double check the reference part to make sure your template meet the requirement.
STEP 3 Configure Certificate template for computer and Users
- In the Certification Authority Microsoft Management Console (MMC), Right click Certificate Templates and click Manage.
- Right click Computer and select Duplicate Template.
- Under Compatibility Settings for the Certification Authority select Windows Server 2003 and Certificate recipient select Windows XP/Server 2003.
- Click the General Tab and change the Template Name to Computer_Auto_Enrollment
- Click the Security tab, and give “Domain Computers” permissions to Enroll and Autoenroll.
- Select the Subject Name tab and change the Subject name format to be DNS Name.
- Check DNS Name
- Under the request handling tab uncheck “Allow private key to be exported“
- Click “OK” to go back to the template list.
- Right click User and select Duplicate Template.
- Under Compatibility Settings for the Certification Authority select Windows Server 2003 and Certificate recipient select Windows XP/Server 2003.
- Change the Template Name to User_Auto_Enrollment
- Select the Security tab, and give “Domain Users” permissions to Autoenroll.
- Select the Subject name format to “Common Name”
- Uncheck “Include email name in subject name”
- Uncheck “Email” in the subject alternative name.
- Check “User principal name (UPN)”
- Under the request handling tab uncheck “Allow private key to be exported”
- Click “OK” to go back to the template list.
Step 4 Configure certificate auto-enrollment for both server, users and computer
On the computer where AD DS is installed, open Group Policy Management. The Select Group Policy Object dialog box opens.
- Right click Default Domain Policy, and then click Edit.
- In the console, expand the following path: Computer Configuration, Policies, Windows Settings, Security Settings, and then Public Key Policies.
- Click Public Key Policies. In the details pane, double-click Certificate Services Client – Auto-Enrollment. The Properties dialog box opens. Configure the following items, and then click OK:
- In Configuration Model, select Enabled.
- Select the Renew expired certificates, update pending certificates, and remove revoked certificates check box.
- Select the Update certificates that use certificate templates check box. Click OK.
By default, this periodic refresh is performed every 90 minutes with a randomized offset of up to 30 minutes. Membership in Administrators, or equivalent, is the minimum required to complete this procedure.
To refresh Group Policy on the local computer, at the Windows CMD prompt, type gpupdate /force, and then press ENTER
To verify NPS enrollment of a server certificate
Log on the NPS server. Type MMC.exe, right click MMC.exe, run as administrator. In MMC, Click File, Add/Remove Snap-in… , select Certificates, click Add > , choose Local computer. click OK.
In the left pane, click Console Root, Certificate (local computer) > Personal > certificate. The certificate created above should show here, note down the name and expire date.
If cert not showing here, troubleshoot.
To Verify Computer Certificate and User certificate
Log on the NPS server. Type MMC.exe, right click MMC.exe, run as administrator. In MMC, Click File, Add/Remove Snap-in… , select Certificates, click Add > , choose Local computer. click OK. Then do the same to add Local-Current User.
In the left pane, click Console Root, Certificate (local computer) > Personal > certificate. Confirm the certificate is there with name, PC_name.Domain_name
Do the same check User certificate, if not, troubleshoot.
Part 3. Configure NPS
Install the Network Policy Server on the Microsoft Windows 2016 Server
In this setup, the NPS is used as a RADIUS server to authenticate wireless clients with EAP-TLS authentication. Complete these steps in order to install and configure NPS on the Microsoft WIndows 2016 server:
- Click Start > Server Manager.
- Click Roles > Add Roles. Click Next.
- Select the service Network Policy and Access Services, and click Next.
- Review the Introduction to Network Policy and Access Services, and click Next.
- Select Network Policy Server, and click Next.
- Review the confirmation, and click Install.
- After the install is completed, a screen similar to this one is displayed. Click Close
Configure the Network Policy Server Service for EAP-TLS Authentication
- Click Start > Administrative Tools > Network Policy Server.
- Right-click NPS (Local), and choose Register server in Active Directory. Click OK. Click OK.
Add the Wireless LAN Controller as an authentication, authorization, and accounting (AAA) client on the NPS.
- Expand RADIUS Clients and Servers. Right-click RADIUS Clients, and choose New RADIUS Client.
- Enter a Friendly name (WLC in this example), the management IP address of the WLC (192.168.0.5 in this example) and a shared secret. The same shared secret is used to configure the WLC.
Note that if you use Ubiquiti controller and APs, the IP you type here will be the APs IP address, not the controller. The reason behind this is unifi controller only push configuration to APs, then APs can work without WLC. But Cisco APs always need WLC to be online. - Click OK to return to the previous screen.
Connection request policies are used to specify which RADIUS servers perform authentication and authorization of RADIUS clients’ connection requests. These policies can also specifywhich servers RADIUS accounting requests are sent to. They’re applied to NPS servers configured as RADIUS servers or RADIUS proxies.
To create a connection request policy
By default there is an policy which handle all the authentication locally, but for scalability and easy troubleshooting, I want to configure the precise policy for Wireless use.
1. In Network Policy Server, right-click Connection Request Policies.
2. Select New on the shortcut menu.
3. In the New Connection Request Policy dialog box, enter a Policy name and leave Type of network access server set to Unspecified.
4. Click Next.
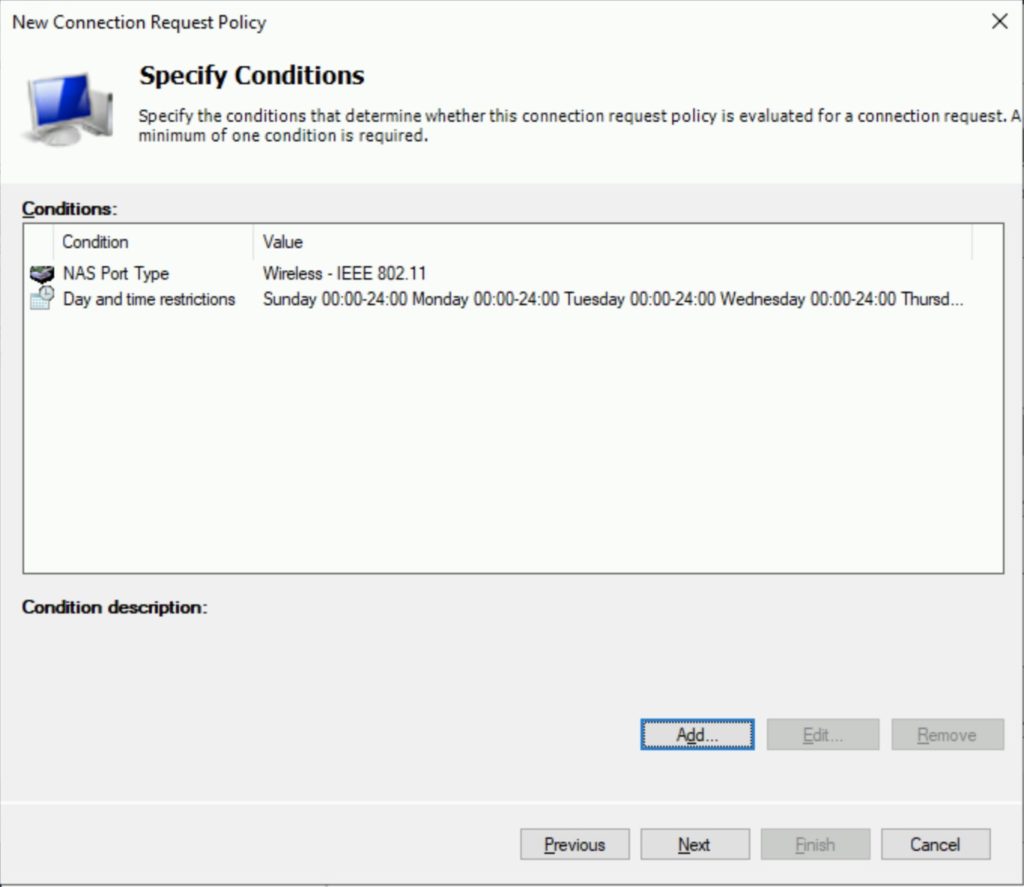
5. In the Specify condition click Add. Then scroll to the bottom, and select NAS Port Type, click Add, in the Common 802.1x Connection tunnel types, select Wireless – IEEE 802.11.click Add, then OK.
6. In the dialog box that follows, Then click Add again, select Day and Time Restrictions, select the time when you want user to be authenticated. click OK. Then click Next.
7. In the Specify Connection Request Forwarding dialog box, select Authenticate requests on this server. Click Next.
8. In the Specify Authentication Methods and Configure Settings dialog boxes, accept the defaults by clicking Next, then click Finish.
Now we work on the network Policies.
- Expand Policies, right-click Network Policies, and choose New.
- Enter a policy name for this rule (Wireless Cert authentication), Leave the type of network access server Unspecified and click Next.
- To have this policy allow only wireless domain users, click add these three conditions, and click Next:
- Windows Groups – Wireless-Cert-Access
- NAS Port Type – Wireless – IEEE 802.11
- Click Access granted to grant connection attempts that match this policy, and click Next.
- Disable all the authentication methods under Less secure authentication methods.
- Under EAP Types: Click Add, select Microsoft: Smart Card or other certificate , and click OK.
Optional : You can also add password authentication, so if the machine or current user don’t have a certificate, it process with password based authentication. To do this click Add… , choose Microsoft: Protected EAP (PEAP), then click Microsoft: Protected EAP (PEAP), and click Edit. Under Eap Types, make sure there is Secured password (EAP_MSCHAP v2). If not, add that here.
Ensure the previously created NPS certificate is selected in the Certificate issued drop-down list, and click Ok. Note that If your server has multiple certificates, you can confirm the certs by name and expire date you noted down in PART 2 Step4.
Click Next multiple times until you Click Finish.
Deploy the Wifi profile to client computer
Right click on the policy and click Edit. Go to Computer Configuration>Policies>Windows Settings>Security Settings>Wireless Network (IEEE 802.11) Polices and right click, Choose Create a New Wireless Network Policy for Windows Vista and Later Releases
Give the Policy a name then click Add > Infrastructure
Give the profile a name and then enter the name of the SSID that you want to connect users to then click Add.
Select the Security tab and select WPA2-Enterprise and AES-CCMP encryption. Then select Microsoft: Smart card or other certificate and
- Network Authentication Method: Microsoft: Protected EAP (PEAP)
- Authentication mode: User or Computer authentication
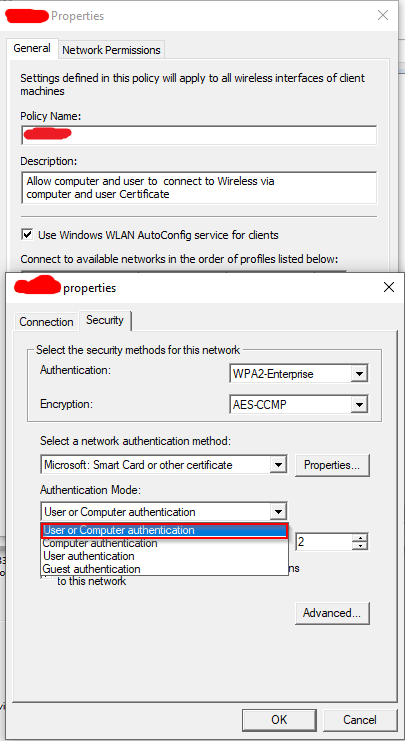
Here are three option explained:
- User or Computer Authentication: Computer will use Computer Cert to authenticate machine before login, and use user Cert to authenticate the user after login, which is the ideal scenario for us.
- Computer authentication: Computer will use Computer Cert to authenticate machine before login. So after computer login, user need to connect to the wifi with username and password.
- User Authentication: Use user Cert to authenticate the user after login, so there will be no automatic pre-login wifi connection.
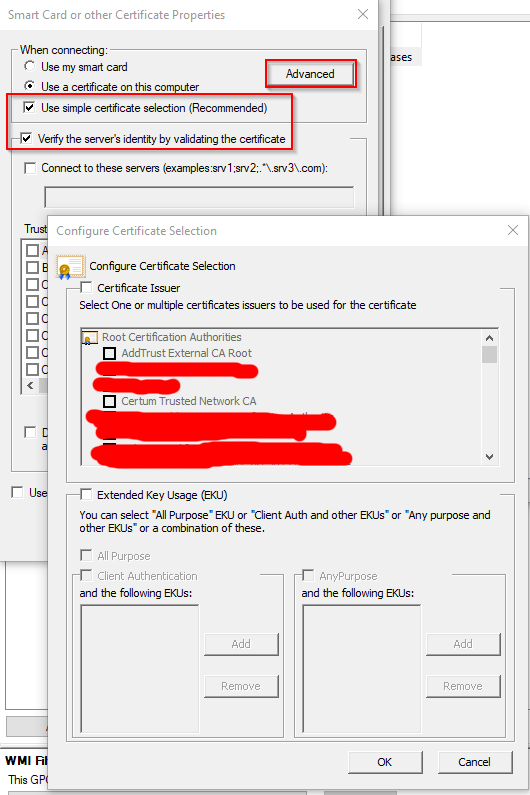
Click Properties after Microsoft: Smart Card or other certificate
- Tick Use simple certificate selection(Recommended)
- Tick Verify the server’s identity by validating the certificate, which means client must verify the server RADIUS certificate. If not ticked, may cause Reason Code: 16, see problem section.
- Keep others unticked.
Click Advanced after When Connecting: make sure no option ticked.
Click OK until save all the Wifi Profile setting.
Link the GPO to the OU where all the mobile clients are sitting.
Now go to page 2 to setup the Cisco Wireless controller for RADIUS Authentication.