Part 4. Configure the WLC for RADIUS Authentication
I will use a Cisco 5520 WLC with software version 8.5.140.0 as example .
Configure the WLC to use the NPS as the authentication server. The WLC must be configured in order to forward the user credentials to an external RADIUS server. The external RADIUS server then validates the user credentials and provides access to the wireless clients.
Complete these steps in order to add the NPS as a RADIUS server for all WLAN, in the Security > AAA > RADIUS > Authentication page:
- Choose Security > AAA > RADIUS > Authentication from the controller interface to display the RADIUS Authentication Servers page.
- In the top right corner, Click New in order to define a RADIUS server.
- Define the RADIUS server parameters. These parameters include the RADIUS Server IP Address, Shared Secret, Port Number(default 1812), and Server Status ( Enabled). The Network User and Management check boxes determine if RADIUS-based authentication applies to management and network (wireless) users. This example uses the NPS as the RADIUS server with an IP address, type the shared secret you created in Part 1. Click Apply.
- Then do the same for accounting: Security > AAA > RADIUS > Accounting

Configure a WLAN for the Clients
Configure the service set identfier (SSID) (WLAN) to which the wireless clients connects.
- Go to WLANs, select Create New, click Go.
- Select WLAN for Type, Type a Profile name and SSID, keep the default for ID.
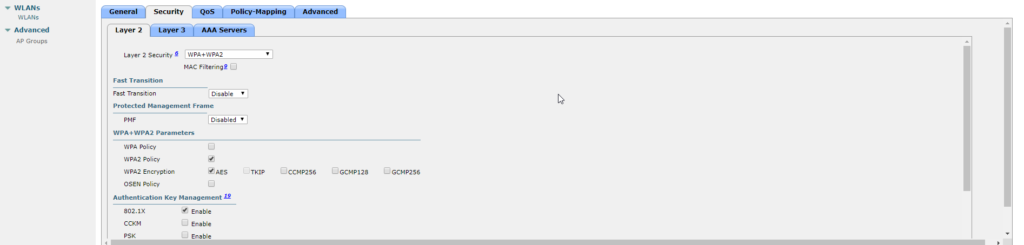
- Define the Layer 2 Authentication as WPA2 so that the clients perform EAP-based authentication (PEAP-MS-CHAP v2 in this example) and use the advanced encryption standard (AES) as the encryption mechanism. Leave all other values at their defaults.
- To configure the SSID for 802.1x, complete these steps: Click the General tab and enable the WLAN.
- Click the Security > Layer 2 tabs, set Layer 2 security to WPA + WPA2, check the WPA+WPA2 Parameters (for example, WPA2 AES) check boxesas needed, and click 802.1x as the Authentication Key Management.
- Leave Layer 3 default. click Apply in the right top corner.
Optional, this will override use of default servers on this WLAN. Click the Security > AAA Servers tabs, choose the IP address of the NPS server from the Server 1 drop-down list, and click Apply.
Part 5 Testing
By now, your wireless infrastructure should be working now. Now use a mobile device (which is sitting in the OU called Mobile devices in Active Directory Users and Computers ). It should connect automatically. If you have below error, fix it by upgrade the hashing algorithm.
Possible error: Continue connecting? If you expect to find [wireless SSID name] in this location, go ahead and connect. Otherwise, it may be a different network with the same name.
Solution: Your Microsoft Root CA’s certificate needs to use SHA256 hashing algorithm instead of SHA1.
https://support.symantec.com/us/en/article.tech246255.html
Check with log in Event Viewer
Before you logon on mobile device, you should see the wifi is connected. On the NPS server, if you go to Event Viewer > Windows Logs > Security, filter the log with Event ID 6272 ( Authentication success ) or Event ID 6273(failure) , you should see the relative log, which include:
- Security ID: youdomain\PCname.
- Account Name: host/pcname.domain
- Authentication Details: Connection Request Policy Name and Network Policy Name, Authentciation Type: EAP, EAP Type: Microsoft: Smart Card or other certificate.
- Result: Full Access.
Then logon the device with your domain name, the wifi should be still connected, but the authentication should be user cert based. To verify this, on the NPS server, if you go to Event Viewer > Windows Logs > Security, filter the log with Event ID 6272 ( Authentication success ) or Event ID 6273(failure) , search by your account name, you should see the relative log, which include:
- Security ID: youdomain\user_name.
- Account Name: user_name@domain
- Fully Qualified Account Name: domain/OU/OU/ Display Name
- Authentication Details: Connection Request Policy Name and Network Policy Name, Authentciation Type: EAP, EAP Type: Microsoft: Smart Card or other certificate.
- Result: Full Access.
Now your wifi infrastructure on a Windows machine should be fully functional.
Connect MAC with Certificate
If you have a MAC lab needed to connect to wireless. You can utilize the Apple Profile manager to configure this. The related Setting is Simple certificate enrollment protocol (SCEP), which often uses a Microsoft certificate authority (CA) Network Device Enrollment Service (NDES).
To make this happen, you will need to select the Network Device Enrollment Service when you install the AD CS role.
https://support.apple.com/en-au/HT204446
Reference:
Minimum server certificate requirements
With PEAP-MS-CHAP v2, PEAP-TLS, or EAP-TLS as the authentication method, the NPS must use a server certificate that meets the minimum server certificate requirements.
Client computers can be configured to validate server certificates by using the Validate server certificate option on the client computer or in Group Policy.
The client computer accepts the authentication attempt of the server when the server certificate meets the following requirements:
- The Subject name contains a value. If you issue a certificate to your server running Network Policy Server (NPS) that has a blank Subject name, the certificate is not available to authenticate your NPS. To configure the certificate template with a Subject name:
-
- Open Certificate Templates.
- In the details pane, right-click the certificate template that you want to change, and then click Properties .
- Click the Subject Name tab, and then click Build from this Active Directory information.
- In Subject name format, select a value other than None.
- The computer certificate on the server chains to a trusted root certification authority (CA) and does not fail any of the checks that are performed by CryptoAPI and that are specified in the remote access policy or network policy.
- The computer certificate for the NPS or VPN server is configured with the Server Authentication purpose in Extended Key Usage (EKU) extensions. (The object identifier for Server Authentication is 1.3.6.1.5.5.7.3.1.)
- Configure the server certificate with the required cryptography setting:
-
- Open Certificate Templates.
- In the details pane, right-click the certificate template that you want to change, and then click Properties.
- Click the Cryptography tab and make sure to configure the following:
- Provider Category: Key Storage Provider
- Algorithm Name: RSA
- Providers: Microsoft Platform Crypto Provider
- Minimum key size: 2048
- Hash Algorithm: SHA2
- Click Next.
- The Subject Alternative Name (SubjectAltName) extension, if used, must contain the DNS name of the server. To configure the certificate template with the Domain Name System (DNS) name of the enrolling server:
-
- Open Certificate Templates.
- In the details pane, right-click the certificate template that you want to change, and then click Properties .
- Click the Subject Name tab, and then click Build from this Active Directory information.
- In Include this information in alternate subject name, select DNS name.
When using PEAP and EAP-TLS, NPSs display a list of all installed certificates in the computer certificate store, with the following exceptions:
- Certificates that do not contain the Server Authentication purpose in EKU extensions are not displayed.
- Certificates that do not contain a Subject name are not displayed.
- Registry-based and smart card-logon certificates are not displayed.
For more information, see Deploy Server Certificates for 802.1X Wired and Wireless Deployments.
Minimum client certificate requirements
With EAP-TLS or PEAP-TLS, the server accepts the client authentication attempt when the certificate meets the following requirements:
- The client certificate is issued by an enterprise CA or mapped to a user or computer account in Active Directory Domain Services (AD DS).
- The user or computer certificate on the client chains to a trusted root CA, includes the Client Authentication purpose in EKU extensions (the object identifier for Client Authentication is 1.3.6.1.5.5.7.3.2), and fails neither the checks that are performed by CryptoAPI and that are specified in the remote access policy or network policy nor the Certificate object identifier checks that are specified in NPS network policy.
- The 802.1X client does not use registry-based certificates that are either smart card-logon or password-protected certificates.
- For user certificates, the Subject Alternative Name (SubjectAltName) extension in the certificate contains the user principal name (UPN). To configure the UPN in a certificate template:
-
- Open Certificate Templates.
- In the details pane, right-click the certificate template that you want to change, and then click Properties.
- Click the Subject Name tab, and then click Build from this Active Directory information.
- In Include this information in alternate subject name, select User principal name (UPN).
- For computer certificates, the Subject Alternative Name (SubjectAltName) extension in the certificate must contain the fully qualified domain name (FQDN) of the client, which is also called the DNS name. To configure this name in the certificate template:
-
- Open Certificate Templates.
- In the details pane, right-click the certificate template that you want to change, and then click Properties.
- Click the Subject Name tab, and then click Build from this Active Directory information.
- In Include this information in alternate subject name, select DNS name.
Problems
on the NPS server, open Event viewer, go to Windows Logs > Security, on the right pane, click Filter current log... Type 6273 in the Event ID.
Find the one with your PC name, then scroll down to Authentication Details.
Example 1. Reason Code: 48 , Reason: The connection request did not match any configured network policy.
An example would be like below:
Authentication Details:

Authentication Details: Connection Request Policy Name: FrankFu Secure Wireless Connections

Network Policy Name: -

Authentication Provider: Windows Authentication Server: nps01.frankfu.com

Authentication Type: EAP

EAP Type: -

Account Session Identifier: 35643135353165342F3xxxxxxxxx3A66332F3731353130

Logging Results: Accounting information was written to the local log file.

Reason Code: 48

Reason: The connection request did not match any configured network policy.
The NPS will process the connection request policies first, determine which NPS server send the request to, then process the Network Policies, determine if the request is granted or declined.
Note that the “Network Policy Name: – ” means the NPS has not process any Network policies yet. Which means the request did not match connection request policies, and request was not forwarded to this NPS.
Go and check the connection request policies condition, such as group membership, and so on.
Example 2. Reason Code: 16 Reason: Authentication failed due to a user credentials mismatch. Either the user name provided does not map to an existing user account or the password was incorrect.
Authentication Details:

Authentication Details: Connection Request Policy Name: FrankFu Secure Wireless Connections

Network Policy Name: FrankFu Wireless Allow Authentication Provider:

Windows Authentication Server: nps01.frankfu.com

Authentication Type: EAP EAP

Type: Microsoft: Smart Card or other certificate

Account Session Identifier: 35643135353337372F34633A33343A38383A36373A34353A66332F3731363239

Logging Results: Accounting information was written to the local log file.

Reason Code: 16

Reason: Authentication failed due to a user credentials mismatch. Either the user name provided does not map to an existing user account or the password was incorrect.
This can be caused by multiple wrong settings. Two typical ones are below, if they don’t fix your issue, do more research on google.
Possible Reason 1: We noticed that the Network policy name is showing here, which means the local NPS server tried to process the Authentication, the Authentication method is Smart Card or other certificate, Reason: existing user account or the password was incorrect.
Since we are using certificate based authentication, all the credential info is in the Client certificate. We should go and check following : 1. If the client has a certificate, check the Certificate template information, note down the template name. 2. Go to the CA, find the template, If the client certificate template meet the requirement, see the “Minimum client certificate requirements”. In my case the DNS name under Include this information in alternate subject name was not selected .
Possible Reason 2: Client side setting may also cause this issue, double check the wifi profile setting in the GPO. A typical misconfig is unticked Verify the server’s identity by validating the certificate. This means client must verify the server RADIUS certificate. If your network environment is fairly simple and you want to stay away from these confusing parameters in the GPO. Another simple way is create a wifi profile on the client, test if it work, then export it to a file and import into the GPO.
To do this, go to a windows 10 client laptop, click wifi icon in the right bottom corner, click Network & Internet Settings, click Wi-fi on the left pane, click Manage know networks in the right pane. Click Add a new network. In the pop up window, add ssid to the network name, security type select WPA2-Enterprise AES, EAP method Smart card or other ertificate, tick Connect automatically.
If this works open a command prompt, type below command:
netsh wlan export profile folder=c:
Copy the file to a shared drive, then import it into the GPO wireless setting when you create a Wireless Network Policy.
Example3: connection warning at client side
“Continue connecting? If you expect to find [SSID-Name] in this Location, go ahead and connect. Otherwise, it may be a different Network with the same Name”
Reason 1: certificate thumbprint algorithm