Windows client
Manually:
Download the NSClient++ x64 from sourceforge.net. start the installation:
Allowed host: the IP of the Nagios server
NSClient password:
Modules to load: enable the “enable common check plugins”, “Enable nsclient server(check_nt)”, “Enable NRPEserver (check_nrpe)”.
Go to the services.msc to check the NSclient++(x64) service is running.
Go to the installation folder, nsclient.ini file stores the configuration, if you want to modify it later.
Via GPO:
1. Install NSCP
Download the NSClient++ x64 and store it in a network location where all the machine have read permission
2. Deploy the NSCP: The package provides everything required to install a default NSClient++ agent. For the purposes of this article, all configurations will be applied to the Default Domain Policy Organizational Unit (OU). The OU(s) utilized in a production environment will vary depending upon the structure of the actual Active Directory domain. Save the .msi file to a shared directory. Then, open the Group Policy Management Console and edit the policy for the selected OU. The package is then selected for deployment by its shared path (<Server>\,<Share>) under the
Computer Configuration > Policies > Software Settings > Software Installation policy.
Upon rebooting, each server to which the GPO is applied will then install the agent. However, the configuration file will be the default installation one and not operational. The customized installation file (described below) requires a second reboot.
If you also wish to support python scripting, also install the .msi file that may be downloaded here.
The .msi install will also add a Windows Firewall rule (pictured above) to allow any inbound traffic to connect to the nscp.exe process.
The following video depicts the Windows boot process and application installation, admittedly not exciting, but included as a demonstration.
3. Edit the Configuration file
The default configuration file — c:\program files\nsclient++\nsclient.ini — deployed above is not customized for a production environment. You may generate new configurations using the nsclient++ program or simply issue the following command to generate a configuration file with all options supported (but not enabled):
c:\program files\nsclient++>nscp settings – -generate – -add-defaults – -load-all


If you have not installed the python .msi file above, you will receive an error that the python .dll file is missing; simply click through the warning an the process will complete.
A configuration file defining the live environment must be deployed to each node before the agents may communicate with the server. The nsclient.ini defines many different features (modules, Nagios Remote Plugin Executor (NRPE) Server, Nagios Service Check Acceptor (NSCA), scripts, etc.) A full description of the capabilities is beyond the scope of this article, but I will focus on modules and NRPE Server settings.
Default settings are located at the bottom of the file. These include:
allowed ciphers = ALL:!ADH:!LOW:!EXP:!MD5:@STRENGTH
allowed hosts = xxx.xxx.xxx.xxx [set to IP address(es) of allowed Nagios/Icinga Servers] cache allowed hosts = true
certificate = [specify path to SSL certificate)
password = [set to shared password] timeout = 30
use ssl = [true or false; if true, requires certificate] verify mode = none
Modules
The other thing which you should configure is which modules to use. There is several modules which can be used to check various aspects of your system. So choosing which you need can be a bit of work. Here we shall start out with the basic ones and for details on the rest check out the [references section]/../references).
| Module | Description | Commands |
|---|---|---|
| CheckSystem | Handles many system checks | check_cpu, check_memory etc |
| CheckDisk | Handles Disk related checks | check_drivesize |
| CheckExternalScripts | Handles aliases (which is what we will use) and external scripts. | N/A |
| NRPEServer | Listens and responds to incoming requests from Nagios via NRPE | N/A |
| … | There are a lot more modules | … |
The finished modules section from the INI file will look like so:
[/modules]
CheckSystem=1
CheckDisk=1
CheckExternalScripts=1
NRPEServer=1
Modules provide the core functionality of NSClient++. To support Nagios/Icinga check_nt, check_nrpe and NSCA commands, the following apply:
NRPEServer = 1 (for Nagios/Icinga check_nrpe commands)
NSCAClient = 1 (for Nagios/Icinga NSCA commands)
NSCAServer = 1 (for Nagios/Icinga NSCA commands)
NSClientServer = 1 (for Nagios/Icinga check_nt commands)
CheckSystem = 1 (important for supporting check_nrpe Performance Counter commands)
CheckExternalScripts = 1
CheckHelpers = 1
CheckEventLog = 1
CheckNSCP = 1
CheckDisk = 1
To implement the NRPE Server, the following modifications apply:
allowed ciphers = ALL:!ADH:!LOW:!EXP:!MD5:@STRENGTH
allow arguments = true
allow nasty characters = true
port = 5666
These settings define the ciphers allowable, whether NSClient++ accepts arguments and normally illegal characters and the port upon which it listens. By default, use ssl = TRUE requires SSL encryption; if you disable this, any check_nrpe commands issued by the Nagios/Icinga server must include the -n option to disable SSL.
Then save the config file to a network location as well.
4. Deploy the configuration file:
The file is deployed through the GPO Computer Configuration > Preferences > Windows Settings > Files.
Action: replace
Source: the location where the configuration file been saved: eg. \\fileserver\config\nsclient.ini
Target: the NSCP installation location, tipically C:\Program Files\NSClient++\nsclient.ini
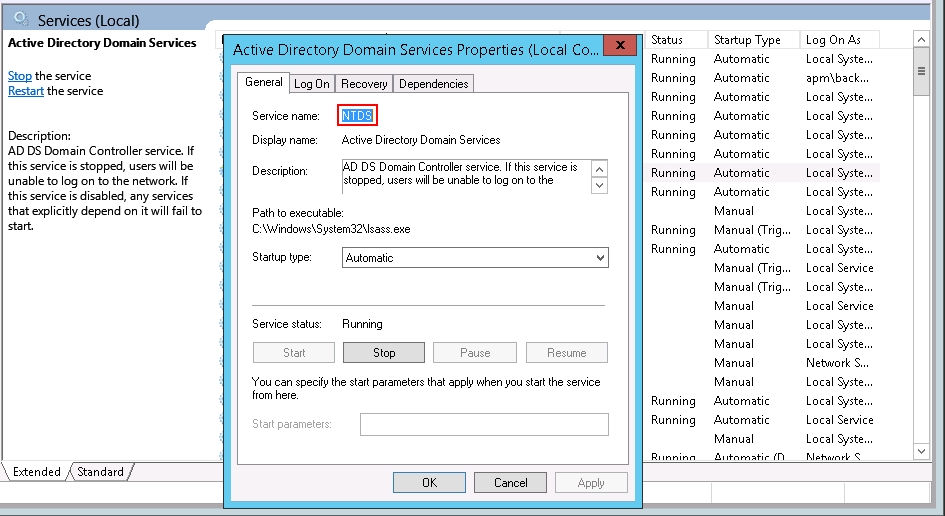
Add Services to monitor
1. find the service name: Start > services.msc > right click the sercie, write down the name after Service name. Eg. the Domain servcies name is NTDS.
2. Edit the /usr/local/nagios/etc/objects/windows.cfg file
In this example I will add two services to monitor: Active Directory Domain services and Printer Spooler.
define service{
        use                     generic-service
        host_name               winserver
        service_description     Active Directory Domain Services
        check_command           check_nt!SERVICESTATE!-d SHOWALL -l NTDS -s mypass
        }

define service{
        use                     generic-service
        host_name               winserver
        service_description     Printer spooler
        check_command           check_nt!SERVICESTATE!-d SHOWALL -l Spooler -s mypass
        }
User check_ad plugin
In your Windows AD Machine :
– Install NSClient++ on the Windows AD server.
– Install the necessary plugins for check_ad in the NSClient++ directory (check_ad.exe)
– Configure, the file NSC.ini with:
command[check_ad]=C:\Program Files\NSClient++\modules\check_ad.exe --dc
command[check_ad_member]=C:\Program Files\NSClient++\modules\check_ad.exe --member
– Check that dcdiag runs on the Windows machine being checked
In your Nagios server :
– Install the NRPE plugin
– Restart Nagios
– Use this command (in the repository /usr/local/nagios/libexec) :
./check_nrpe -H @IP -c check_ad
No handler for command ‘check_ad’:http://serverfault.com/questions/584545/nagios-nrpe-plugin-check-ad-fixed
https://sourceforge.net/projects/nrpent/files/nrpent/0.8b/nrpe_nt.0.8b-bin.zip/download
Enable the firewall on the Windows servers
No matter install it manually or via GPO, make sure below ports are enabled:
- check_nt: 12489
- nrpe: 5666
Problems
1. Internal Server Error:
Use the command:
tail -30 /var/log/httpd/error_log
[Tue Mar 21 10:42:43.785607 2017] [cgi:error] [pid 1262] [client ::1:60394] End of script output before headers: statusjson.cgi, referer: http://localhost/nagios/trends.html
[Tue Mar 21 10:42:43.789397 2017] [cgi:error] [pid 3958] [client ::1:60398] AH01215: (13)Permission denied: exec of '/usr/local/nagios/sbin/statusjson.cgi' failed, referer: http://localhost/nagios/trends.html
[Tue Mar 21 10:42:43.789431 2017] [cgi:error] [pid 3958] [client ::1:60398] End of script output before headers: statusjson.cgi, referer: http://localhost/nagios/trends.html
[Tue Mar 21 10:42:44.112605 2017] [cgi:error] [pid 4007] [client ::1:60396] AH01215: (13)Permission denied: exec of '/usr/local/nagios/sbin/avail.cgi' failed, referer: http://localhost/nagios/side.php
Note the highlighted area: Permission denied.
Then try:
sudo setenforce 0
If it works, then we need to fix the SElinux configuration. on the nagios doc it says we can use two command instead of set the permission to permissive or disabled.
 chcon -R -t httpd_sys_content_t /usr/local/nagios/sbin/
 chcon -R -t httpd_sys_content_t /usr/local/nagios/share/
But after some trying, it still need another command, Since …/nagios/sbin contains scripts, it needs script permissionts:
chcon -R -t httpd_sys_script_exec_t /usr/local/nagios/sbin/
This solution is here: https://support.nagios.com/forum/viewtopic.php?f=7&t=22374 by patrickh99.
2. 500 error after login
after tail -20 /var/log/httpd/error_log
[Mon Apr 24 03:53:39.690681 2017] [core:notice] [pid 2137] AH00094: Command line: '/usr/sbin/httpd -D FOREGROUND'
[Mon Apr 24 03:53:44.112118 2017] [authn_file:error] [pid 2141] (2)No such file or directory: [client 210.185.99.25:61634] AH01620: Could not open password file: /usr/local/nagios/etc/htpasswd.users
Then check the actual folder, the name is different:
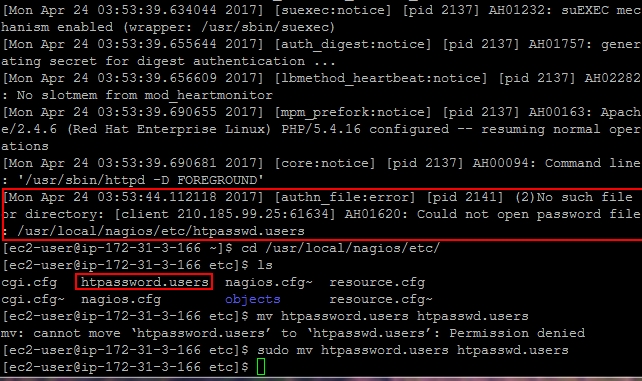
use
mv /usr/local/nagios/etc/htpassword.users /usr/local/nagios/etc/htpasswd.users
then restart the nagios and httpd service, done!
3. When you click on a service and then Re-schedule the next check of this service , Got error
Error: Could not open command file '/usr/local/nagios/var/rw/nagios.cmd' for update!

The permissions on the external command file and/or directory may be incorrect. Read the FAQs on how to setup proper permissions
The probably problem is the apache and nagios is not in the nagcmd group:
use this command to verify:
$ grep nag /etc/group
nagios:x:1001:apache,nagios
nagcmd:x:1002:
Then use command sudo usermod -aG :
$ sudo usermod -aG nagcmd apache
$ sudo usermod -aG nagcmd nagios
$ grep nag /etc/group
nagios:x:1001:apache,nagios
nagcmd:x:1002:apache,nagios
Then change the ownership of the folder /usr/local/nagios/var/rm:
$ sudo chown nagios:nagcmd -R /usr/local/nagios/var/rw
$ ls -l /usr/local/nagios/var/rw
total 0
prw-rw----. 1 nagios nagcmd 0 Apr 26 16:43 nagios.cmd
srw-rw----. 1 nagios nagcmd 0 Apr 26 16:43 nagios.qh
Then restart the nagios service and apache service:
$ sudo service nagios restart
Restarting nagios (via systemctl):                         [  OK  ]
$ sudo service httpd restart
Redirecting to /bin/systemctl restart  httpd.service
Go back to the web interface and have a try.
4. Check_snmp does not exist
check_snmp will get installed only if you have net-snmp and net-snmp-utils installed . So first install them.
In ubuntu:
sudo apt-get update
sudo apt-get install -y autoconf gcc libc6 libmcrypt-dev make libssl-dev wget bc gawk dc build-essential snmp libnet-snmp-perl gettext
http://net-snmp.sourceforge.net/wiki/index.php/Net-Snmp_on_Ubuntu
5. connection refused
If there is a firewall sitting between the monitoring server and the target monitored server, make sure the port 5666 (nrpe), 12489 (check_nt) is permited.
6. Deal with $ sign
The service such as “MSSQL$SQLEXPRESS” has a $ sign in it, we needs to use “check_command check_nt!SERVICESTATE!-d SHOWALL -l MSSQL$$SQLEXPRESS”
7. No performance data from command
NSClient – ERROR: No performance data from command: check_drivesize
NSClient – ERROR: No performance data from command: check_cpu
NSClient – ERROR: No performance data from command: xxxxxxxxxxxxxxxx
References
https://assets.nagios.com/downloads/nagioscore/docs
https://assets.nagios.com/downloads/nagioscore/docs/nagioscore/4/en/quickstart.html
Internal error: http://www.linuxquestions.org/questions/linux-newbie-8/nagios-internal-server-error-903798/
Deploy the NSCP : https://stephenfritz.blogspot.com.au/2014/07/automated-nagiosicinga-nsclient.html
Installing Nagios Plugins From Source: https://support.nagios.com/kb/article.php?id=569
Install NRPE v3 From Source: https://support.nagios.com/kb/article.php?id=515