ASA firewall configuration
First of all it’s always good to know how to get help documentation in the ASA, because the command sets between different model are slightly different, however, you can use the syntax bellow to get the related help:
help { NAT | access-list | dhcp | ip | ospf | rip | pope | aaa | adsm .....}
In this chapter I will take ASA 5505 as example:
ASA5505 default configuration:
The ASA can be restored to its factory default configuration by using the configure factory-default global configuration mode command.
1. The default hostname is ciscoasa, privileged EXEC and console line password are not configured, however, the system still ask you to enter the password, just don’t type anything, hit enter.
2. PAT is configured so that inside host addresses are translated using the outside interface IP address.
3. HTTP access for ASDM is enabled.
4. The outside interface is configured to discover its IP configuration and domain information from an upstream device.
dhcpd auto_config outside
5. DHCP services are provided to the inside hosts.
dhcpd address 192.168.1.5-192.168.1.14 inside
dhcpd enable inside
The configuration includes two preconfigured VLAN networks:
- VLAN 1 – For the inside network
- VLAN 2 – For the outside network
ASA interactive setup initialization wizard
Similar to cisco ISR , the wizard is displayed when an ASA is erased and rebooted using the write erase and reload privileged EXEC commands.
Most of the basic configuration command are same to the Cisco routers, some difference:
- do not need the keyword “do” even if you are not in the privileged EXEC mode. e.g. you can use
ASA(config)# show running-config show interface ip, not theshow ip interface.- default route:
ASA(config)#route outside 0.0.0.0 0.0.0.0 next_hop_address show route, notshow ip routeshow switch vlan
To change the master passphrase, use the key config-key password-encryption [new-pass [old-pass]] command.
To determine if password encryption is enabled, use the show password encryption command.
To enable password encryption and encrypts all user passwords:
password encryption aes
ASA configuration Reference:
http://www.cisco.com/c/en/us/td/docs/security/asa/asa91/configuration/firewall/asa_91_firewall_config.html
Configuring Logical VLAN Interfaces
Configuring interfaces on the 5505 is different from the other 5500 series ASA models. With other ASAs, the physical port can be assigned a Layer 3 IP address directly, much like a Cisco router. With the ASA 5505, the eight integrated switch ports are Layer 2 ports. Therefore, when configuring an ASA 5505, there are two kinds of interfaces that need to be configured:
- Logical VLAN interfaces – These interfaces are configured with the Layer 3 information including a name, security level, and IP address. On an ASA 5505, Layer 3 parameters are configured on a logical VLAN interface called a switch virtual interface (SVI). An SVI requires a name, an interface security level, and an IP address.
- Physical switch ports – These are Layer 2 switch ports which are assigned to the logical VLAN interfaces.
LVI command
| ASA Command | Description |
| Interface vlan vlan_number | Enters VLAN interface configuration mode |
| nameif if_name |
|
| security-level value | Sets the security level, where number is an integer between 0 (lowest) and 100(highest) |
Create new VLAN
An ASA 5505 with a Base license does not allow three fully functioning VLAN interfaces to be created. However, a third “limited” VLAN interface can be created if it is first configured with the no forward interface vlan command. This command limits the interface from initiating contact with another VLAN.
Therefore, when the inside and outside VLAN interfaces are configured, the no forward interface vlan number command must be entered before the nameif command is entered on the third interface. The number argument specifies the VLAN ID to which this VLAN interface cannot initiate traffic. The Security Plus license is required to achieve full functionality.
The IP address of an interface can be configured using one of the following options:
- Manually – Commonly used to assign an IP address and mask to the interface.
- DHCP – Used when an interface is connecting to an upstream device providing DHCP services. The interface can be a DHCP client and discover its IP address and DHCP-related information from the upstream device.
- PPPoE – Used when an interface is connecting to an upstream DSL device providing point-to-point connectivity over Ethernet services. The interface can be a PPPoE client and discover its IP address from an upstream PPPoE DSL device.
Commands are listed below:
| To configure | ASA command | Description |
| Manually | ip address ip-address netmask | Assigns an IP address to the interface |
| Using DHCP | ip address dhcp | Used to have the interface request an IP address configuration from the upstream device. |
| ip address dhcp setroute | Used to have the interface request and install a default route to the upstream device | |
| using PPPoE | ip address pppoe | interface configuration mode command that requests an IP address from the upstream device |
| ip address pppoe setroute | same command but it also requests and installs a default route to the upstream device. |
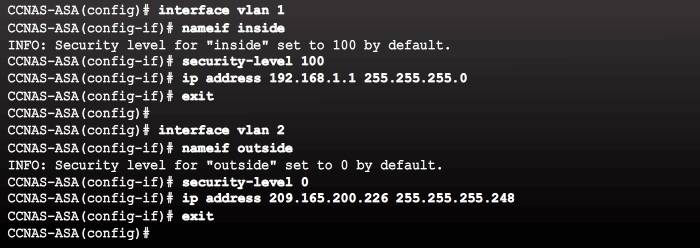
How default security level values are assigned to the inside interface and outside interfaces. Therefore, the security-level command is really only required if an administrator chooses to change those values. Any other interface should be assigned a security level value.
Configure Remote access service
configure telnet
{ passwd | password }password: Sets the login password for telnettelnet { ipv4_address mask | ipv6_address/prefix} if_name: identifies which inside host or network can Telnet to the ASA interface.clear configure telnet: to remove the Telnet connection.telnet timeout minutes: by default telnet sessions left idle for five minutes are closed by the ASA.aaa authentication telnet console LOCAL: configure Telnet to refer to the local database for authentication. the LOCAL keyword is case sensitive and is a predefined server tab.clear configure telnet: removes the Telnet connection from the configuration
Configure ssh
username name password passwordaaa authentication ssh console LOCAL: configure SSH to refer to the local database for authentication. The LOCAL keyword is case sensitive and is a predefined server tab.crypto key generate rsa modulus modulus_size: Generate the RSA key, 2048 is recommended.ssh {ipv4_address mask | ipv6_address/prefix} if_nameclear configure sshcommand to remove the SSH connection.ssh version version_number:( optional ) By default, the ASA allows both SSH version 1 and version 2.ssh timeout minutes: alters the default exec timeout of 5 minutes.
Configure NTP
Network Time Protocol (NTP) services can be enabled on an ASA to obtain the date and time from an NTP server. To enable NTP, use the global configuration mode commands:
ntp authenticate: enables authentication with an NTP server.ntp trusted-key key_id: specifies an authentication key ID to be a trusted key, which is required for authentication with an NTP server.ntp authentication-key key_id md5 key: sets a key to authenticate with an NTP server.ntp server ip_address [key key_id]: identifies an NTP server.
To verify the NTP configuration and status, use the show ntp status and show ntp associations commands.
Configuring DHCP Services
An ASA can be configured to be a DHCP server to provide IP addresses and DHCP-related information to hosts. To enable an ASA as a DHCP server and provide DHCP services to hosts, use the commands:
dhcpd address ip_address1 [-ip_address2] if_name: create a DHCP pool range from ip_address1 to ip_address2.dhcpd dns dns1[dns2]: optional , specifies the IP address of the DNS server.dhcpd lease leaes_length: optional, chagnes the lease length (seconds) grated t the client, default is 3600 seconds (1hour), can be 0 to 1,048,575 seconds.dhcpd domain domain_name: optional, specifies the domain name assigned to the client.dhcpd enable if_name: enable the DHCP daemon on the interface of the ASA.
Note: If the ASA outside interface was configured as a DHCP client, then the dhcpd auto_config outside global configuration mode command can be used to pass the DHCP-obtained information to the DHCP inside clients.
To verify DHCP settings, use the following commands:
- show dhcpd state – Displays the current DHCP state for inside and outside interfaces.
- show dhcpd binding – Displays the current DHCP bindings of inside users.
- show dhcpd statistics – Displays the current DHCP statistics.
To clear the DHCP bindings or statistics, use the clear dhcpd binding or clear dhcpd statistics command.
Object groups
Objects are created and used by the ASA in place of an inline IP address in any given configuration. An object can be defined with a particular IP address, an entire subnet, a range of addresses, a protocol, or a specific port or range of ports. The object can then be re-used in several configurations.
The advantage is that when an object is modified, the change is automatically applied to all rules that use the specified object. Therefore, objects make it easy to maintain configurations.
Objects can be attached or detached from one or more object groups when needed, ensuring that the objects are not duplicated, but can be re-used wherever needed. These objects can be used in NAT, access lists, and object groups. Specifically, network objects are a vital part of configuring NAT.
There are two types of objects that can be configured:
- Network object – Contains a single IP address and subnet mask. Network objects can be of three types: host, subnet, or range. A network object is configured using the object network command.
Configuration:
To create a network object, use the
object network object-nameglobal configuration mode command. The prompt changes to network object configuration mode.A network object name can contain only one IP address and mask pair. Therefore, there can only be one statement in the network object. Entering a second IP address/mask pair replaces the existing configuration.
Network objects can be defined using one of the three methods:
#
host ip-addr: assigns an IP address to the named object#
subnet net-address net-mask: assigns a network subnet to the named object#
range ip-addre-1 ip-addr-n: assigns a range of IP addresses to the named object.Use the no form of any of these three commands to remove a network object. To erase all network objects, use the
clear config object networkcommand.Note: This command clears all network objects.
Verify:
show running-config object - Service object – Contains a protocol and optional source and/or destination port. A service object is configured using the object service command.
To create a service object, use the object service object-name global configuration mode command. The prompt changes to service object configuration mode. The service object can contain a protocol, ICMP, ICMPv6, TCP, or UDP port (or port ranges).
- service protocol [ source [operator port ]] [ destination [operator port ]]
- service tcp [ source [operator port ]] [ destination [operator port ]]
- service udp [ source [operator port ]] [ destination [operator port ]]
- service icmp [ source [operator port ]] [ destination [operator port ]]
- service icmp6 [ source [operator port ]] [ destination [operator port ]]
Optional keywords are used to identify source port or destination port, or both. Operators such as eq (equal), neq (not equal), lt (less than), gt (greater than), and range, support configuring a port for a given protocol. If no operator is specified, the default operator is eq.
If an existing service object is configured with a different protocol and port, the new configuration replaces the existing protocol and port with the new ones.
Use the no form of the command to remove a service object. To erase all service objects, use the clear config object service command.
Note: A network object is required to configure NAT in ASA image versions 8.3 and higher.
The ASA supports various types of object groups:
- Network: A network-based object group specifies a list of IP host, subnet, or network addresses.
- Service: a service-based object group is used to group TCP, UDP, or TCP and UDP ports into an object. The ASA enables the creation of a service object group that can contain a mix of TCP services, UDP services, ICMP-type services, and any protocol.
- Security: A security group object group can be used in features that support Cisco TrustSec by including the group in an extended ACL, which in turn can be used in an access rule.
- ICMP-type: The ICMP protocol uses unique types to send control messages (RFC 792). The ICMP-type object group can group the necessary types required to meet an organization’s security needs, such as to create an object group called ECHO to group echo and echo-reply.
- User: locally created, as well as imported active directory user groups can be defined for use in features that support the identity firewall.
Note: A protocol object group can also be created. However, it is not recommended, and the use of a service object-group should be used instead.
The following guidelines and limitations apply to object groups:
- Objects and object groups share the same name space.
- Object groups must have unique names.
- An object group cannot be removed or emptied if it is used in a command.
- The ASA does not support IPv6 nested object groups.
Configuring Common Object Groups
To configure a network object group, use the object-group network grp-name global configuration mode command. After entering the command, add network objects to the network group using the network-object and group-object commands.
Network-object add a specific host,
group-object add another group into this group.
asa(config)# object-group network ADMIN-HOST
asa(config-network-object-group)# description Admin hosts
asa(config-network-object-group)#network-object host 192.168.1.3
asa(config-network-object-group)#network-object host 192.168.1.4
asa(config-network-object-group)#exit
asa(config)#object-group network all-hosts
asa(config-network-object-group)#description All inside hosts
asa(config-network-object-group)#network-object 192.168.1.32 255.255.255.240
asa(config-network-object-group)#group-object ADMIN-HOST //add the members of ADMIN-HOST into all-hosts.
Note: A network object group cannot be used to implement NAT. A network object is required to implement NAT.
- To configure an ICMP object group, use the
object-group icmp-type grp-nameglobal configuration mode command. After entering the command, add ICMP objects to the ICMP object group using the icmp-object and group-object commands. - To configure a service object group, use the
object-group service grp-nameglobal configuration mode command. The service object group can define a mix of TCP services, UDP services, ICMP-type services, and any protocol. After entering the object-group service command, add service objects to the service group using the service-object and group-object commands. - To configure a service object group for TCP, UDP, or TCP and UDP, specify the option in the
object-group service grp-name [tcp | udp | tcp-udp]global configuration mode command. When tcp, udp, or tcp-udp is optionally specified on the command line, service defines a standard service object group of TCP/UDP port specifications, such as “eq smtp” and “range 2000 2010.” After entering the command, add port objects to the service group with the port-object and group-object commands. - To remove all the object groups from the configuration, use the clear configure object-group global configuration mode command.To verify group object configurations, use the show running-config object-group command.
Object group reference: http://www.cisco.com/c/en/us/td/docs/security/asa/asa82/configuration/guide/config/objectgroups.html
Next part(ACL, NAT, AAA)