Clone a Virtual Domain Controller
Because of the benefits of virtualization, implementing DCs as virtual machines in Hyper-V is common practice. Unfortunately, with earlier versions of Windows Server, you couldn’t take advantage of all the features and conveniences of virtualization when the virtual machine (VM) was a domain controller. For example, you couldn’t create Hyper-V checkpoints without risk of Active Directory database corruption, and you couldn’t export a DC for the purposes of creating a replica to use as another DC in the domain.
Starting with Windows Server 2012, DCs running on Hyper-V are virtualization aware, and there are built-in safeguards to prevent the Active Directory database from being adversely affected when the VM is rolled back in time by applying a checkpoint.
These new safeguards not only allow checkpoints to be used with DCs, but also permit cloning virtual DCs safely.
Domain Controller Cloning Prerequisites
To clone a DC, you need to verify the following prerequisites:
• The hypervisor must support virtual machine generation identifiers. Currently, this includes Hyper-V running on Windows Server 2012/R2, Microsoft Hyper-V Server 2012/R2, and VMware vSphere 5.0 Update 2 and later.
• The DC to be cloned must be running Windows Server 2012 or later.
• The PDC emulator FSMO role is running Windows Server 2012 or later.
• A GC server must be available.
• The following server roles must not be installed on the source DC: DHCP, Active Directory Certificate Services (AD CS), and Active Directory Lightweight Directory Services (AD LDS).
Steps for Cloning a Domain Controller
After you have verified the prerequisites, you clone a DC by following these steps:
1. Authorize the source DC for cloning by adding the DC’s computer account to the Cloneable Domain Controllers group in the Users folder in Active Directory.
2. Run the PowerShell cmdlet Get-ADDCCloningExcludedApplicationList on the source DC to be sure it’s not running any services that are incompatible with cloning. If any unsupported server roles are listed, they must be uninstalled. Other services or applications that are listed must be verified with the software vendor to determine whether they will be affected by a computer name or SID change. Listed software that’s determined to be com- patible must be added to the compatible list of programs by running the same command with the -GenerateXml option.
3. Run the PowerShell cmdlet New-ADDCCloneConfigFile on the source DC. This command creates an .xml file named DCCloneConfig.xml in the %windir%\NTDS folder. With this command, you can specify the computer name and IP address settings for the target DC.
4. Shut down the source DC.
5. Export the source DC virtual machine. You can export the VM to a share or a local drive by using the Hyper-V console or the Export-VM PowerShell cmdlet. If you export to a local drive, you must first copy the exported folder to a location where the other Hyper-V server can access it. Before you export the VM, make sure to delete all check- points first.
6. Import the virtual machine into Hyper-V. You can use the Hyper-V console or the Import-VM PowerShell cmdlet. If you’re using the Hyper-V console, be sure to select the “Copy the virtual machine (create a new unique ID)” option, and when using PowerShell, make sure you use the -GenerateNewId option to create a VM-Generation ID on the new DC. Rename the VM.
7. Start the source DC and then the new DC. The cloned DC processes the DCCloneConfig. xml file created on the source DC because it was copied during the export/import process.
8. Both the source DC and the cloned DC are members of the Cloneable Domain Controllers group at this point. Best practices suggest removing both accounts and leaving the group empty until you’re ready to clone again.
Example of cloning Virtual DC
clone a DC named DC1 on a server named HyperV-S1 to a new DC named DC2 running in HyperV-S2, all running Windows Server 2012 R2.
1. On DC1, add the DC1 computer account to the Cloneable Domain Controllers group.
2. On DC1, open an elevated PowerShell prompt and enter the Get- ADDCCloningExcludedApplicationList cmdlet. In this example, no incompatible applications or services are found.
3. Next, specify the new DC’s configuration by using this cmdlet at the PowerShell prompt:New-ADDCCloneConfigFile -CloneComputerName “DC2” -Static IPv4Address “10.11.1.102” -IPv4DNSResolver “10.11.1.101” -IPv4SubnetMask “255.255.0.0” -IPv4DefaultGateway “10.11.1.250”
If the new DC should be placed in a different Active Directory site, you can use the -SiteName option to specify a site.
4. Shut down DC1.
5. Export the DC1 VM. In this example, you use PowerShell to export it to a share named VMExports on a server named Server1:
Export-VM -Name DC1 -Path \\Server1\VMExports
The VM is copied to a subfolder of the specified path named DC1\Virtual Machines.
6. Import the DC1 VM. On HyperV-S2, issue the following command:
$vm = Import-VM -Path \\Server1\VMExports\DC1\Virtual Machines -Copy –GenerateNewID
The $vm parameter captures the name of the imported VM, which is the name of the exported VM plus a timestamp. This parameter is used in the next step. If you use the exported VM to create additional DCs, you also need to specify paths for the configuration file, VHD files, snapshot files, and the smart paging folder.
7. Rename the imported VM on HyperV-S2 with this cmdlet:
Rename-VM -VM $vm -New-Name “DC2”
8. Start DC1 and DC2. The new DC reads the DCCloneConfig.xml file and configures itself with the parameters specified in this file.
9. Remove DC1 and DC2 from the Cloneable Domain Controllers group.
Note: It’s not necessary to use PowerShell for exporting, importing, and renam- ing the VM. You can perform these tasks in the Hyper-V management console. However, you do need PowerShell to check for compatible soft- ware and create the clone configuration file.
Folders to support Active Directory:
• NTDS—By default, this folder is located in %systemroot% (usually C:\Windows). It contains the following files:
- ntds.dit: The main Active Directory database.
- edb.log: Holds a log of Active Directory transactions (changes). If Active Directory is shut down unexpectedly, changes that didn’t get fully written to the database can be redone by using the data in this file to commit the changes. This file can grow to a maxi- mum of 10 MB, and then new log files are created, named edb00001.log, edb00002. log, and so forth.
- edb.chk: Stores information about the last committed transaction; used with edb.log to determine which transactions still need to be written to the database.
- edbres00001.jrs: A placeholder file that simply takes up disk space. If the volume on which ntds.dit is stored fills up, this file and another named edbres00002.jrs are deleted to free up disk space so that pending transactions can be committed to the data- base. After the changes are made, the DC is shut down, and the administrator must make disk space available before Active Directory can operate again.
• SYSVOL—By default, this folder is located in %systemroot%. It contains group policy templates, logon/logoff scripts, and DFS synchronization data.
Active Directory Backup
Active Directory is backed up when you perform a full backup of a DC, when you back up the volumes containing system recovery information, and when you perform a system state backup. Backups can be created with one of three methods included with Windows Server 2012/R2:
Windows Server Backup—A GUI backup tool that guides you through creating a number of backup types, including system state backups. This tool isn’t installed by default. You install it with the Add Roles and Features Wizard or the Add-WindowsFeature PowerShell cmdlet.
• wbadmin.exe—A command-line tool for automating aspects of a backup. The Windows Server Backup tool must be installed for this command to work.
• PowerShell—The Start-WBBackup cmdlet has many of the same capabilities as wbadmin.exe. The Windows Server Backup tool must be installed for this cmdlet to work.
Active Directory Defragmentation
To maintain performance and efficiency, the Active Directory database requires periodic maintenance in the form of defragmentation and compaction. There are two methods of Active Directory defragmentation: online and offline.
Online defragmentation occurs automatically when Active Directory performs garbage collection. Garbage collection runs every 12 hours on a DC and removes objects that have been deleted for more than 180 days. Objects that have been deleted but not removed are referred to as “tombstoned.” When an Active Directory object is deleted, it’s not actually removed from the database, much as a deleted file isn’t physically erased from the file system. Instead, the object is marked for deletion and left in the database for a period called the tombstone lifetime, which by default is 180 days. During garbage collection, tombstoned objects older than the tombstone lifetime are removed from the database.
The tombstone lifetime has important implications for Active Directory backups. Suppose the tombstone lifetime is set to its default 180 days, and the Active Directory database is backed up on day 1. A user account, Julie, is deleted purposefully on day 3. On day 15, the database on a DC becomes corrupted and must be restored from backup with a nonauthoritative restore. The backup from day 1 is used for the restore, which is before the Julie account was deleted. However, because other DCs still have a record of the Julie account as being deleted, replication deletes the Julie account on the DC being restored. This is the result you want.
Now suppose the tombstone period is only 10 days. In the same situation, the Julie account is removed from the database during garbage collection on day 13. When the database is restored, the Julie account is restored with it, but the other DCs have no record of the Julie account being deleted, so the account remains, which isn’t the result you want. Because of this potential database inconsistency, an Active Directory backup is considered invalid if it’s older than the tombstone lifetime. The tombstone lifetime applies to the entire forest and can be changed by using Attribute Editor on the ForestRootDomain object. (Attribute Editor is a tab in the Proper- ties dialog box of an Active Directory object.)
Online defragmentation removes deleted objects and frees up space in the database, but it doesn’t compact the database to close up gaps that deleted objects create in the database.
Offline defragmentation is necessary to keep the database lean and efficient. In Windows Server versions before Windows Server 2008, you had to restart the DC in DSRM to perform offline defragmentation, which interrupts other services running on the DC. Starting with Windows Server 2008, offline maintenance is possible because the Active Directory service can be stopped for performing maintenance and then restarted. Microsoft refers to this feature as restartable Active Directory. Using this feature, a server restart isn’t required. However, another DC must be online before you can stop the Active Directory service so that users can continue to log on. While Active Directory is stopped, DNS on that DC stops servicing queries, so client computers should have the address of an alternate DNS server configured, too.
Like a file system, a database becomes fragmented over time because of object deletion and creation. Where deleted objects once were, gaps in the database are created, which makes the database less efficient in performance. Compacting the database removes the gaps, much as defragmenting a hard drive does for the file system.
Active Directory compaction is done with the ntdsutil command. The database can’t be compacted in place, so a copy is made to a location you specify. After compaction is finished, the compacted database is copied to the original location.
Steps of offline defragmentation:
The “ntdsutil” is needed to perform defragmentation and is the same tool used to check Active Directory errors. The following steps will detail the process.
Prerequisites
- Plan the Active Directory shutdown impact properly and measure how it will affect the rest of the organization. Length of time to complete the defragmentation depends on the size of the Active Directory database and the how bad it is fragmented.
- Always perform a system state backup prior to the process.
Step 1: Stopping the Active Directory Service
- Login to the primary domain controller as Domain admin or Enterprise Admin
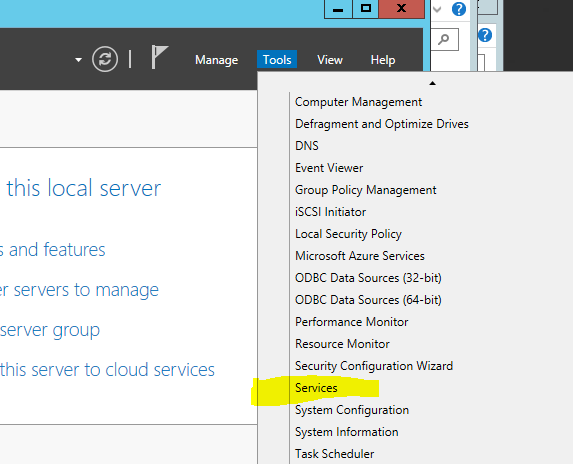
- Navigate to Server Manager > Tools > Services
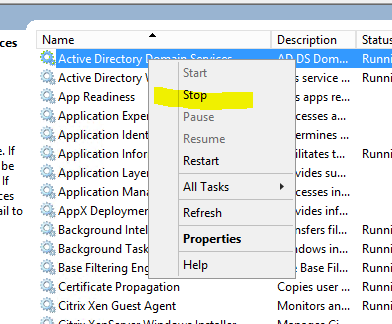
- In Services.mmc right-click on Active Directory Domain Services and click Stop
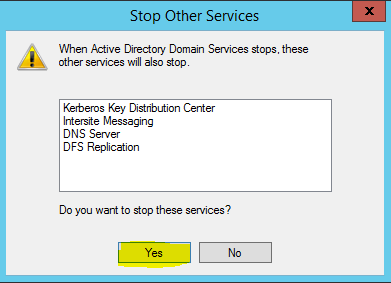
- Services to be stopped are then listed. Click Yes to continue.
Step 2: Perfroming the Offline Active Directory Fragmentation
- Once services stops, run the Command Prompt in Administrator mode
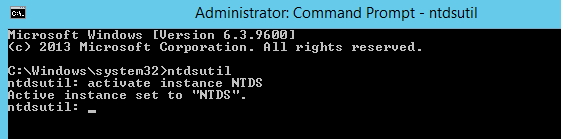
- In the Command prompt window, type ntdsutil and press enter
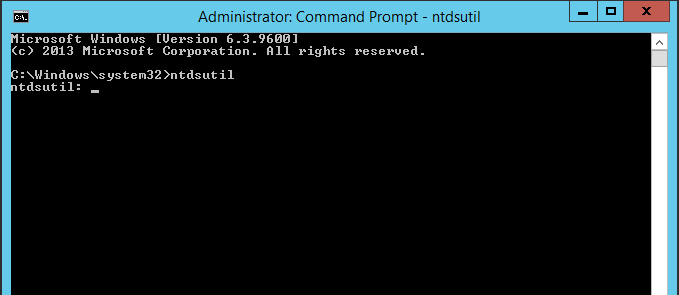
- In prompt type activate instance NTDS and press enter
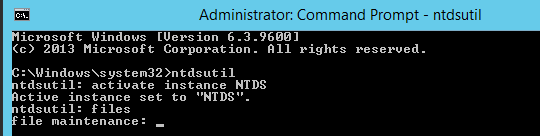
- Type files and press enter
- At the file maintenance we need specify the location where NTDS compact database will save. For this Step-By-Step, the folder C:\CompactDB was created. Type compact to C:\CompactDB and press enter
- The defragment process begins. The time to completion will depend on the size of the database
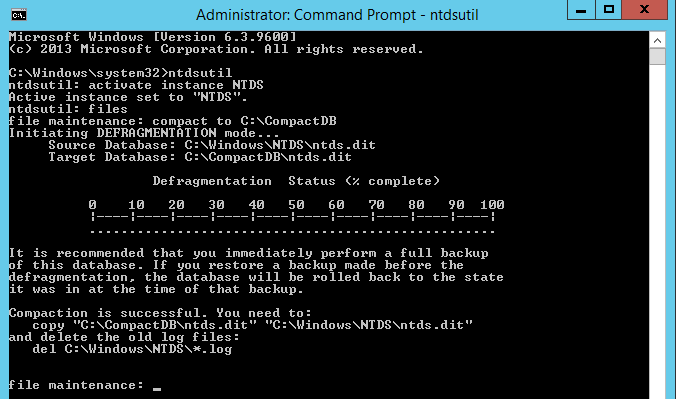
- Once completed type q to exit from the utility
- Close the Command Prompt console
- Copy the defragmented database from C:\CompactDB\ntds.dit to C:\Windows\NTDS\ntds.dit
- Delete the log files found in the directory
- Return to the Services.mmc
- Right-click on Active Directory Domain Services and click Start