Securing VTY ports
If the Cisco IOS software image on your router does not support SSH, you can improve the security of administrative lines by restricting VTY access. Restricting VTY access is a technique that allows you to define which IP addresses are allowed Telnet access.
Syntax is :
R1(config)#line vty 0 15
R1(config-line)#login local
R1(config-line)#transport input ssh
R1(config-line)# access-class access-list-number { in [ vrf-also ] | out }
- Both named and numbered access lists can be applied to VTYs.
- Identical restrictions should be set on all the VTYs, because a user can attempt to connect to any of them.
Extended IPv4 ACLs
Syntax:
r1(config)# access-list access-list-number {deny|permit|remark} protocol source source-wildcard
[operator] [port-number or name] destination destination-wildcard
[operator] [port-number or name] [established]
- Operator can be equal (eq), not equal (neq), greater than (gt), and less than (lt).
Note that there is no keyword “IP” in the beginning.
Eg:
r1(config)# access-list 103 permit tcp 192.168.10.0 0.0.0.255 any eq 80
r1(config)# access-list 103 permit tcp 192.168.10.0 0.0.0.255 any eq 443
r1(config)# access-list 103 permit tcp any 192.168.10.0 0.0.0.255 established
r1(config)#int g0/0
r1(config-if)#ip access-group 103 in
r1(config-if)#ip access-group 104 out
ACL 103 allows traffic coming from any address on the 192.168.10.0 network to go to any destination, subject to the limitation that the traffic is using destination ports 80 (HTTP) and 443 (HTTPS) only. Note that in this entries, the source port number is not necessary, destination IP address is not necessary.
ACL 104 does that by blocking all incoming traffic(because there is an implicit deny in the end), except for previously established connections. The permit statement in ACL 104 allows inbound traffic using the established parameter,which allows only responses to traffic that originates from the 192.168.10.0/24 network to return to that network. A match occurs if the returning TCP segment has the ACK or reset (RST) bits set, which indicates that the packet belongs to an existing connection.
Note: The access lists could have been applied to the S0/0/0 interface but in that case, the router’s ACL process would have to examine all packets entering the router, not only traffic to and from 192.168.11.0. This would cause unnecessary processing by the router.
Filtering traffic with Extended ACLs(same diagram above):
 r1(config)#access-list 101 deny tcp 192.168.11.0 0.0.0.255 192.168.10.0 0.0.0.255 eq 20
 r1(config)#access-list 101 deny tcp 192.168.11.0 0.0.0.255 192.168.10.0 0.0.0.255 eq 21
 r1(config)#access-list 101 permit ip any any
 r1(config)#interface g0/1
 r1(config-if)#ip access-group 101 in
To prevent the implied deny any statement at the end of the ACL from blocking all traffic, the permit ip any any statement is added.
To allow DHCP request through ACLs
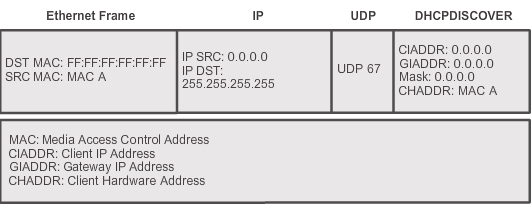
Before this let’s have a look DHCP discovery message format:
If we don’t allow the ACL to accept the UDP 67 traffic, then the clients’ DHCP discovery message can not go through ACL to communicate with the DHCP server. So we need to explicate allow it.
access-list 100 permit udp host 0.0.0.0 host 255.255.255.255or
access-list 100 permit udp any eq bootpc any eq bootps
ICMP
Difference between the echo and echo-reply: the direction.
- Echo should be applied on the direction from the source to the destination;
- Echo-reply should be applied on the direction from the destination back to the source.
For example, if router A interface G0/1(192.168.0.1) connected to Router B interface G0/1(192.168.0.2), and you try to ping router B interface G0/1 by the command “ping 192.168.0.2”, if you want to allow this traffic, use following commands
Router B(config)# access-list 100 permit icmp any any echo
Router B(config)#interface g0/1
Router B(config-if)#ip access-group 100 in
Or you can use
Router B(config)# access-list 100 permit icmp any any echo-reply
Router B(config)#interface g0/1
Router B(config-if)#ip access-group 100 out
Named Extended ACLs
Same as standard ACLs.
Step 1. r1(config)# ip access-list extended name
Step 2. In named ACL configuration mode, specify the conditions to permit or deny:
r1(config-ext-nac)# permit|deny protocol source source-wildcard
[operator] [port-number or name] destination destination-wildcard
[operator] [port-number or name] [established]
Step 3. Return to privileged EXEC mode and verify the ACL with the show access-lists name command.
Remove a named extended ACL: use the no ip access-list extended name global configuration command.
Common ACL Errors:
- When blocking port number, always block the port number associated with the server IP. Eg, if the source Ip address is the client, the destination address is the server, the port number is straight after destination address. The source port address is usually randomly generated.
- Make sure the ACL is applied to the correct interface and correct direction.
IPv6 ACLs
There is only Named extended ACL in the IPv6.
- Create ACLs: same syntax as IPv4
- Apply ACLs:
r1(config-if)#ipv6 traffic-filter ACL_name in|out - No wildcard mask, use prefix-length instead.
- IPv6 includes a similar deny ipv6 any any statement at the end of each IPv6 ACL. The difference is IPv6 also includes two other implicit statements by default:
- permit icmp any any nd-na
- permit icmp any any nd-ns
Neighbor Discovery (ND) messages to resolve layer 3 addresses to layer 2 MAC addresses. ND uses Neighbor Solicitation (NS) and Neighbor Advertisement (NA) messages.
Configure IPv6 ACL
r1(config)#ipv6 access-list access-list-name
r1(config)# deny|permit protocol {source-ipv6-prefix/prefix-length|any|host source-ipv6-address}
[operator] [port-number or name] {destination-ipv6-prefix/prefix-length|any|host dest-ipv6-address}
[operator] [port-number or name]
Applying an IPv6 ACL to an interface
Router(config-if)# ipv6 traffic-filter access-list-name { in | out }
Remove: To remove an ACL from an interface, first enter the no ipv6 traffic-filter command on the interface, and then enter the global no ipv6 access-list
VTY ports: Note: IPv4 and IPv6 both use the access-class command to apply an access list to VTY ports.
Time-based ACL
Use time-based access list is easy and can be useful in some situations. To implement it, you need:
- Define time-range, the time range, identified by a name, can be ‘absolute‘ or ‘periodic‘.
- Define ACL, where the time-range is applied to
- Apply ACL; for istance: to the interface, to the vty, to the control-plane, …
Examples #1: Periodic Time
Permit SSH router access on the weekends from 8:00 to 17:00.
- Define time-range
Ciscozine(config)#time-range time-ssh
Ciscozine(config-time-range)#periodic weekend 08:00 to 17:00
- Define ACL
Ciscozine(config)#ip access-list extended permit-ssh
Ciscozine(config-ext-nacl)#permit tcp any any eq 22 time-range time-ssh
- Apply ACL
Ciscozine(config)#line vty 0 4
Ciscozine(config-line)#access-class permit-ssh in
Example #2: Absolute time
Block SNMP protocol from 1st March 2011:
- Define time-range
Ciscozine(config)#time-range time-snmp
Ciscozine(config-time-range)#absolute start 00:00 1 March 2017
- Define ACL
Ciscozine(config)#ip access-list extended deny-snmp
Ciscozine(config-ext-nacl)#deny udp an an eq snmp time-range time-snmp
Ciscozine(config-ext-nacl)#permit ip any any
- Apply ACL
Ciscozine(config)#interface fastEthernet 0/1
Ciscozine(config-if)#ip access-group deny-snmp in
Remember: To check if a time-based access lists is active or not, use the ‘show ip access-list’ or the ‘show time-range’ command
ACL guidelines
- Create an ACL globally and then apply it.
- Ensure the last statement is an implicit deny any or deny any any.
- Remember that statement order is important because ACLs are processed top-down. As soon as a statement is matched the ACL is exited.
- Ensure that the most specific statements are at the top of the list.
- Remember that only one ACL is allowed per interface, per protocol, per direction.
- Remember that new statements for an existing ACL are added to the bottom of the ACL by default.
- Remember that router generated packets are not filtered by outbound ACLs.
- Place standard ACLs as close to the destination as possible.
- Place extended ACLs as close to the source as possible.