Route filtering
First , we need to know the difference in how OSPF choose intra-area versus interarea routes.
Intra area
OSPF use pure link-state logic for intra-area routes, with full topology information about an area, piecing together the topology map from the Type 1 and Type 2 LSAs. This logic relies on all routers inside the area having an identical copy of the link-state database (LSDB) for that area.
If we use Route filtering inside one area, first , OSPF routers do not advertise routes; instead, they advertise LSAs. Any filtering applied to OSPF messages would need to filter the transmission of LSAs. However, inside one area, all routers must know all LSAs, so the entire SPF concept will fail, and routing loops could occur. As a result, OPFS can not and does not allow the filtering of LSAs inside an area.
interarea routes
For interarea routes, OSPF use distance vector logic. The intra-area SPF calculation includes the calculation of the metric of the best route to reach each ABR in the area. To choose the best interarea route, a router use distance vector logic of taking its known metric to reach the ABR and adds the metric for that subnet as advertised by the ABR. This means that no additional SPF calculation is required to find all interarea routes for a given prefix/length, making the logic more like distance vector logic.
OSPF does allow some route filtering, however, taking advantage of the fact that OSPF uses distance vector logic with Type 3 LSAs ( and Type 5 used for external routes). Because of the underlying distance vector logic, an OSPF ABR can be configured to filter Type 3 LSAs, with no risk of creating routing loops.
Therefore, Cisco IOS limits OSPF route filtering to the following:
- Filtering Type 3 LSAs on ABRs.
- Filtering Type 5 LSAs on ASBRs
- Filtering the router that OSPF would normally add to the IP routing table on a single router.
Type 3 LSA filtering
ABR connect to the backbone area and at least one other area. ABR creates and flood type 3 summary LSAs into one area to represent the subnets in the other areas connected to that ABR.
Type 3 LSA filtering tells the ABR to filter the advertisement of these Type 3 LSAs, this essentially stops the type 3 LSAs represent all subnets in other areas from been flooded into the area been specified.
Router filtering example
In this case, we want to do the following configuration:
- On ABR01, filter subnet 3 from being advertised.
- On ABR02, filter subnet 2 and 3 from being advertised.
As a result, Subnet 1 can be advertised both by ABR01 and ABR02, so we have a redundant route in case one route failed; subnet 2 can only be advertised by ABR01; subnet 3 will never be advertised into Area1 , therefore, subnet isolation is achieved.

Syntax:
First, create a prefix list for the subnet you don’t want to advertise.
ip prefix-list list-name [seq seq-value] {deny | permit prefix/prefix-length} [ge ge-value] [le le-value]
you can find more about it here: http://frankfu.click/networking/cisco/ccnp/eigrp-2-ccnp-load-balancing/
Router(config-router)#area number filter-list prefix name {in | out}
- With subnets matched by a deny action being filtered
- With subnets matched with a permit action allowed through as normal.
- when in is configured, Cisco IOS filters prefixes being created and flooded into the configured area.
- When out is configured, Cisco IOS filters prefixes being created and flooded out of the configured area.
- better to add
ip prefix-list name seq seq-value permit 0.0.0.0/0 le 32to allow all other subnets
Keep in mind that:
- The type 3 LSA filtering can only filter the LSAs from being flooded throughout the entire area,
- this feature does not change the LSDB flooding process,
- does not change the LSAs added by the ABRs or ASBRs,
- does not change the SPF algorithm’s choice of the best route.
When SPF chooses routes to add to IP routing table, if a router has been configured with a distributed-list in router subcommand, enabling this feature, that router filters the routes before adding them to that router’s IP routing table. By filtering routes from being added to the IP routing table, you prevent the routers from forwarding packets to that filtered subnets.
E.g. in following example: packets targeting at 172.16.10.0/24 will be never be sent to there.
ip prefix-list filter-1 seq 3 deny 172.16.10.0/24
router ospf 1
distribute-list prefix filter-1 in
Route summarization
At ABRs
syntax:
router (config-router)# area number range ip-address mask [advertise | no-advertise] [cost number]
- The no-advertise option is equivalent to the Type3 LSA filtering, essentially tells the ABR to not advertise the Type3 LSA for the summary route.
- If no subordinate subnets exist, the ABR does not advertise the summary.
- The summary will be advertised into all other areas except the area specified in this command.
- You can set a metric, but if you did not set, the ABR assign a best metric among all subordinate subnets by default.
- The ABR advertises the summary route as a type 3 LSA, the ABR does not advertise the subordinate subnets by default. Thus save the router system resource.
At ASBRS
ASBRs create a Type 5 External LSA for each redistributed subnet, listing the subnet number as the LSID and listing the mask as one of the fields in the LSA. The LSA also lists the ASBR’s RID as the advertising router and a cost metric for the route. You can think of the Type 5 LSA as working much like a Type 3 LSA, except for routes learned externally.
syntax:
summary-address prefix mask [not-advertise]
- To create the summary, the ASBR actually createsa Type 5 LSA for the summary route
- If no subordinate subnets exist, the ASBR does not advertise the summary.
- The ABR advertises the summary route as a type 5 LSA, the ASBR does not advertise the subordinate subnets by default. Thus save the router system resource.
- You can not set the metric of the summary route, this is the main difference to ABRs’ summary route.
Default routes and Stub Areas
Inject the default route into the OSPF route:
Route map:
Syntax:
route-map name {permit | deny} [sequence_number]
match ( 1st set of criteria)
route-map name {permit | deny} [sequence_number]
match ( 2nd set of criteria)
Redistribute the default route:
default-information originate [always] [metric metric-value] [metric-type type-value] [route-map map-name]
- With this command, it injects a default route into OSPF, as an External Type 2 route, using a Type 5 LSA, with metric 1, but only if a default route exists in that router’s routing table.
- Always: default route is advertised even if there is no default route in the router’s routing table.
- Metric: default is 1.
- metric-type: keyword defines whether the LSA is listed as external type 1 or type 2 (default)
- route-map: the decision of when to advertise, and when to withdraw, the default route is based on matching the referenced route-map with permit action.
Stub Area
A stub area is an area in which you don’t allow advertisements of external routes, thus reducing the size of the database even more. Instead, the ABR advertises a default route (through itself) in place of the external routes and generates network summary (Type 3) link-state advertisements (LSAs) in order to reach these external routes. If you have no external routes in your network, then you have no need to define stub areas.
Stub areas are shielded from external routes but receive information about networks that belong to other areas of the same OSPF domain. You can define totally stubby areas. Routers in totally stubby areas keep their LSDB-only information about routing within their area, plus the default route. By designating an area border router (ABR) interface to the area as a stub interface, you suppress external route advertisements through the ABR. Packets destined for external routes are automatically sent to the ABR, which acts as a gateway for outbound traffic and routes the traffic appropriately.
OSPF stub router feature provides a simple way to enable flooding default routes inside the stub area, this job typically done by ABRs. At the same time, ABR chooses to not advertise external routes (Type 5 LSAs) into the area, interarea routes (in Type 3 LSAs) into the area.
The features of stub area:
- ABRs create a default route, using Type 3 LSA, listing subnet 0.0.0.0 and mask 0.0.0.0 and flood that into the stub area.
- ABRs do not flood type 5 LSAs into the stub area.
- ABRs might not flood other type 3 LSAs into the area
- The default route has a metric of 1 unless otherwise configured using the router subcommand:
area number default-cost cost
Not-so-stubby areas (NSSAs) are an extension of OSPF stub areas. Like stub areas, they prevent the flooding of AS-external link-state advertisements (LSAs) into NSSAs, relying instead on default routing to external destinations. As a result, NSSAs (like stub areas) must be placed at the edge of an OSPF routing domain. NSSAs are more flexible than stub areas in that an NSSA can import external routes into the OSPF routing domain, thereby providing transit service to small routing domains that are not part of the OSPF routing domain.
Four types of stub area
stubby, totally stubyy, not-so-stubby area (NSSA) , and totally NSSA.
Two type of these areas have the word totally, this do with whether Type 3 LSAs are flooded into the area.
- For totally stubby area and totally NSSA, the ABR filters the Type 3 LSAs. Note that both totally stubby area, totally NSSA are Cisco proprietary.
- For stubby with NSSA in the name, ABRs do not filter Type 3 LSAs.
NSSA redistribute external routes into the area, but without NSSA in the name the stubby area can not redistribute external routes.
Configure the Stub areas
| Action | Configuration Steps |
| Stubby | area area-id stub on each router in the area |
| Totally Stubby | area area-id stub no-summary on the ABRs;
without no-summary, on all other routers in the area.
|
| Set the Metric of the default route | area area-id default-cost metric on an ABR. Default value is 1 |
Remove Stub areas
Note that if you have configured totally stubby area, then you want to cancel the stub area. using command no area area-id stub no-summary
will make the area a stubby area, if you want to make a normal are, use the command : no area area-id stub
Verify:
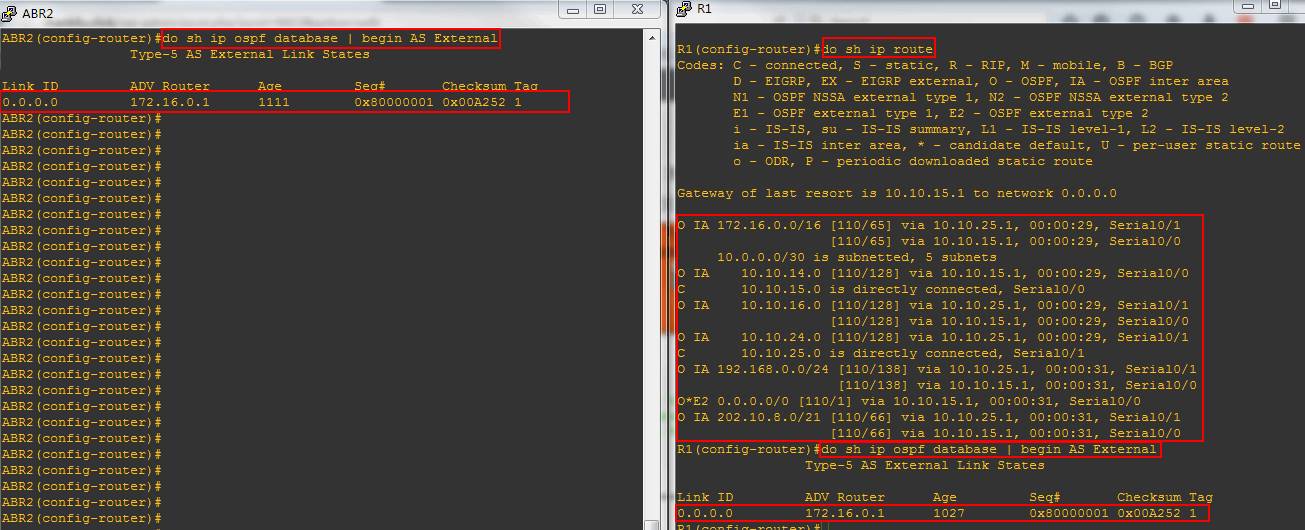
- show ip ospf database | begin AS External : show the external routes. ( note that the keywords “AS External” is case sensitive )
- show ip route: it lests a single interarea route– a default route, with destination 0.0.0.0/0.
- show ip ospf database database-summary: this statistics still show no external Type 5 LSAs, just as when the area was stubby, but now show only two Type 3 LSAs, whereas before, several existed.
- Show ip ospf database | begin Summary: this command shows the output beginning with the Type 3 Summary LSAs.
example:
The Area 5 is supposed to be a totally stub area,
So we issue following command:
On router R1:
R1(config-router)# area 5 stubOn router ABR1:
ABR1(config-router)# area 5 stub no-summaryOn router ABR2:
ABR2(config-router)# area 5 stub no-summaryThen we compare the OSPF database change:
Before configuring stub area:
After configuring Stub area:
From this figure above, we can see that all the routes, which are not belong to area 5, disappeared and only the default route left.
From the figure above, we can see that all the external route information in the database disappeared as well.


The Not-So-Stubby Area (NSSA)
The NSSA option for stubby areas overcomes the restriction on external routes. The solution is simple: because stubby areas can have no Type 5 LSAs, later OSPF RFCs defined a newer LSA type (Type 7) that servers the same purpose as the Type 5 LSA, but only for external routes in stubby areas. So, an NSSA area can act just like a stub area, except that routers can inject external routes into the area.
Configuration:
Totally NASSAs: area area-number nassa no-summary
Normal NASSA: omit the no-summary keyword.
Stubby area types and LSA
| Area Type | ABRs flood Type 5 External LSA into Area | ABRs flood Type 3 summary LSAs into the area | Allows Redistribution of external LSAs into the Stubby area |
| Stub | no | yes | no |
| Totally stubby | no | no | no |
| NSSA | no | yes | yes |
| Totally NSSA | No | no | yes |
OSPF v3
OSPFv3 support both IPv4 and IPv6.
The LSAs change:
Renamed LSAs:
- Type 3: The type 3 LSA is renamed as Interarea prefix LSA for ABRs.
- Type 4: The type 4 LSA is renamed as Interarea prefix LSA for ASBRs.
New LSAs:
- Type 8: called Link LSAs, only exist on a local link, where they are used by a router to advertise the router’s link-local address to all other routers on the same link. OSPFv3 also uses Type 8 LSA to set option bits for a specific network’s LSA.
- Type 9: called Intra-Area Prefix LSAs, can send information about IPV6 networks (including stub networks) attached to a router (similar to Type 1 LSA for IPv4 networks). Type 9 LSA can also send information about transit IPv6 network segments within an area ( similar to Type 2 LSA for IPv4 networks).
Configuration:
creating ospf routing process, going into the interface, instructing interface to be part of that process.
1. Syntax: r1(config-if)# ipv6 router ospf process-id
Note: issue it in the interface configuration mode.
2. OSPFv3 requires a 32-bit router ID to be assigned before OSPF can be enabled on an interface.
r1(config-router)# router-id rid
3. Modify OSPFv3 router ID: same as v2
4. * Enable OSPFv3 on an interface: r1(config-if)# ipv6 ospf process-id area area-id
The process-id value identifies the specific routing process and must be the same as the process ID used to create the routing process in the ipv6 router ospf process-id command.
OSPFv3 address family configuration
Similar to Named EIGRP, the OSPFv3 address family configuration approach lets you support the routing of both IPv4 and IPv6 under a single OSPF process. With such a configuration, there is a single link-state database containing information for both IPv4 and IPv6 networks.
Steps to Configure:
1. Start the OSPFv3 routing process with the command: router ospfv3 process-id
2. (optional) configure a router ID: router-id rid
3. Create an address family for IPv4 and / or IPv6 with the command : address-family (ipv4 | ipv6} unicast
4. Enter interface configuration mode, and enter the command: ospfv3 process-id {ipv4 | ipv6} area area-number
Note: Even though the OSPFv3 address family configuration approach supports both IPv4 and IPv6, it will not peer with a router using an OSPFv2 configuration.
Other router configuration:
passive-interface interfacename numbermaximum-paths number: allows you to load-balance across paths.area area-number stub no-summary: configure a totally stubby area.
Verify:
- show ospfv3 neighbor
- show ip route ospfv3
- show ipv6 route ospf
- show ospfv3 interface brief
- show ospfv3 database