FTP
Anonymous user: when you log in with anonymous user, the system still prompt to enter a password, but you can use any one.
For the fedora, the ftpusers file, which is used to restrict the user from using the ftp, is located in /etc/vsftpd/ftpusers.
Note that Fedora also check the file user_list, this file’s usage is defined in the file vsftpd.conf:
-
userlist_deny— When used in conjunction with theuserlist_enabledirective and set toNO, all local users are denied access unless the username is listed in the file specified by theuserlist_filedirective. Because access is denied before the client is asked for a password, setting this directive toNOprevents local users from submitting unencrypted passwords over the network.The default value isYES. -
userlist_enable— When enabled, the users listed in the file specified by theuserlist_filedirective are denied access. Because access is denied before the client is asked for a password, users are prevented from submitting unencrypted passwords over the network.The default value isNO, however under Fedora the value is set toYES. -
user_list file— Specifies the file referenced byvsftpdwhen theuserlist_enabledirective is enabled.The default value is/etc/vsftpd/user_listand is created during installation.
Issue: the command mode can access the FTP server but the browser can not
The windows client can connect to the FTP server by cmd, but not IE.
Background knowledge:
FTP supports two modes. These modes are called Standard (or PORT or Active) and Passive (or PASV). The Standard mode FTP client sends PORT commands to the FTP server. The Passive mode client sends PASV commands to the FTP Server. These commands are sent over the FTP command channel when establishing the FTP session.
How to change the Internet Explorer FTP Client mode
- Start Internet Explorer.
- On the Tools menu, click Internet Options.
- Click the Advanced tab.
- Under Browsing, click to clear the Enable folder view for FTP sites check box.
- Click to select the Use Passive FTP (for firewall and DSL modem compatibility) check box.
- Click OK.
Related article: https://support.microsoft.com/en-us/kb/323446
PostgreSQL on Fedora 20
$ sudo yum install postgresql-server postgresql-contrib
The postgresql server is turned off and disabled by default. You can enable its start during the boot using following command:
$ sudo systemctl enable postgresql
You can start the postgresql server only when necessary as follows.
$ sudo systemctl start postgresql
Job for postgresql.service failed. See 'systemctl status postgresql.service' and 'journalctl -xn' for details.
The database needs to be populated with initial data after installation. The error log describes problem and its solution.
The database initialization could be done using following command. It creates the configuration files postgresql.conf and pg_hba.conf
$ sudo postgresql-setup initdb
Then you can issue the command
$ sudo systemctl start postgresql
Tips and tricks
For database management is comfortable to use graphical tools such as phpPgAdmin or pgadmin3
$ sudo yum install phpPgAdmin
$ sudo yum install pgadmin3
Firewall
PostgreSQL operates on port 5432 (or whatever else you set in your postgresql.conf). In firewalld you can open it like this:
$ # make it last after reboot
$ firewall-cmd --permanent --add-port=5432/tcp
$ # change runtime configuration
$ firewall-cmd --add-port=5432/tcp
In case of iptables:
$ iptables -A INPUT -p tcp --dport 5432 -m state --state NEW,ESTABLISHED -j ACCEPT
Bear in mind that you probably don’t want to open your database server to the whole world.
Routing
For more knowledge about routing, see related articles: http://frankfu.click/networking/networking-fundamental.html
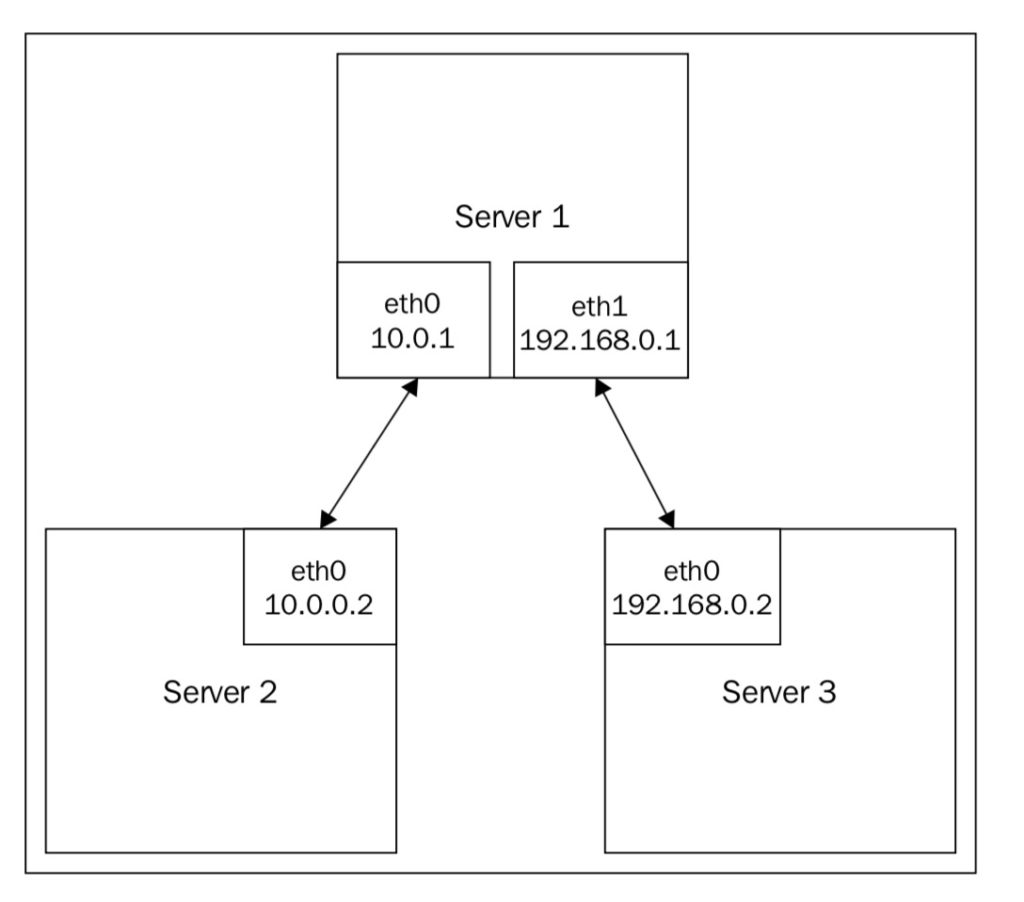
A linux server can work as a router if multiple NIC installed on the server. We will configure a routing based on direct attached network.
The server 1 will act as a router, In addition to 10.0.0.1/24 being configured on eth0, we’re going to configure 192.168.0.1/24 on eth1.
1. Configure the network interface on eth1 on server 1: # ip link set dev eth1 up
# ip addr add dev eth1 192.168.0.1/24
# ip addr list eth1
3: eth1: <BROADCAST,MULTICAST,UP,LOWER_UP> mtu 1500 qdisc pfifo_
fast state UP group default qlen 1000
link/ether 00:0c:29:99:ff:c1 brd ff:ff:ff:ff:ff:ff
inet 192.168.0.1/24 scope global eth1
valid_lft forever preferred_lft forever
inet6 fe80::20c:29ff:fe99:ffc1/64 scope link
valid_lft forever preferred_lft forever
2. Connect your third system to eth1 on server 1.
3. Configure eth0 on server 3 with an IP address of 192.168.0.2:
# ip link set dev eth0 up
# ip addr add dev eth0 192.168.0.2/24
# ip addr list eth1
eth0: <BROADCAST,MULTICAST,UP,LOWER_UP> mtu 1500 qdisc pfifo_
fast state UP group default qlen 1000
link/ether 00:0c:29:99:ff:c2 brd ff:ff:ff:ff:ff:ff
inet 192.168.0.2/24 scope global eth1
valid_lft forever preferred_lft forever
inet6 fe80::20c:29ff:fe99:ffc1/64 scope link
valid_lft forever preferred_lft forever
4. Add a default route on server 3:
# ip route add default via 192.168.0.1
5. Enable routing on server 1:
# echo net.ipv4.ip_forward=1 > /etc/sysctl.conf
# sysctl -p /etc/sysctl.conf
6. Add a default route on server 2:
# ip route add default via 10.0.0.1
now if you Ping server 3 from server 2, it should just through.
NAT
To make a Linux server edge router, NAT should be configured. Now we add another NIC eth2
1. Configure eth2 to receive an IP address via DHCP:
auto eth2
iface eth2 inet dhcp
2. Use iptables to enable NAT on packets heading out through eth2:
# /sbin/iptables -t nat -A POSTROUTING -o eth2 \
-j MASQUERADE
# /sbin/iptables -A FORWARD -i eth2 -o eth0 -m \
state –state RELATED,ESTABLISHED -j ACCEPT
# /sbin/iptables -A FORWARD -i eth0 –o eth2 -j ACCEPT
How it works:
Iptables is a command-line tool in Linux for interfacing with the Linux kernel firewall, which is implemented as a part of the netfilter subsystem.
Let’s break down the first command line:
- The -t option specifies the packet matching table to use. In this case, we’re going to use the nat table.
- -A indicates that the specified rule should be appended to the selected chain, which in this case is POSTROUTING. The POSTROUTING chain is processed after the kernel handles packet routing.
- -o specifies the output interface. In our example, the eth0 interface contains the internal IP systems and eth2 leads to the Internet.
- -j specifies what to do if the packet matches the rule. In this case, we’re going to masquerade the packet (modify the IP).
Put them together and we have matching packets heading out on eth2; rewrite the source IP address and track it in the NAT table.
The second command is added in the -m command, which matches a packet property, in this case state.
For the packets that came in on eth2 (from the Internet), and destined to eth0 (lan), check to see if they are related to or are a part of an established connection. If so, accept the packet and assign it to the FORWARD chain. The FORWARD chain handles any packet that is being passed through your router rather than the packets originating from the system (OUTPUT chain) or packets destined to your system (INPUT chain).
Finally, any packets that come in on eth0 (lan) and are heading out on eth2 (Internet) are just automatically accepted.