This chapter we will work on the directory /dev in the Linux filesystem.
Two types of data transferring
Character devices: transferring data character by character to and from the device.
Block devices: transfers chunks or blocks of information at a time by using physical memory to buffer the transfer.
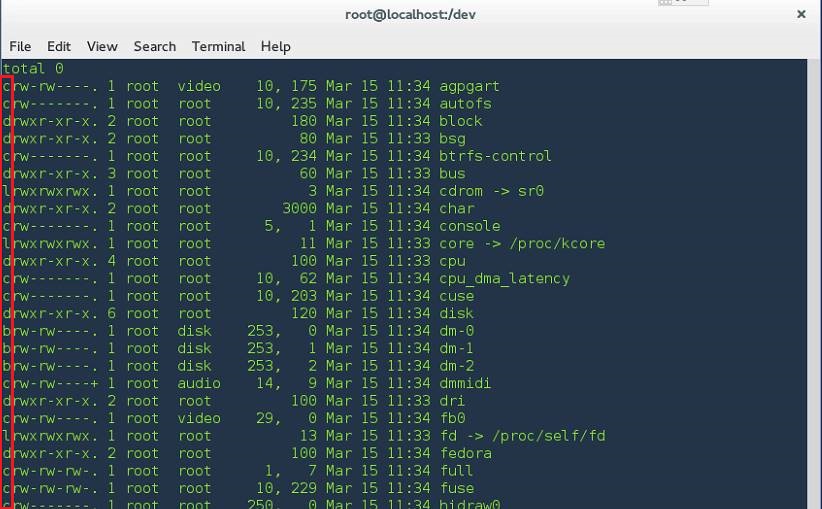
To see whether a particular device transfers data character-by-character or block-by-block, recall that the command ls -l displays a c or b character in the type column indicating the type of device file.
Steps to mount new disk
Before we working on the hard disk, we need to know which harddrives are attached to the computer.
User following command to find all the harddrives (no matter mounted or not):
lshw -class diskfdisk -lhwinfo --disk
When you get a new disk, you want to put into use, follow the following steps:
step1, use fdisk to partition or make volume.
Step2, use mkfs to format the new disk.
Step3, create a new directory (usually under /media ) or use a existing one , issue mount command to mount the new device to the directory.
Fdisk
Choose the disk to partition, use command fdisk /dev/<diskfilename> . eg. fdisk /dev/sdb
Then you will need the following options to do change on the disk, Basic fdisk commands you need are:
- p print the partition table
- n create a new partition
- d delete a partition
- t change a partition type, eg swap to ext4 or vice versa.
- q quit without saving changes
- w write the new partition table and exit. Don’t forget to do this step to commit the change, or else, you work will lose.
If you want to create a 10 G Primary partition from the disk:
Command (m for help): n
Command action
   e   extended
   p   primary partition (1-4)
p
Partition number (1-4): 1
First cylinder (1-621, default 1):<RETURN>
Using default value 1
Last cylinder or +size or +sizeM or +sizeK (1-621, default 621): +10G
Change the 2nd partition type to virtual memory for the Linux:
Command (m for help): t
Partition number (1-4): 2
Hex code (type L to list codes): 82
Changed system type of partition 2 to 82 (Linux swap)
Command (m for help): p
mkfs
mkfs [options] [-t type fs-options] device [size]
| -t, –type type | Specify the type of filesystem to be built. If not specified, the default filesystem type (currently ext2) is used. |
| fs-options | Filesystem-specific options to be passed to the real filesystem builder. Although not guaranteed, the following options are supported by most filesystem builders. |
|
Produce verbose output, including all filesystem-specific commands that are executed. Specifying this option more than once inhibits execution of any filesystem-specific commands. This is really only useful for testing. |
|
Display version information and exit. Option -V will display version information only when it is the only parameter, otherwise it will work as –verbose. |
|
Display help and exit. |
Example:
mkfs -t ext4 /dev/sdb0
mkswap: prepare the swap partition, basically is assign a partition for the system as the swap partition.e.g.:
mkswap /dev/sdb6
swapon: activate the swap partition. e.g. :
swapon /dev/sdb6
swapoff: deactivate the swap partition.
Mount
The standard form of the mount command is:
mount -t type device dir
This tells the kernel to attach the filesystem found on device (which is of type type) at the directory dir.
If only directory or device is given, for example:
mount /dir
then mount looks for a corresponding mountpoint (and then, if not found, for a corresponding device) entry in the /etc/fstab file, and attempts to mount it.
Umount
The umount command detaches the specified file system(s) from the file hierarchy.
umount dir
A file system is specified by giving the directory where it has been mounted.
Giving the special device on which the file system lives may also work, but is an obsolete method, mainly because it will fail in case this device was mounted on more than one directory.
Note that, its good practice to check if the directory is in use or not, you can use command fuser -u dir to see if any user if using the dir which you want to umount, thus prevent some problem.
The Files /etc/fstab, /etc/mtab And /proc/mounts
The file /etc/fstab may contain lines describing what devices are usually mounted where, using which options.
The command
mount -a [-t type] [-O optlist]
causes all filesystems mentioned in fstab (of the proper type and/or having or not having the proper options) to be mounted as indicated, except for those whose line contains the noauto keyword. This command would typically be included in a boot script. Adding the -F option will make mount fork, so that the filesystems are mounted simultaneously.
When mounting a filesystem mentioned in fstab or mtab, it suffices to give only the device, or only the mount point. The programs mount and umount maintain a list of currently mounted filesystems in the file /etc/mtab. If no arguments are given to mount, this list is printed.
The mount program does not read the /etc/fstab file if both device (or LABEL/UUID) and dir are specified.
To check the UUID of a filesystem: sudo blkid
For example:
mount /dev/foo /dir
If you want to override mount options from /etc/fstab, you have to use:
mount device|dir -o options
and then the mount options from command line will be appended to the list of options from /etc/fstab. If there are duplicate options, the usual behavior is that the one occuring last in the command will be used.
When the proc filesystem is mounted (at /proc, for instance), the files /etc/mtab and /proc/mounts have very similar contents. The former has somewhat more information, such as the mount options used, but is not necessarily up-to-date (compare with the -n option below). It is possible to replace /etc/mtab by a symbolic link to /proc/mounts. When you have very large numbers of mounts things will be much faster with the symlink, but some information is lost that way; in particular, the “user” option will fail.
XFS
This is the tradition file system, to show the usage:
[root@server ~]# lsblk
NAME MAJ:MIN RM SIZE RO TYPE MOUNTPOINT
xvda 202:0 0 30G 0 disk
└─xvda1 202:1 0 20G 0 part /
loop0 7:0 0 696M 0 loop /var/tmp
So the hard disk size is 30G, but only 20G is used. To grow the first partition of the disk /dev/xvda:
[root@server ~]# sudo growpart /dev/xvda 1
CHANGED: partition=1 start=2048 old: size=41940959 end=41943007 new: size=62912479 end=62914527
Double check the change:
[root@server ~]# lsblk
NAME MAJ:MIN RM SIZE RO TYPE MOUNTPOINT
xvda 202:0 0 30G 0 disk
└─xvda1 202:1 0 30G 0 part /
loop0 7:0 0 696M 0 loop /var/tmp
LVM
The structure of a Logical Volume Manager disk environment is illustrated by Figure below. Logical Volume Management enables the combining of multiple individual hard drives and/or disk partitions into a single volume group (VG). That volume group can then be subdivided into logical volumes (LV) or used as a single large volume. Regular file systems, such as EXT3 or EXT4, can then be created on a logical volume.
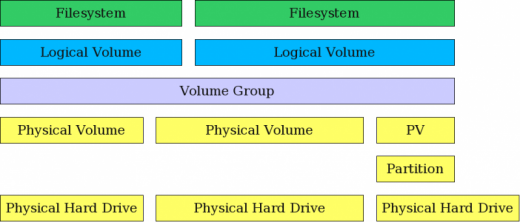
we can create logical partitions that can span across one or more physical hard drives. First, the hard drives are divided into physical volumes, then those physical volumes are combined together to create the volume group and finally the logical volumes are created from volume group.
- Physical Volumes (PVs) are unused partitions on hard disks that the LVM can use to store information.
- Volume Groups (VGs) contain one or more PVs. They represent the pools of hard disk
storage space that are available to the LVM for creating logical volumes. Additional
PVs can easily be added to a VG after creation. - Logical Volumes (LVs) are the usable volumes that are created by the LVM from the
available storage space within a VG. LVs contain a filesystem and are mounted to a
directory in the Linux filesystem hierarchy. In addition, LVs can be resized easily by
the LVM to use more or less storage space.
Add a hard drive in linux without reboot
The lazy way here would be to reboot, at which time a host rescan is done anyway.
A better way, is to force a scsi rescan. First, let’s determine which scsi host is in use
![]()
In this case it’s host2
![]()
oh noes, permission denied, even through I sudo’d !
If you examine the syntax, this is because although I used sudo, it is dropped after the “>”. the correct way is to run the echo through a pipeline then tee through.
![]()
the return to stdout is “- – -“. So what is this actually doing ?
The 3 “-” are acting as wildcards to represent the “Channel, SCSI ID and LUN” id’s available on a scsi host. So effectively “Scan all the things now!”
You could execute this against all the hosts by substituting the host id with a ? like this;
On a Red hat EL system (5.4 +) there is an included script /usr/bin/rescan-scsi-bus.sh which will achieve the same result.
From the host console, you should see a device discovery message; (or you could tail /var/log/dmesg )
![]()
running the list hardware command again should now show the new Disk device;
Steps to create volumes by LVM:
- Make sure you have lvm2 installed, use
yum install lvm2orapt-get install lvm2 - make physical volumes:
$ pvcreate /dev/sdb /dev/sdc
If you want to create more, use space to separate them.Then use
pvscanorpvdisplayto see the infor of the PVs. - Then create volume groups: Use vgcreate, vgdisplay CommandsVolume groups are nothing but a pool of storage that consists of one or more physical volumes. Once you create the physical volume, you can create the volume group (VG) from these physical volumes (PV).In this example, the volume group vol_grp1 is created from the two physical volumes as shown below.
$ vgcreate vg01 /dev/sdb /dev/sdc
  Volume  group "vg01" successfully created
LVM processes the storage in terms of extents. We can also change the extent size (from the default size 4MB) using -s flag.
- Create Logical Volumes – Use lvcreate, lvdisplay commandlvcreate command creates the logical volume with the size of 20GB from the volume group.
$ lvcreate -L 20GB -n logical_vol1 vg01
  Logical volume "logical_vol1" created
Use lvdisplay command as shown below, to view the available logical volumes with its attributes.
$ lvdisplay
  --- Logical volume ---
  LV Name                /dev/vg01/logical_vol1
  VG Name                vg01
  LV UUID                 ap8sZ2-WqE1-6401-Kupm-DbnO-2P7g-x1HwtQ
  LV Write Access      read/write
  LV Status              available
  # open                  0
  LV Size                  20.00 GiB
  Current LE              5120
  Segments               1
  Allocation               inherit
  Read ahead sectors  auto
  - currently set to     256
  Block device            254:0
- Format:Now it is ready to use for the storage purpose, don’t forget to format it into the desired filesystem.
Device names for LVM volumes follow the convention:/dev/<volume group>/<logical volume>.$ mkfs.ext3 /dev/vg01/logical_vol1 - Then mount this volume to a directory.
LVM resize: lvextend Command or lvreduce
Extend the voluem:
Similar to windows Extend Volume, we can extend the size of the logical volumes in linux as well. changes the size of the logical volume from 20GB to 30GB.
$ lvextend -L30GB /dev/vg01/logical_vol1
  Size of logical volume vg01/logical_vol1 changed from 20.00GiB(5120 extents) to 30.00
GiB(7680 extents).
  Logical volume logical_vol1 successfully resized
When you extend the logical volume, you can do it in three ways:
1, How large you want it to be.
The following command extends the logical volumne /dev/myvg/homevol to 12 gigabytes.
# lvextend -L12G /dev/myvg/homevol
lvextend — extending logical volume “/dev/myvg/homevol” to 12 GB
lvextend — doing automatic backup of volume group “myvg”
lvextend — logical volume “/dev/myvg/homevol” successfully extended
2, how much you want to extend the volume
The following command adds another gigabyte to the logical volume /dev/myvg/homevol.
# lvextend -L+1G /dev/myvg/homevol
lvextend — extending logical volume “/dev/myvg/homevol” to 13 GB
lvextend — doing automatic backup of volume group “myvg”
lvextend — logical volume “/dev/myvg/homevol” successfully extended
As with the lvcreate command, you can use the -l argument of the lvextend command to specify the number of extents by which to increase the size of the logical volume. You can also use this argument to specify a percentage of the volume group, or a percentage of the remaining free space in the volume group. The following command extends the logical volume called testlv to fill all of the unallocated space in the volume group myvg.
3. Use 100% free space
lvextend -l +100%FREE /dev/myvg/testlv
The whole procedure:
1. register physical volume -> pvcreate /dev/sdx
2. extend volume group -> vgextend vg-name /dev/sdx
3. extend logical volume to use all free space -> lvextend lv-path -l +100%FREE
4. extend ext4 filesystem -> resize2fs /dev/device-name
Example of expand a volume:
In this case, I run out of the space on root volume / , so I plugged a new hard drive and want to assign all the space on the new hard drive to the volume / .
1. Before register the physical volume, we need to find out the hard drive number. Use the ls -l /dev to get the number, as shown in the picture, the sdf is the last one, so we know that is the new plugged one, we can also check the date, I did this on Aug3 11:40, which also confirm that. 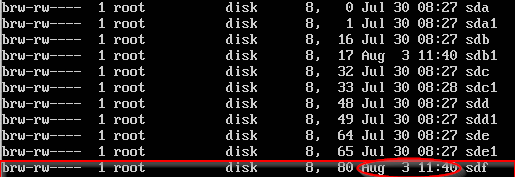
command sudo pvcreate /dev/sdf
2. Get the volume group name first. Using command mount or df / we can find device name which is mapping to mount point / , in this case it is /dev/mapper/root-root  roo-root in
 /dev/mapper/root-root on / means:
- First root before the dash: The Logical volume group name .
- Second root after the dash: The Logical volume name
Then, extend the volume group: sudo vgextend root /dev/sdf
3. Extend the logical volume: To find the LV path by the LV name, is sudo lvdisplay — Logical volume — LV Path /dev/root/root .LV Name: root; VG Name: root
sudo lvextend /dev/root/root -l +100%FREE
4. Resize the device root-root: resize2fs /dev/mapper/root-root
5. Verify: df -h
Shrink the volume:
Reducing a file system in an inconsistent state could have disastrous consequences.
Now, we will resize the actual file system size to 18G:
# resize2fs /dev/vg01/logical_vol1 18G
Keep in mind that the difference between computer gigabytes (1024^3 bytes) and drive manufacturer gigabytes (1000^3 bytes). In this case, the difference is very important. To be on the safe side, we’ll just shrink the file system a bit more than necessary and expand it to use the full space available later. Next, reduce the size of the logical volume:
# lvreduce -L 20G /dev/vg01/logical_vol1
In this case, use the actual size you want to the volume to be. Finally, grow the file system so that it uses all available space on the logical volume:
# resize2fs /dev/vg01/logical_vol1
Monitor the filesystem
disk free space – df command
This command show all the mounted filesystem in the system, don’t need parameter.
- -h: in human-readable format, G-gigabyte, M-megabyte.
directory usage – du command
This command show the usage of a directory, followed by the directory you want to check, note it also show all the subdirectories.
- -s: summary
- -h: human-readable format.
Inodes and free inodes,blocks – dumpe2fs command
followed by the volume( partition)
Error check – fsck
Before using fsck command, you must first umount the filesystem.
fsck options <filesystem_path>
OPTIONS
- -a
Automatically repair the file system without any questions (use this option with caution). Note that e2fsck supports -a for backwards compatibility only. This option is mapped to e2fsck’s -p option which is safe to use, unlike the -a option that some file system checkers support. - -n
For some filesystem-specific checkers, the -n option will cause the fs-specific fsck to avoid attempting to repair any problems, but simply report such problems to stdout. This is however not true for all filesystem-specific checkers. In particular, fsck.reiserfs(8) will not report any corruption if given this option. fsck.minix(8) does not support the -n option at all. - -r
Interactively repair the filesystem (ask for confirmations). Note: It is generally a bad idea to use this option if multiple fsck’s are being run in parallel. Also note that this is e2fsck’s default behavior; it supports this option for backwards compatibility reasons only. - -y
For some filesystem-specific checkers, the -y option will cause the fs-specific fsck to always attempt to fix any detected filesystem corruption automatically.
Quotas
Steps:
1. Edit the /etc/fstab to add the usrquota and grpquota options for the target file system
Reference:
http://www.computerhope.com/unix/umount.htm