Text Editor
- The Emacs editor uses the Ctrl key in combination with certain letters to perform special functions, can be used with the LISP(LISt Processing) artificial intelligence programming language, and supports hundreds of keyboard functions,such as the vi editor.
- Another text editor that uses Ctrl key combinations for performing functions is the nano editor (based on the Pine UNIX editor). It has the hints at the bottom of the page.
- In GUI environment,you can instead use the gedit editor to quickly edit text files.
Modes
Normal mode: Shen you enter vi editor, you are in normal mode by default. you can enter any command to edit the text. most keys on the keyboard are defined to be a specific command. As the key or key sequence is issued, that command is executed.
At any time, pressing the ![]() ESC
ESC![]() key returns the user to normal mode.
key returns the user to normal mode.
input mode: this is where most users expect an editor to start. This “mode” actually refers to commands issued from vi mode but that allow the user to start inputing data into the file.
command mode: to reach that mode, one must first be in vi mode, then issue a colon ( : ). That same colon will appear at the bottom left corner of the screen.
input mode is similar to other text editors, so we will put attention on the normal mode and command mode.
Normal mode:
Move the cursor:
- hjkl keys to move the cursor: h(left) j(down) k(up) l(right)
- Use direction key to move the cursor.
- type 2w to move the cursor two words forward to the beginning of the word. Note that this count from the next word, the current word where the cursor is not the first one.
- type 3e to move the cursor to the end of the third word forward. Note that this count from the current word, the current word where the cursor is the first one.
- 0 (zero) or | : move to the begin of a line
- $ : move to the end of a line
- n| : move to the nth column
- w : move to next word
- b : move to previous word
- ( : move to the beginning of a sentence ( . as the separation point)
- ) : move to the end of a sentence
- { : move to the beginning of a paragraph ( empty line as the separation point)
- } : move to the end of a paragraph
- 1G : move to the 1st line
- G : move to the end line
- nG : move to the nth line
- :n : move to the nth line
- H: move to the top of the screen
- nH: move to nth line from the top of the screen
- M: move to the middle of the screen
- L: move to the bottom of the screen
- nL : move to the nth line from the bottom of the screen
Insert or append text (after you press one of these keys, you enter insert mode) :
- i: insert before the cursor
- I: insert before the line
- a: insert after the cursor
- A: insert after the line
- o: insert a empty line next to the cursor line
- O: insert a empty line before the cursor line
Delete the text (after you press one of these key combo, you are still in the normal mode):
- x : delete the letter under the cursor
- X: delete the letter before the cursor
- dw: delete a word until the start of the next word, INCLUDING a space if there is one following the word after the cursor. Note, if you only type d, vim is waiting for you to type w or something else, if you type w, then vim delete the word after the cursor, if you type something wrong, press <ESC> to start over.
- de: delete to the end of the current word, EXCLUDING the space. Note the different between the dw and de.
- d$ or D: delete from the cursor to the end of the line.
- delete more word: if you want to delete 2 words, type d2w; use d4w to delete 4 words.
- dd: delete the line, d2d to delete two lines, and so forth.
Undo command
- lower case u to undo the last command executed.
- Capital U to return the whole line to its original state.
- If you want to undo the undo’s, use CTRL-R.
Put command
Type p to put the previously deleted text after the cursor. Similar to the cut function.
Replace command
1. Move the cursor so that it is on top of the first error.
2. Type r and then type the character which should be there.
3. Type a capital R to replace from the cursor.
4. s : delete letter under cursor and enter input mode
5.S: delete the current line and enter input mode
Change operator
- To change from the cursor until the end of a word, type ce. Note that ce deletes the part of the word and places you in Insert mode.
- To change the number of words you want or change to the end of the line.
c [number] motion
motion: w – work, l – letter ,
eg. c2w , to change two words after the cursor, this will delete the 2 words after your cursor and put you in the insert mode.
c$ will change the rest of the line. - To increase indent current line : >>
- To decrease indent current line: <<
- J : combine the current line and next line into one line.
- ~ : change the character in the cursor between uppercase and lowercase.
Cursor location and file status
1. CTRL-G.
A message will appear at the bottom of the page with the filename and the position in the file. Remember the line number for Step 3.
NOTE: You may see the cursor position in the lower right corner of the screen. This happens when the ‘ruler’ option is set (see :help ‘ruler’ )
2. Press G to move you to the bottom of the file.
Type gg to move you to the start of the file.
3. Type the number of the line you were on and then G . This will return you to the line you were on when you first pressed CTRL-G.
Note: these command are case sensitive.
Search command
- Type / followed by a phrase to search for. For example, if you type / error, the “error”, error1, syserror will all match.
- To search for the same phrase again, simply type n .
To search for the same phrase in the opposite direction, type N . - To search for a phrase in the backward direction, use ? instead of / .
- To go back to where you came from press CTRL-O. Repeat to go back further. CTRL-I goes forward.
wildcard
- ^ : beginning of a line.
/^Auwill search line starting with Au. - . : match one character.
.Auwill search for pattern such as dau , eau. - $ : match a line end with characters before $. E.g.
/com. $will search for pattern such as google.com. , Cisco.com., etc.
MATCHING PARENTHESES SEARCH
** Type % to find a matching ),], or } . **
1. Place the cursor on any (, [, or { in the line below marked —>.
2. Now type the % character.
3. The cursor will move to the matching parenthesis or bracket.
4. Type % to move the cursor to the other matching bracket.
5. Move the cursor to another (,),[,],{ or } and see what % does.
—> This ( is a test line with (‘s, [‘s ] and {‘s } in it. ))
NOTE: This is very useful in debugging a program with unmatched parentheses!
The substitute command ( find and replace)
** Type :s/old/new/g to substitute ‘new’ for ‘old’. **
- Type :s/thee/the <ENTER> . Note that this command only changes the first occurrence of “thee” in the line. add /g to change every occurrences.
- To change every occurrence of a character string between two lines, type :#,#s/old/new/g where #,# are the line numbers of the range
of lines where the substitution is to be done. - Type :%s/old/new/g to change every occurrence in the whole file.
- Type :%s/old/new/gc to find every occurrence in the whole file, with a prompt whether to substitute or not.
Execute an external command
Type :! followed by an external command.
Writing files
save as
:w /path/filename
save
:w
To verify this: :!ls or :!dir .
To remove the file by Typing (MS-DOS): :!del filename or (Unix): :!rm filename
Rename current file
:f new_name :rename current file name into new_name
Open another file
:e filename
After open another file, switch between two different files:
:e#
Selecting text to write:
** To save part of the file, type v motion :w FILENAME **
1. Move the cursor before the be first letter you want to select.
2. Press v and move the cursor to make the selection. Notice that the text is highlighted.
3. Press the : character. At the bottom of the screen :'<,’> will appear.
4. Type w TEST , where TEST is a filename that does not exist yet.
NOTE: Pressing v starts Visual selection. You can move the cursor around to make the selection bigger or smaller. Then you can use an operator to do something with the text.
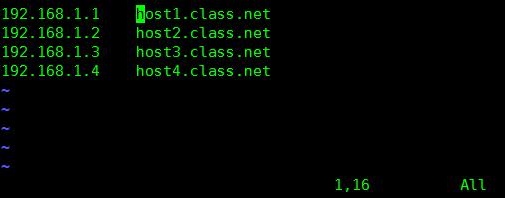
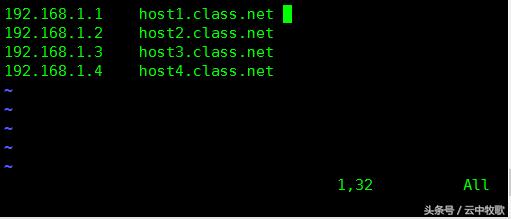
Visual Block
Press ctrl-v to start visual block selection.Visual block is useful when you want to work on several columns:
We want to move only the block of hostname to the last column:
 move cursor to the left top:
Then press ctrl-v to enter Visual Bock mode:
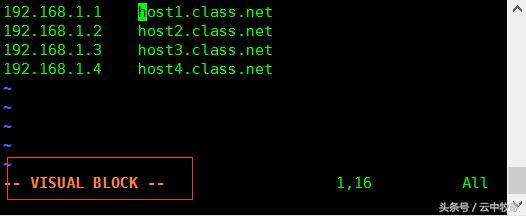
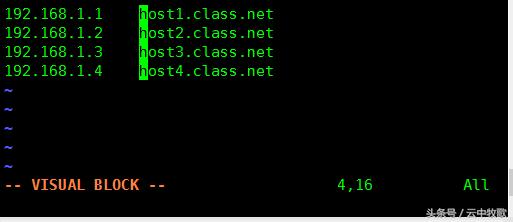
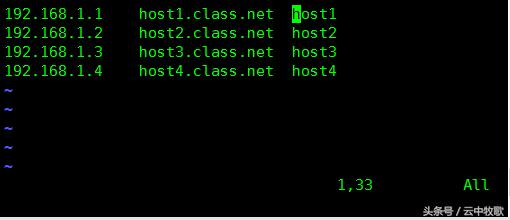
select the block you want to copy, you can select lines first or columns first according to your preference:
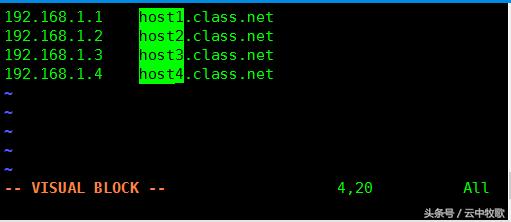
Then press y and move cursor to the left top of the block you want to paste:
Then press p :
If you want to delete a block, press D after selecting the visual block.
Insert a character
This will be useful if you want to comment out multiple lines by insert a # at the beginning of the lines
- Press Esc to enter ‘command mode’
- Use Ctrl+V to enter visual block mode
- Move Up/Downto select the columns of text in the lines you want to comment.
- Then hit Shift+i and type the text you want to insert.
- Then hit Esc, wait 1 second and the inserted text will appear on every line.
Retrieving and merging files
Place the cursor in the place after where you want to insert the file. The use the command :r filename <Enter>
The content of the file named filename will be inserted after the cursor.
:nr filename
read a file and insert the content after nth line.
Copy and paste text
Use the y operator to copy ( yank ) and p to paste (put) the text after the cursor, P before the cursor.
Use Visual mode (press v) to select ” item.”, copy it with y , move to the place where you want to paste and put the text there with p .
Note: you can also use yw yanks one word, y2w to yank two word.
- yy : copy current line
- nyy: copy n line from the line where the cursor is .
- dnd: delete n lines from the current cursor line, then paste and put the text with p
Cut and paste text
Move the curse to one end(start or end) of a text block, Press v to enter the visual mode,then move right or left to select the text block, press x to delete the text block. Move to the start position when you want to paste the text blcok, then press p.
Control display
ctrl-d : scroll half screen forward
ctrl-f : scroll one screen forward
ctrl-u: scroll half screen backward
ctrl-b : scroll one screen backward
ctrl-e: scroll one line up
ctrl-y: scroll one line down
Command mode
Set option
Typing “:set xxx” sets the option “xxx”. Some options are:
- ‘all’ show all available options
- ‘ic’ ‘ignorecase’ ignore upper/lower case when searching
- ‘is’ ‘incsearch’ show partial matches for a search phrase
- ‘hls’ ‘hlsearch’ highlight all matching phrases
- ‘nu’ ‘number’ show line number
- ‘nonu’ ‘nonumber’. hide line number
- ‘ai’ automatic indent, eg. if you start one line with tab space, when you press enter, the following line will also start with a tab space.
- ‘sw=n’ ‘shiftwidth’. set the shift width. This will affect the number of space the >> and << command move in normal mode. If you set sw=5, then in normal mode, press >> the current line will move right 5 spaces.
- ‘tw=n’ ‘textwidth’ Automatically wrap the line to n characters, if one word is more than n characters, then display the whole word.
after that , move the cursor to the beginning of the file, type gqG. Then the file will display in the new format
You can either use the long or the short option name.
Reverse the Set:
Prepend “no” to switch an option off: :set noic
- NOTE: To remove the highlighting of matches enter: :nohlsearch
NOTE: If you want to ignore case for just one search command, use \c in the phrase: /ignore\c <ENTER>
Getting help
- Press the <help> key (if you have one)
- Press the F1 key (if you have one)
- Type :help <enter>
To find help on a subject by give the :help command a argument. Example::help user-manual
Create a startup script
To start using more features you have to create a “vimrc” file:
- Start editing the “vimrc” file. For Unix:
:e ~/.vimrc; For MS-Windows::e $VIM/_vimrc - Read the example “vimrc” file contents: :r $VIMRUNTIME/vimrc_example.vim
- Write the file with: :w
Auto-completion: Ctrl-D or <TAB>
Use VIM as a hex editor
:%!xxd (: to normal model, % whole file, ! execute, xxd
Giving an output like this. This is split into Octet count/line (octets per line may be changed with parameter -c on xxd command), hex representation and text representation.
Once you make the changes (in the hex part), you can go back to text with -r command on xxd, so
:%!xxd -r
Reference
