Policy settings
Policy settings can be managed or unmanaged.
- A managed policy setting is applied to a user or computer when the object is in the scope of the GPO containing the setting. When the object is no longer in the GPO’s scope or the policy is set to “Not configured,” however, the setting on the user or computer reverts to its original state.
- An unmanaged policy setting is persistent, meaning it remains even after the computer or user object falls out of the GPO’s scope until it’s changed by another policy or manually. The policies already loaded in Active Directory are managed policies, but you can customize Group Policy by adding your own policies, which are unmanaged.
The following sections focus on these categories of settings:
• Software installation—In the Software Settings folder under both the Computer Configuration and User Configuration nodes.
• Scripts—In the Windows Settings folder under both the Computer Configuration and User Configuration nodes.
• Folder redirection—In the Windows Settings folder under the User Configuration node.
Software installation
Applications are deployed with the Windows Installer service, which uses installation packages called “MSI files.” A Microsoft Software Installation (MSI) file is a collection of files gathered into a package with an .msi extension that contains the instructions Windows Installer needs to install an application.
You might want to install a software package that’s available only as an executable (.exe) file. Depending on the software developer, an .exe file might contain an MSI file that you can extract with the command filename.exe/extract (replacing filename with the .exe file’s name). If that’s not possible, you might need to con- vert the .exe to an MSI. Although there’s no Windows utility for this purpose, third-party programs are available, such as Advanced Installer (www.advancedinstaller.com) and Exe to MSI (www.exetomsi.com).
Configuring Software Installation for Computers
In the Computer Configuration node, software packages are assigned to target computers, meaning installation of the software is mandatory, and assigned packages are installed the next time the computer starts. To assign a software package to a computer, you must create a shared folder on a server that gives the computer the Read & execute permission. Typically, you do this by assigning the necessary permissions to the Authenticated Users special identity group.
Advanced Application Deployment Options
To access other options for deploying applications, click the Advanced option button in the Deploy Software dialog box or open the Properties dialog box for a package you’ve already added to the Software installation node. The Properties dialog box has several tabs with options for changing how the application is deployed:
• General—This tab is mostly just information about a package, including the name, version, language, publisher, and hardware platform. You can change the package name.
• Deployment—You can select whether a package is published or assigned. In the Computer Configuration node, software packages can only be assigned, so the Published option is disabled. The Deployment type selection determines what’s available in the Deployment options section, including when and how an application is deployed. For example, an application can be installed at user logon or when a document used by the application is opened. Another deployment option uninstall this application automatically if the user or computer falls out of the scope of management. In the Computer Configuration node, the only two deployment options are Auto-install and Uninstall.
At the bottom of this tab, you can choose user interface options (Basic or Maximum), but these options are available only in the User Configuration node. Clicking the Advanced button shows other options for ignoring language when deploying the package and making a 32-bit application available on 64-bit machines (enabled by default).
• Upgrades—You can deploy a package upgrade by specifying which existing packages should
be upgraded by the new package and which packages can upgrade the current package.
• Categories—You use this tab to associate a published package with a category. Control Panel’s Programs applet lists available applications under the specified categories. This option is used only for packages published in the User Configuration node.
• Modifications—You can use this tab to customize a package installation by using a transform file (.mst extension). Select transform files for customizing the installation of an MSI file. A transform file contains information about features and components that can be used to customize an application installation. For example, if you’re installing Microsoft Office, you can use the Office Resource Kit to create a transform file that overrides the default installation path or specifies which Office components should be installed.
• Security—A standard DACL for the package object. By default, Authenticated Users have Read permission, and Domain Admins have Full control.
After a package is deployed to a computer, by default it’s not installed again.
However, if changes have been made to the original package, right-click the package in the Software installation extension and click All Tasks, and then click Redeploy application. This action re-installs the package on target computers.
To remove a deployed package, right-click the package and click All Tasks, and then click Remove. You have the option to uninstall the software immediately or simply prevent new installations yet allow users to use already deployed packages.
Configuring Software Installation for Users
The Software installation extension performs the same function in the User Configuration node as in the Computer Configuration node—deploying software to remote destinations—but has important differences in options and execution. A software package can only be assigned to a computer, but there are two options for deploying software to users:
• Published—A published application isn’t installed automatically; instead, a link to install the application is available in Control Panel’s Programs and Features by clicking the “Install a program from the network” link. Published applications can also be configured to install when the user opens a file type associated with the application.
• Assigned—Assigned applications can be installed automatically when the user logs on to a computer in the domain, or it can be set to install automatically if a user opens a file associated with the application.
Scripts
You can type the commands in a text file and save the file with a .ps1 extension, such as myscript.ps1. To run this string of commands, type PowerShell myscript.ps1 at a command prompt or just myscript.ps1 at a PowerShell prompt. In addition to PowerShell scripts, you can create command scripts, which are just a series of com- mands saved in a file with a .bat extension, also known as a batch file.
There’s a Scripts extension in both the Computer Configuration and the User Configuration nodes in the path Policies, Windows Settings, Scripts. In the Computer Configuration node, you configure startup or shutdown scripts, and in the User Configuration node, you con- figure logon and logoff scripts. For example, to configure a logon script, navigate to User Configuration, Policies, Windows Settings, Scripts, and then right-click Logon and click Properties. The properties of a logon script are the same as for the other three script types.
This dialog box has two tabs:
• Scripts—This tab is used for command scripts (batch files), and scripts that can be run by Windows Scripting Host (WSH). WSH is used to run VBScript and JScript files.
• PowerShell Scripts—To run PowerShell scripts, the target computer must be running Windows 7 or later.
By default, Windows looks in the SYSVOL share on the DC in the folder containing the GPO where you’re creating the script. The advantage of using the SYSVOL share is that scripts are replicated automatically and can be retrieved by clients from a DC in the domain.
If you want to store scripts in the SYSVOL folder with your GPO, you need the GUID of the GPO to locate the correct folder. You can find the GUID by looking in the System\Policies folder in Active Directory Users and Computers. Or click the “Show Files…” in the logon\logoff Script setting windows.
Permission consideration in the logon/logoff script
Any user configuration items, including login scripts are run with the user’s permissions. In order to run a script (or software installation) with elevated permissions you need to either run it using Computer configuration, which will run as local system, or use group policy preferences to create a scheduled task and configure the desired credentials.
Folder redirection
Folder redirection enables an administrator to set policies that redirect folders in a user’s profile directory. This feature is useful when you want users to store documents on a server for centralized backup, but you don’t want to change the way they access their document folders. It’s also quite useful when roaming profiles are used because it decreases the network bandwidth needed to upload and download a user’s roaming profile.
Folder redirection applies strictly to user accounts and is found only under the User Configuration node in Policies, Windows Settings, Folder Redirection.
- Setting—In this list box, you have the following options:
- Not configured: This default option means folder redirection isn’t enabled for the folder.
- Basic – Redirect everyone’s folder to the same location: This option redirects the selected folder to the same location for all user accounts in the GPO’s scope.
- Advanced – Specify locations for various user groups: With this option, you can redirect folders to different locations based on group membership.
- Target folder location—In this list box, you have the following options:
- Create a folder for each user under the root path: The default setting; you specify the UNC path to a share in the Root Path text box. Each user has a folder under the root path. For example, the Documents folder for a user with the logon name jsmith is at \\411Server1\redirected\jsmith\Documents.
- Redirect to the user’s home directory: If home directories are defined, the folder is redi- rected to the specified location.
- Redirect to the following location: The folder is redirected to the path you specify in the Root Path text box. If you use this option, multiple users have the same location for the folder.
- Redirect to the local userprofile location: The folder is located wherever the user’s local profile is stored, which is usually in the C:\Users folder.
In the Settings tab, you specify options for redirection, including whether the folder should remain redirected or revert to its original location if the policy is removed.
Fore more check here:
http://frankfu.click/microsoft/windows-fundamental/user-account/folder-redirection/
Working with Administrative Templates
Both the Computer Configuration and User Configuration nodes have an Administrative Templates folder. In the Computer Configuration node, the settings in Administrative Templates affect the HKEY_LOCAL_MACHINE Registry key. Settings in the User Configuration node affect the HKEY_LOCAL_USER Registry key.
Hundreds of settings are defined in the Administrative Templates nodes, and many more can be added through customization. The Administrative Templates folder uses policy definition files, called administrative template files, in XML format (with an .admx extension), which makes creating your own policies fairly easy if you need to control a setting not provided by default.
The following sections cover these topics related to administrative templates:
• Computer Configuration settings
• User Configuration settings
• Administrative Templates property filters
• Custom administrative templates
• Migrating administrative template files
• Security templates
Computer Configuration Settings
This section doesn’t attempt to cover all the settings in Administrative Templates, but it gives you a brief explanation of the types of settings in each folder under Administrative Templates.
• Control Panel—This folder has three subfolders: Personalization, Regional and Language Options, and User Accounts. Personalization has settings that affect the look of Windows, in particular the lock screen and background. Settings in Regional and Language Options allow administrators to set and restrict the language in the Control Panel user interface. The single policy in User Accounts configures a default user logon picture for all users on target computers.
• Network—There are 20 subfolders where you can control a host of network settings on target computers, including but not limited to Background Intelligent Transfer Service (BITS) parameters, DNS client settings, network connection settings, offline files configura- tion, and TCP/IP settings.
• Printers—Settings in this folder control how computers interact with network printers, including automatic printer publishing in Active Directory, printer browsing, and Internet printing parameters.
• Server—Settings in this folder control options for backing up a computer. • Start Menu and Taskbar—Settings in this folder allow you to specify a Start screen layout
and pin apps to the Start screen.
• System—This folder contains more than 35 subfolders with settings for controlling general computer system operation. Some computer functions that can be controlled include disk quotas, the file system, group policy processing, logon and shutdown, power management, and user profiles.
• Windows Components—This folder contains more than 50 subfolders with settings for configuring specific Windows components, such as app deployment, Event Viewer, File Explorer, Internet Explorer, Windows PowerShell, Windows Update, Work Folders, and many others. Some settings in this folder have an identical counterpart in the User Configuration node. When a conflict exists, the setting in Computer Configuration takes precedence.
User Configuration Settings
Most of the previous information about Administrative Templates in the Computer Configuration node applies to the User Configuration node, too. Administrative Templates in User Configuration also contain the Control Panel, Network, Start Menu and Taskbar, System, and Windows Components subfolders, although most of the settings are different because they apply to specific users rather than all users who log on to a computer.
With Administrative Templates in the User Configuration node, you can customize many aspects of a user’s working environment. Policies in this node add the following subfolders to the previous list for the Computer Configuration node:
• Desktop—Controls the look of users’ desktops, determines which icons are available, and can limit actions users can take on the desktop.
• Shared Folders—Controls whether a user can publish shared folders and Distributed File System (DFS) root folders in Active Directory.
Working with Filters
The number of settings in the Administrative Templates section of a GPO can be daunting when you’re trying to find a particular policy to configure. There are several hundred policy settings under both Computer Configuration and User Configuration. If you know the name of the setting you need to configure or at least know the first word of the name, you can sort the settings alphabetically under All Settings and find it that way. Filters work only with settings in the Administrative Templates folders; you can’t filter settings in the Software Settings or Windows Settings folders.
Thankfully, you can narrow the search by using a filter in the Group Policy Management Editor:
1. Open a GPO in the GPME, and click Policies, Administrative Templates under Computer Configuration or User Configuration. You see the filter icon on the toolbar.

2. Click Action, Filter Options from the menu to open the Filter Options dialog box.
3. You can configure a filter with the following criteria:
- Managed—Select Any, Yes, or No. If you select Any, both managed and unmanaged policies are included in the filter criteria. If you select Yes, only managed policies are included, and if you select No, only unmanaged policies are included.
- Configured—Select Any, Yes, or No to see only configured policies, unconfigured policies, or both.
- Commented—You can add a comment to any policy setting in Administrative Templates by double-clicking it and typing a comment in the Comment text box. This filter option allows you to view only policy settings with a comment, those without a comment, or both. By default, policy settings don’t have a comment.
- Enable Keyword Filters—Select this check box, if needed, and in the Filter for word(s) text box, type one or more words that are part of the policy setting’s title, help text, or comment field. You can specify how the words match by selecting Exact, All, or Any.
- Enable Requirements Filters—Narrow the search by OS or application platform. For example, you might want to see only policy settings that work with Windows Server 2012 R2.
Using Custom Administrative Templates
Administrative templates are a collection of policy definition files in XML format. These XML files, referred to as “ADMX files” because of their .admx extension, specify Registry entries that should be controlled and the type of data the entries take. Many software vendors provide administrative template files for controlling their applications’ settings through group policies. For example, Microsoft offers administrative template files for the Microsoft Office suite.
Windows versions before Vista and Server 2008 used .adm files. This format can still be used on the same system as ADMX files, but you can create and edit ADMX files only on Windows Vista or later computers. ADMX files can also have an .adml extension, which provides a language-specific user interface in the Group Policy Management Editor. You can find all ADMX and ADML files under %systemroot%\PolicyDefinitions and open them in Notepad or an XML editor. However, you don’t usually edit the standard ADMX files that ship with Windows.
Adding a Custom Administrative Template to Group Policy
If you create your own ADMX file or download one for configuring settings on an installed application, you can simply add the ADMX file to the %systemroot%\PolicyDefinitions folder. The next time you open the GPME, the file is loaded. Any language-specific files (.adml) should be placed in the corresponding language folder. For example, if there’s a U.S. English file, place it in the en-US folder under the PolicyDefinitions folder.
Working with Older Administrative Templates
If you’re using older ADM administrative templates, you can add them manually by following these steps:
1. In the GPMC, open a GPO in the GPME. Right-click the Administrative Templates folder under Computer Configuration or User Configuration and click Add/Remove Templates.
2. In the Add/Remove Templates dialog box, click Add.
3. In the Policy Templates File Explorer window, browse to the ADM file’s location. Select the ADM file and click Add.
4. In the Add/Remove Templates dialog box, click Close.
Migrating Administrative Templates
If you’re running a Windows Server 2008 or later domain but still have to support clients older than Vista or are running older applications that use ADM files, you might want to migrate the older ADM files to ADMX format so that you can make use of the central store. As mentioned, the central store ensures that all policy definitions are replicated to other DCs. Because the cen- tral store can’t work with ADM files, you need to convert the ADM files to ADMX files with ADMX Migrator, a snap-in tool available free from the Microsoft Download Center. To use this tool, follow these steps:
1. Download ADMX Migrator from the Microsoft Download Center.
2. Install ADMX Migrator on the computer with the ADM files; in most cases, it’s a domain controller.
3. Navigate to the folder where you installed ADMX Migrator, and double-click the faAdmxEditor.msc file. An MMC opens with the ADMX Migrator snap-in.
4. Click Generate ADMX from ADM.
5. After the ADMX file is generated, move it to the %windir%\PolicyDefinitions folder or the central store.
Working with Security Templates
Security templates are text files with an .inf extension that contain information for defining policy settings in the Computer Configuration\Policies\Windows Settings\Security Settings node of a local or domain GPO. You can use them to create and deploy security settings to a local or domain GPO and to verify the current security settings on a computer against the settings in a template.
3 tools for working with security templates:
- Security templates snap-in:You use the Security Templates snap-in to create and edit security templates. You can create templates for computers with differing security requirements, such as servers with different roles installed or different physical locations.When a user creates a new template, it’s stored in the user’s Documents folder in Security\ Templates. After the template is created, it can be imported into a local or domain GPO or be used by the Security Configuration and Analysis snap-in. If you configure account policies in your template to import into a GPO, remember that settings in the Account Policies node are used only when linked to a domain or applied to a local GPO.
You create a security template in one of two ways:
• Use the existing security settings on a computer—If you want to create a security template using a baseline of settings from an existing desktop computer or server, open secpol.msc, and then right-click the Security Settings node and click Export policy. By default, policies are exported to the user’s Documents folder in Security\Templates. Then you open the exported policy with the Security Templates snap-in, make changes as necessary, and save the template.
• Create a security template from scratch—Open the Security Templates snap-in in an MMC, and then right-click the folder under the Security Templates node and click New Template. This method creates a template with no defined settings. - Security configuration and Analysis snap-in.
The Security Configuration and Analysis snap-in is useful for checking a computer’s existing security settings against the known settings in security template files that have been imported into a security database.
5 possible results
- An X in a red circle indicates a mismatch
- A check mark in green indicates a match
- A question mark in a white circle indicates that the policy wasn’t defined or the user doesn’t have permission to access the policy
- An exclamation point in a white circle indicates that the policy doesn’t exist on that computer
- No indicator indicates that the policy wasn’t defined in the template
You can also use this snap-in to apply a security template to a computer. Windows does not supply a preconfigured MMC, so we have to add this snap-in to an MMC.
- Secedit.ese
The initial security settings are in %systemroot%\security\templates\DC security.inf
Using the Security Configuration Wizard
The Security Configuration Wizard (SCW) guides you through creating, editing, and applying a security policy on Windows servers. It creates an XML file that can be deployed to servers with Group Policy.
The SCW does more than just apply settings; it analyzes the server environment, disables unnecessary services, and configures Windows Firewall settings. You can also include security templates in the security policy the SCW produces.
To use the SCW, follow these steps:
1. In Server Manager, click Tools, Security Configuration Wizard from the menu. You have the option to create a new security policy, edit an existing policy, apply an existing policy, or roll back the last applied security policy.
2. Next, you select a server to act as a baseline for the policy. The server is analyzed for the roles and services it’s running. If you plan to apply the policy to multiple servers, they should be configured with similar roles and services.
3. You can change the list of roles and features the server performs. If you’re editing an existing policy to apply to a server with different roles configured, you can make the necessary change.
4. Other configuration windows include those for configuring network security rules, authentication rules, and auditing. Before you save the policy, you can specify one or more security templates to include in the policy. If you add multiple templates, you can prioritize them in case any settings conflict.
5. You assign a name to the policy, and it’s saved by default in C:\Windows\security\msscw\
Policies.
6. Finally, you can apply the policy to the selected server or apply the policy later by running the wizard again and choosing to apply an existing policy.
If you want to use Group Policy to apply a saved policy created by the SCW, first use the scwcmd.exe command-line tool to convert the XML file to a GPO. For example, if you created a policy named DCSecPol.xml, enter the following command to convert the policy to a GPO named DCSecPol. The GPO is stored in the Group Policy Objects folder in the Group Policy Management console.
scwcmd transform /p:DCSecPol.xml /g:DCSecPol
Configuring Group Policy Preferences
Unlike user or computer policies that can’t be changed by users, group policy preferences enable administrators to set up a baseline computing environment yet still allow users to make changes to configured settings.
Both the Computer Configuration and User Configuration nodes have a Preferences folder with two subnodes—Windows Settings and Control Panel Settings—containing settings organized into categories.
With group policy preferences, you can perform many useful tasks:
• Create and modify local users and groups.
• Enable and disable devices on a computer, such as USB ports, DVD drives, and removable media.
• Create drive mappings.
• Manage power options.
• Create and manage files, folders, and shortcuts.
• Create and modify printers.
• Configure custom Registry settings.
• Configure custom application settings.
• Configure Control Panel settings.
• Configure Internet Explorer.
Computers need the Group Policy Preferences Client Side Extensions (GPP CSE) package installed to recognize and download settings in the Preferences folder when processing group policies. This package is already installed in Windows Server 2008 and later. For older clients (such as Windows XP, Windows Vista, and Windows Server 2003), you can download the client-side exten- sions package by going to www.microsoft.com/download and searching for “client-side extensions.”
How Group Policy Preferences Are Applied
Preferences are refreshed on the same schedule as policies by default.
- This means Computer Configuration preferences are refreshed when the computer restarts and every 90 minutes there- after.
- User Configuration preferences are refreshed when the user logs on and then every 90 minutes.
You can change this behavior by setting preferences to be applied only once. That way, preferences are used as a baseline configuration for the settings they affect, but users can still change them. Another difference between policies and preferences is management. If a managed policy setting is removed, unconfigured, or disabled, the original setting is restored on target users or computers. With preferences, the settings aren’t restored by default, but you can change this behavior to make preferences act more like managed policies.
Creating Group Policy Preferences
There aren’t hundreds of built-in preference settings to configure as there are with policies. In fact, there aren’t any preferences at all—just preference categories. You must create each preference you want to deploy. The process of creating most preferences is similar. In this example, you create a folder preference under the User Configuration node:
1. Open the GPO in the Group Policy Management Editor, and navigate to User Configuration, Preferences, Windows Settings.
2. Right-click Folders, point to New, and click Folder to open the New Folder Properties dialog box.
3. In the New Folder Properties dialog box, select from the following actions in the General tab (which are common to most preferences categories):
- Create—Creates a new folder.
- Replace—Deletes and re-creates a folder. If the folder already exists, it’s deleted along with its contents, and a new folder with the same name is created with the specified attributes. If the folder doesn’t already exist, a new folder is created.
- Update—Updates a folder’s properties. If the folder doesn’t exist, a new folder is created.
- Delete—Deletes a folder.
4. In this case, select Update. If the folder already exists, it’s updated with any changes; otherwise, the folder is created.
5. Select the path of the folder or type the path in the Path text box. For this example, create a file named TestPrefs in the Documents folder of a user’s profile. You can specify the %UserProfile% variable in the path. For example, if the user is testuser1, the %UserProfile% variable has the value C:\Users\testuser1, so the full path is %UserProfile%\Documents\ TestPrefs .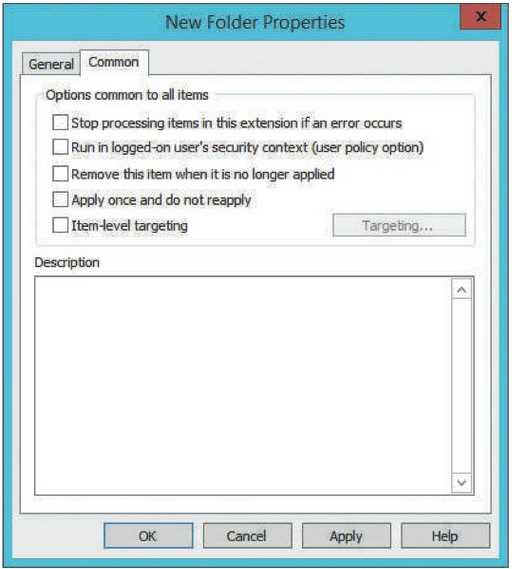
6. Select attributes for the folder. You can choose from Read-only, Hidden, and Archive (the default setting).
7. If you choose Delete or Replace, you have additional options for deleting the folder. When the action is Create or Update, the delete options are grayed out.
8. Click the Common tab to see additional properties that are common to all preferences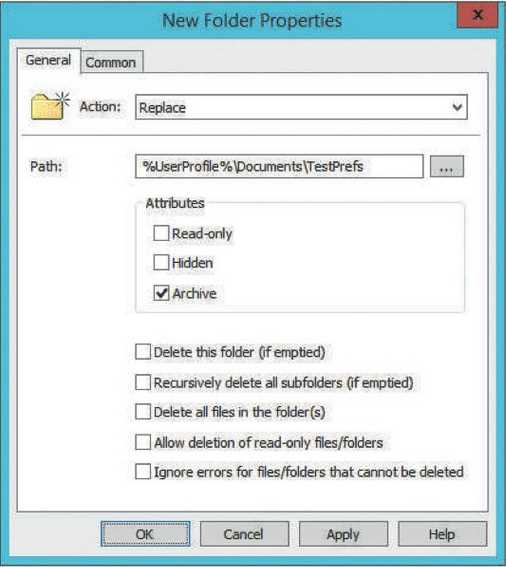
• Stop processing items in this extension if an error occurs—If there’s more than one preference in the extension (for example, you create two folder preferences), and this option is selected, no additional preferences are processed in the extension if there’s an error.
• Run in logged-on user’s security context (user policy option)—By default, preferences are processed with the SYSTEM account security context. Enable this option to have preference processing use the logged-on user’s security context. This option ensures availability of resources the user has permission to and makes sure environment variables are set for the logged-on user.
• Remove this item when it is no longer applied—Select this option if you want preferences to be restored to their original values when the user or computer account falls out of the GPO’s scope. For example, if you select this option and the user account falls out of the GPO’s scope, the folder is removed. This option isn’t available when the action in the General tab is set to Delete.
• Apply once and do not reapply—By default, preferences are applied on the same schedule as policies. Enable this option if you want users to be able to change the preference setting without their changes being overridden by the next Group Policy refresh.
• Item-level targeting—Item-level targeting enables you to target specific users or computers based on criteria, as described next in “Item-Level Targeting.”
Item-Level Targeting
Preferences operate the same way as policies for default inheritance and scope. However, you can target users or computers for each preference based on certain criteria. For example, you can specify that only portable computers that are docked have a preference applied. Select the “Item-level targeting” option in the Common tab of the preference’s Properties dialog box, and then click the Targeting button to define criteria that a computer or user must meet before the preference is applied.
Criteria can be combined with the AND and OR operators. For example, if you want to target only mobile computers running Windows 8, you can create an item-level targeting statement that effectively says “If the operating system is Windows 8 AND a battery is present, apply this preference”
Example of GP preferences:
1. Deploy VPN:
Under Computer Configuration, click to expand Preferences and Control Panel Settings. Right-click Network Options, point to New, and click VPN Connection.
2. Deploy Internet Explorer settings:
Under User Configuration, click to expand Preferences and Control Panel Settings. Right-click Internet Settings, point to New, and click Internet Explorer 10.