In this article, we will focus on deploying Windows 7 and 10, and the Server is windows 2012 R2.
In the WDS MMC, right click Active Directory Prestaged Devices, click add device.
In the Identity page, Give it a descriptive name and Device ID (MAC address in 00-0C-29-71-08-26 format). Then click next.
Boot window:
Referral server: if you want to download the boot program from another server other than current server.
PXE prompt Policy: For unattended installation: use Always continue the PXE boot.
Client unattend:
You can create a easy unattended file here, but it’s recommended to use ADK
If you don’t have one, click Create new.
- Then select the Setup Language to you like.
- Enter a Domain credential that can run WDS service.
- Architechture support: Select the Specify the install image, the click Select…, add the image you want to install.
- Installation info: The disk number start from 0, partition number from 1. In Windows 8, 10, it typically use partition ID 2 cause the first one is system reserved., in Windows 7, we use partition 1.
Create Prestaged Devices in bulk
You can create a CSV file named c:\devices.csv to store the Device name, MAC address, OU info (not recommend to modify OU here, may has bug with it):
HostName,GUID,DN
win10sec,00-50-56-27-18-31,"OU=testingOU,DC=test,DC=com"
win10First,00-0C-29-71-08-26,"OU=testingOU,DC=test,DC=com"
Then create a powershell file in the same folder to create prestaged devices from this csv file:
$csv=Import-Csv c:\devices.csv;

Foreach ($line in $csv){
 New-WdsClient -DeviceName $($line.Hostname) -DeviceID $($line.GUID) -PxePromptPolicy OptIn -WdsClientUnattend "\\Wds\reminst\WdsClientUnattend\win10.xml"-JoinDomain $True -OU $($line.DN) -Domain "test.com" -JoinRights Full -User "test\Domain_admin_user"
 }
\\Wds\reminst\WdsClientUnattend\win10.xml is the network location of the answer file, you need to change it into your own location.
https://technet.microsoft.com/en-us/library/dn283430(v=wps.630).aspx
Before configuration a answer file, it’s critical to know how the configuration passes work, you can find here: http://frankfu.click/microsoft/70-411-administering-win-2012r2/configuration-passes-windows-setup.html
Answer file
Windows 7 Answer file: http://misheska.com/blog/2013/07/26/windows-7-automated-install-settings/
The configuration I want to do in the answer file:
- wipe disk and partition it.
- choose windows image to install and the target partition to install
- After installation, join domain to the domain according to prestaged devices.
- Set up the OOBE, location, language, time zone,
After I tried on VM machine, I found one answer file can not deal with all the settings. Then after some research, and we can use two answer files to do these tasks:
- first file to wipe disk, partition;
First answer file (step 1 and 2):
Before creating answer file, we need to figure out which partition we want to install windows, this is especially important If you don’t want to re-partition the disk, you can boot into a WinPE then Shift + F10 to activate Command Prompt. or if you can boot into windows:
Open cmd, type diskpart, then use following command:
list disk

select disk 0

list partition
Note down the partition number you want to install windows by the size of the partition, it’s not the system reserved partition number which may only have 100MB or some size similar.
Where to configure:
Microsoft-Windows-Setup | DiskConfiguration | Disk | ModifyPartitions | ModifyPartition
Partition type:
| Partition | Active | Letter | Label | Format | Extend |
|---|---|---|---|---|---|
| Primary | Yes | Yes | Yes | Yes | Yes |
| Extended | No | No | No | No | No |
| Logical | No | Yes | Yes | Yes | Yes |
| EFI | No | Yes | Yes | Yes | No |
| MSR | No | No | No | No | No |
Child Elements
| Active | Specifies whether the partition is active. |
| Extend | Specifies whether to extend the partition to use the remainder of contiguous space on the hard disk. |
| Format | Specifies the file system format to apply to the partition. |
| Label | Specifies the name to apply to the partition. |
| Letter | Specifies the drive letter to assign to the partition. |
| Order | Specifies the order in which the partition will be modified. |
| PartitionID | Specifies the identification number of the partition to modify. |
Valid Passes
Note the partition number start from 1 and disk number start from 0. For a windows 10 clean installation, you may install a windows on disk 0, partition 2.
In windows 10 you can create an answer file by:
- Go to “Components > amd64_Microsoft-Windows-setup_10.x.xxxxx.x_neutral > DiskConfiguration” Right click Diskconfiguration “, Add configuration to pass1 WindowsPE.
- In the answer file right click “diskConfiguration”, click “insert new disk”, click disk and input 0 in the DiskID.
WillWipeDiskspecifies whether to erase all partitions on the hard disk before adding additional configurations to the disk. I tried many times to only - Right CLick CreatePartitions, click “Insert new createpartition”, we will create a system reserved partition
- Action: AddLIstItem
- Extend: false
- order: 1
- size: 100 , the unit is MB
- Type: primary
- Right CLick CreatePartitions, click “Insert new createpartition”, we will create a Windows system
- Action: AddLIstItem
- Extend: true
- order: 2
- size: leave it default, so we will use all the rest disk space.
- Type: primary
- Right Click ModifyPartitions, click “Insert new Modifypartition”, we will modify the system reserved partition
- Action: AddLIstItem
- Active: true
- Extend: false
- Format: NTFS
- Label: system reserved
- Letter: leave it empty
- order: 1
- PartitionID:1
- TypeID: leave it empty
- Right Click ModifyPartitions, click “Insert new Modifypartition”, we will modify the windows partition
- Action: AddLIstItem
- Active: false
- Extend: true
- Format: NTFS
- Label: windows10
- Letter: C
- order: 2
- PartitionID:2
- TypeID: leave it empty
Then add the location to install windows 7 and the image you select, you can find the image group, image name, file name in the WDS console.
The file file should be selected in WDS MMC, the Active Directory Prestaged Devices, or in the WDS server Properties > Client > enable unattended installation.
The answer file will like bellow:
Install with partitioning disk and formating disk<?xml version="1.0" encoding="utf-8"?> <unattend xmlns="urn:schemas-microsoft-com:unattend"> <settings pass="windowsPE"> <component name="Microsoft-Windows-Setup" publicKeyToken="31bf3856ad364e35" language="neutral" versionScope="nonSxS" processorArchitecture="x86"> <WindowsDeploymentServices> <Login> <WillShowUI>OnError</WillShowUI> <Credentials> <Username>domain_admin_user</Username> <Domain>domain_name</Domain> <Password>password</Password> </Credentials> </Login> <!-- This part use the image group name and image name on your WDS server--> <ImageSelection> <WillShowUI>OnError</WillShowUI> <InstallImage> <ImageGroup>ImageGroup1</ImageGroup> <ImageName>Windows 10 Enterprise Evaluation</ImageName> <Filename>install.wim</Filename> </InstallImage> <InstallTo> <DiskID>0</DiskID> <PartitionID>2</PartitionID> </InstallTo> </ImageSelection> </WindowsDeploymentServices> <EnableNetwork>true</EnableNetwork> </component> <component name="Microsoft-Windows-International-Core-WinPE" publicKeyToken="31bf3856ad364e35" language="neutral" versionScope="nonSxS" processorArchitecture="x86"> <SetupUILanguage> <UILanguage>en-US</UILanguage> </SetupUILanguage> <InputLocale>en-AU</InputLocale> <SystemLocale>en-AU</SystemLocale> <UILanguage>en-US</UILanguage> <UserLocale>en-AU</UserLocale> </component> <component name="Microsoft-Windows-Setup" publicKeyToken="31bf3856ad364e35" language="neutral" versionScope="nonSxS" processorArchitecture="amd64"> <!--#########start deployment service, including select image, the target partition to install######--> <WindowsDeploymentServices> <Login> <WillShowUI>OnError</WillShowUI> <Credentials> <Username>domain_admin_user</Username> <Domain>domain_name</Domain> <Password>password</Password> </Credentials> </Login> <ImageSelection> <!--The onError option make sure the silent installation, OnError is the default option--> <WillShowUI>OnError</WillShowUI> <InstallImage> <ImageGroup>ImageGroup1</ImageGroup> <ImageName>Windows 10 Enterprise Evaluation</ImageName> <Filename>install.wim</Filename> </InstallImage> <InstallTo> <DiskID>0</DiskID> <PartitionID>2</PartitionID> </InstallTo> </ImageSelection> </WindowsDeploymentServices> <!--######### deployment service end #####--> <EnableNetwork>true</EnableNetwork> <!--##########Disk partition start#####--> <DiskConfiguration> <Disk wcm:action="add" xmlns:wcm="http://schemas.microsoft.com/WMIConfig/2002/State"> <!--##########Disk partition Creation start#####--> <CreatePartitions> <CreatePartition wcm:action="add"> <Order>1</Order> <Size>100</Size> <Type>Primary</Type> </CreatePartition> <CreatePartition wcm:action="add"> <Order>2</Order> <Type>Primary</Type> <Extend>true</Extend> </CreatePartition> </CreatePartitions> <!--##########Disk partition Creation ends#####--> <!--##########Disk partition format start#####--> <ModifyPartitions> <ModifyPartition wcm:action="add"> <Active>true</Active> <Format>NTFS</Format> <Label>System Reserved</Label> <Order>1</Order> <PartitionID>1</PartitionID> </ModifyPartition> <ModifyPartition wcm:action="add"> <Active>false</Active> <Format>NTFS</Format> <PartitionID>2</PartitionID> <Order>2</Order> <Letter>C</Letter> <Label>Windows10</Label> </ModifyPartition> </ModifyPartitions> <!--##########Disk partition format ends#####--> <DiskID>0</DiskID> <WillWipeDisk>true</WillWipeDisk> </Disk> </DiskConfiguration> <!--#########disk partition ends############--> </component> <component name="Microsoft-Windows-International-Core-WinPE" publicKeyToken="31bf3856ad364e35" language="neutral" versionScope="nonSxS" processorArchitecture="amd64"> <SetupUILanguage> <UILanguage>en-US</UILanguage> </SetupUILanguage> <InputLocale>en-AU</InputLocale> <SystemLocale>en-AU</SystemLocale> <UILanguage>en-US</UILanguage> <UserLocale>en-AU</UserLocale> </component> </settings> <cpi:offlineImage cpi:source="wim:d:/wim/install.wim#Windows 10 Enterprise Evaluation" xmlns:cpi="urn:schemas-microsoft-com:cpi" /> </unattend>
Note that you may get an error messages says ” unknow property: xmlns:wcm”, just ignore it. But if you want to modify it later, you may have to manually delete the <Diskconfiguration> </diskconfiguration> part.
You can also choose to only format the disk by only use the modifypartition part, and set the willWipeDisk to false, the file will like this:
Install with only formating disk<?xml version="1.0" encoding="utf-8"?> <unattend xmlns="urn:schemas-microsoft-com:unattend"> <settings pass="windowsPE"> <component name="Microsoft-Windows-Setup" publicKeyToken="31bf3856ad364e35" language="neutral" versionScope="nonSxS" processorArchitecture="x86"> <WindowsDeploymentServices> <Login> <WillShowUI>OnError</WillShowUI> <Credentials> <Username>Domain_admin_user</Username> <Domain>domain_name</Domain> <Password>password</Password> </Credentials> </Login> <ImageSelection> <WillShowUI>OnError</WillShowUI> <InstallImage> <ImageGroup>ImageGroup1</ImageGroup> <ImageName>Windows 10 Enterprise Evaluation</ImageName> <Filename>install.wim</Filename> </InstallImage> <InstallTo> <DiskID>0</DiskID> <PartitionID>2</PartitionID> </InstallTo> </ImageSelection> </WindowsDeploymentServices> <EnableNetwork>true</EnableNetwork> </component> <component name="Microsoft-Windows-International-Core-WinPE" publicKeyToken="31bf3856ad364e35" language="neutral" versionScope="nonSxS" processorArchitecture="x86"> <SetupUILanguage> <UILanguage>en-US</UILanguage> </SetupUILanguage> <InputLocale>en-AU</InputLocale> <SystemLocale>en-AU</SystemLocale> <UILanguage>en-US</UILanguage> <UserLocale>en-AU</UserLocale> </component> <component name="Microsoft-Windows-Setup" publicKeyToken="31bf3856ad364e35" language="neutral" versionScope="nonSxS" processorArchitecture="amd64"> <WindowsDeploymentServices> <Login> <WillShowUI>OnError</WillShowUI> <Credentials> <Username>Domain_admin_user</Username> <Domain>domain_name.com</Domain> <Password>password</Password> </Credentials> </Login> <ImageSelection> <WillShowUI>OnError</WillShowUI> <InstallImage> <ImageGroup>ImageGroup1</ImageGroup> <ImageName>Windows 10 Enterprise Evaluation</ImageName> <Filename>install.wim</Filename> </InstallImage> <InstallTo> <DiskID>0</DiskID> <PartitionID>2</PartitionID> </InstallTo> </ImageSelection> </WindowsDeploymentServices> <EnableNetwork>true</EnableNetwork> <DiskConfiguration> <Disk wcm:action="add" xmlns:wcm="http://schemas.microsoft.com/WMIConfig/2002/State"> <ModifyPartitions> <ModifyPartition wcm:action="add"> <Active>true</Active> <Format>NTFS</Format> <Label>System reserved</Label> <Order>1</Order> <PartitionID>1</PartitionID> </ModifyPartition> <ModifyPartition wcm:action="add"> <PartitionID>2</PartitionID> <Order>2</Order> <Label>Windows10Part</Label> <Letter>C</Letter> <Format>NTFS</Format> <Active>false</Active> </ModifyPartition> </ModifyPartitions> <DiskID>0</DiskID> <WillWipeDisk>false</WillWipeDisk> </Disk> <WillShowUI>OnError</WillShowUI> </DiskConfiguration> </component> <component name="Microsoft-Windows-International-Core-WinPE" publicKeyToken="31bf3856ad364e35" language="neutral" versionScope="nonSxS" processorArchitecture="amd64"> <SetupUILanguage> <UILanguage>en-US</UILanguage> </SetupUILanguage> <InputLocale>en-AU</InputLocale> <SystemLocale>en-AU</SystemLocale> <UILanguage>en-US</UILanguage> <UserLocale>en-AU</UserLocale> </component> </settings> <settings pass="specialize"> <component name="Microsoft-Windows-UnattendedJoin" processorArchitecture="amd64" publicKeyToken="31bf3856ad364e35" language="neutral" versionScope="nonSxS" xmlns:wcm="http://schemas.microsoft.com/WMIConfig/2002/State" xmlns:xsi="http://www.w3.org/2001/XMLSchema-instance"> <Identification> <UnsecureJoin>true</UnsecureJoin> <JoinDomain>domain_name.com</JoinDomain> <MachineObjectOU>OU=testingOU,DC=domain_name,DC=com</MachineObjectOU> <Credentials> <Domain>domain_name.com</Domain> <Password>password</Password> <Username>Domain_admin_user</Username> </Credentials> </Identification> </component> <component name="Microsoft-Windows-Shell-Setup" processorArchitecture="amd64" publicKeyToken="31bf3856ad364e35" language="neutral" versionScope="nonSxS" xmlns:wcm="http://schemas.microsoft.com/WMIConfig/2002/State" xmlns:xsi="http://www.w3.org/2001/XMLSchema-instance"> <ComputerName>%MACHINENAME%</ComputerName> <DisableAutoDaylightTimeSet>false</DisableAutoDaylightTimeSet> <ShowPowerButtonOnStartScreen>true</ShowPowerButtonOnStartScreen> <TimeZone>AUS Eastern Standard Time</TimeZone> </component> </settings> <cpi:offlineImage cpi:source="wim:d:/wim/install.wim#Windows 10 Enterprise Evaluation" xmlns:cpi="urn:schemas-microsoft-com:cpi" /> </unattend>
https://technet.microsoft.com/en-au/library/dd744365(v=ws.10).aspx
In windows 7:
The difference is the type and the number of partition:
- Right CLick CreatePartitions, click “Insert new createpartition”, we will create a system reserved partition
- Action: AddLIstItem
- Extend: false
- order: 1
- size: 1000 , the unit is MB
- Type: primary
NOTE: Don’t worry about getting the size exact – just set it to a reasonable minimum. In the next setting, we will extend the partition to fill all remaining disk space on the drive.
- Right Click ModifyPartitions, click “Insert new Modifypartition”, we will modify the system reserved partition
- Action: AddLIstItem
- Active: true
- Extend: true, this will ignore the size we set in previous step and extend the partition to use the remainder of contiguous space on the hard disk.
- Format: NTFS
- Label: Windows7
- Letter: C
- order: 1
- PartitionID:1
- TypeID: leave it empty
Second answer file (step 3, 4)
Join domain and OOBE setting.
Domain: microsoft
OOBE file setting<?xml version="1.0" encoding="utf-8"?> <unattend xmlns="urn:schemas-microsoft-com:unattend"> <settings pass="oobeSystem"> <component name="Microsoft-Windows-International-Core" processorArchitecture="amd64" publicKeyToken="31bf3856ad364e35" language="neutral" versionScope="nonSxS" xmlns:wcm="http://schemas.microsoft.com/WMIConfig/2002/State" xmlns:xsi="http://www.w3.org/2001/XMLSchema-instance"> <InputLocale>en-AU</InputLocale> <SystemLocale>en-AU</SystemLocale> <UILanguage>en-AU</UILanguage> <UILanguageFallback>en-AU</UILanguageFallback> <UserLocale>en-AU</UserLocale> </component> <component name="Microsoft-Windows-Shell-Setup" processorArchitecture="amd64" publicKeyToken="31bf3856ad364e35" language="neutral" versionScope="nonSxS" xmlns:wcm="http://schemas.microsoft.com/WMIConfig/2002/State" xmlns:xsi="http://www.w3.org/2001/XMLSchema-instance"> <OOBE> <HideEULAPage>true</HideEULAPage> <HideLocalAccountScreen>true</HideLocalAccountScreen> <HideOEMRegistrationScreen>true</HideOEMRegistrationScreen> <HideOnlineAccountScreens>true</HideOnlineAccountScreens> <ProtectYourPC>1</ProtectYourPC> <HideWirelessSetupInOOBE>true</HideWirelessSetupInOOBE> </OOBE> <UserAccounts> <AdministratorPassword> <Value>UABAAHMAcwB3ADAAcgBkAEEAZABtAGkAbgBpAHMAdAByAGEAdABvAHIAUABhAHMAcwB3AG8AcgBkAA==</Value> <PlainText>false</PlainText> </AdministratorPassword> <LocalAccounts> <LocalAccount wcm:action="add"> <Password> <Value>UABAAHMAcwB3ADAAcgBkAFAAYQBzAHMAdwBvAHIAZAA=</Value> <PlainText>false</PlainText> </Password> <Description>local admin</Description> <DisplayName>admin</DisplayName> <Group>administrators</Group> <Name>admin</Name> </LocalAccount> </LocalAccounts> </UserAccounts> <TimeZone>AUS Eastern Standard Time</TimeZone> <DisableAutoDaylightTimeSet>false</DisableAutoDaylightTimeSet> <ShowPowerButtonOnStartScreen>true</ShowPowerButtonOnStartScreen> </component> </settings> <settings pass="specialize"> <component name="Microsoft-Windows-Shell-Setup" processorArchitecture="amd64" publicKeyToken="31bf3856ad364e35" language="neutral" versionScope="nonSxS" xmlns:wcm="http://schemas.microsoft.com/WMIConfig/2002/State" xmlns:xsi="http://www.w3.org/2001/XMLSchema-instance"> <ComputerName>%MACHINENAME%</ComputerName> <ShowPowerButtonOnStartScreen>true</ShowPowerButtonOnStartScreen> <TimeZone>AUS Eastern Standard Time</TimeZone> </component> <component name="Microsoft-Windows-UnattendedJoin" processorArchitecture="amd64" publicKeyToken="31bf3856ad364e35" language="neutral" versionScope="nonSxS" xmlns:wcm="http://schemas.microsoft.com/WMIConfig/2002/State" xmlns:xsi="http://www.w3.org/2001/XMLSchema-instance"> <Identification> <Credentials> <Domain>your_domain</Domain> //used to join domain <Password>password</Password> <Username>domain_admin_user</Username> </Credentials> <JoinDomain>domain_name</JoinDomain> <MachineObjectOU>ou=testingOU,DC=domain_name,DC=com</MachineObjectOU> </Identification> </component> </settings> <cpi:offlineImage cpi:source="wim:d:/wim/install.wim#Windows 10 Enterprise Evaluation" xmlns:cpi="urn:schemas-microsoft-com:cpi" /> </unattend>
Link this file to the image. In WDS MMC, click the server, click your wds server FQDN, Install images > the image group >right click on the image name, choose proerties > tick allow image to install in unattended mode, click select file>choose the answer file.
Or you can make it easier, configure all these in one answer file, link it both to the architechture, image, and Active Directory Prestaged Devices.
Reference:
OOBE:
Time zone: https://technet.microsoft.com/en-us/library/cc749073(v=ws.10).aspx
Automate joining domain
https://technet.microsoft.com/en-us/library/cc730845(v=ws.10)
You can also pre-set a language and specify language and locale settings in the oobeSystem configuration pass in the Microsoft-Windows-International-Core component. When you do this, the Windows Welcome language selection UI page will be skipped when the end users boot to Windows Welcome.
https://technet.microsoft.com/en-us/library/dd744569(v=ws.10).aspx
Microsoft-Windows-Shell-Setup
It contains elements and settings that control how the Windows operating system shell is installed on a destination computer.:
https://msdn.microsoft.com/en-us/windows/hardware/commercialize/customize/desktop/unattend/microsoft-windows-shell-setup
The Microsoft-Windows-International-Core component
It includes the language and input locale settings for the system and the user:
https://technet.microsoft.com/en-us/library/cc766400(v=ws.10).aspx
https://docs.microsoft.com/en-us/windows/deployment/deploy-windows-mdt/create-a-windows-10-reference-image
Build a simple answer file
https://technet.microsoft.com/en-us/library/cc749317(v=ws.10).aspx
Store the answer file on a DVD or USB to deploy automated installation
| Search Order | Location | Description | ||
|---|---|---|---|---|
|
1 |
Registry
HKEY_LOCAL_MACHINE\System\Setup\UnattendFile |
Specifies a pointer in the registry to an answer file. The answer file is not required to be named Unattend.xml. | ||
|
2 |
%WINDIR%\Panther\Unattend | The name of the answer file must be Unattend.xml or Autounattend.xml.
|
||
|
3 |
%WINDIR%\Panther | Windows Setup caches answer files to this location for use in subsequent stages of installation. For example, when a computer reboots, Setup can continue to apply the settings in an answer file. If you explicitly specify an answer file by using Windows Setup or Sysprep, the answer file cached to this directory is overwritten with the explicitly specified answer file.
|
||
|
4 |
Removable read/write media in order of drive letter, at the root of the drive. | Removable read/write media in order of drive letter, at the root of the drive.
The name of the answer file must be Unattend.xml or Autounattend.xml, and the answer file must be located at the root of the drive. |
||
|
5 |
Removable read-only media in order of drive letter, at the root of the drive. | Removable read-only media in order of drive letter, at the root of the drive.
The name of the answer file must be Unattend.xml or Autounattend.xml, and must be located at the root of the drive. |
||
|
6 |
windowsPE and offlineServicing configuration passes:
All other passes:
|
In the windowsPE and offlineServicing configuration passes, the name of the answer file must be Autounattend.xml.
For all other configuration passes, the file name must be Unattend.xml. |
||
|
7 |
%SYSTEMDRIVE% |
The answer file name must be Unattend.xml or Autounattend.xml |
 Important
Inplace upgrade from win7/8 to win10 with MDT
https://docs.microsoft.com/en-us/windows/deployment/deploy-windows-mdt/upgrade-to-windows-10-with-the-microsoft-deployment-toolkit
Problem:
1.The answer file does not wipe disk/create partition
The only way I found to get around this was to attach one unattend answer file to the prestaged client(Disk partitioning) and one to the install image. Once I attached it there, my partitions work. If I try it using an answer file attached to the image to change disk configuration, no partitioning works at all. I’m pretty sure it has to do with when the two types of answer files are applied during the whole image process, but I haven’t been able to find a straight answer on that.
I have two answer files. One attached to the architecture solely for disk configuration. One attached to the install images for the Windows Setup answers & other info.
2.Client machine does not join the domain
First of all, don’t choose the ou for the computer account although there is an option in the WDS prestaged device setup, this may result in the computer account being created but computer does not join. Let the computer go to the default folder, then you drag to the desired OU, this bug existe on windows 10 as of Aug 2017.
According to this article, you must have the UnsecureJoin setting (under the Microsoft-Windows-UnattendedJoin component) set to True and you must have the Microsoft-Windows-Shell-Setup component (even if empty) in your unattend file. Both of those must be in the specialize pass.
The downside is that because the domain join happens in the specialize pass, the computer will join the domain with a randomly generated computer name. This is because the ComputerName setting is in the OOBE pass, and is detailed in this article. The workaround is to use a script in conjunction with the FirstLogonCommands setting to join the computer to the domain after the OOBE pass.
| Unsecure join | Secure join |
|---|---|
|
This method resets the computer account to a known, shared computer password and joins the computer to a domain without credentials. For Windows Vista, Windows Server 2008, Windows 7, and Windows Server 2008 R2 images, this shared computer password is a dynamically generated, strong password that is set by Windows Deployment Services. The password is inserted into the ImageUnattend.xml file as the <MachinePassword> setting. For images from an earlier version of Windows, this shared computer password is the computer name.
To implement an unsecure join, set UnsecureJoin = TRUE and ensure that the Microsoft-Windows-Shell-Setup component exists for the specialize phase. |
This method is secure in the sense that it requires credentials (user name, domain, and password) before you can reset the account and perform the domain join. However, in practice this method is actually less secure because the credentials reside in the ImageUnattend.xml file in plain text.
To implement a secure join, add the following to the unattend file:
This method is preferred by me personally, because you can prestage a couple of PC in Active directory. remove the password after deployment to eliminate the plain text password risk. |
3. PXE-E16: No offer received.
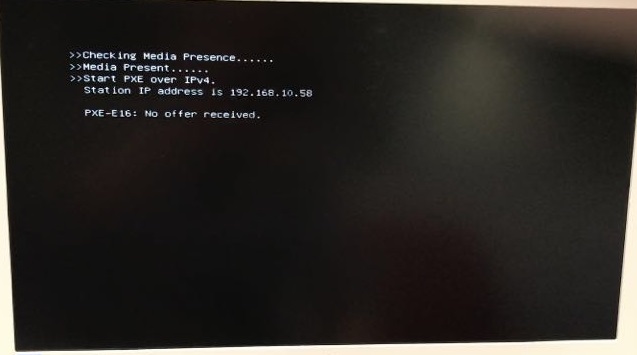
On the WDS server, disable the NetBIOS from the TCP/IP seetings – WINS tab.
Disable NETBIOS

After I disabled it, I tried again and now it works perfectly.
4. Stuck in downloading nbp file
Cause: faulty network cable…., change into a good one to resolve.
5. <DiskConfiguration> error
Open the xml file, check if there is any empty parse, such as <typeID></typeID>. Delete these empty lines will solve the issue.
6. Something went wrong on the VMware windows 10 client
Try to ignore it and test on physical machine. This error does not happen on real windows 10 client machine for me.