Standalone and Enterprise CA
Terminology
- Certificate revocation list: A list of certificates that the CA administrator has invalidated before their expiration dates. Reason maybe the private key has been compromised or is suspected for employee leaving company or so on.
- Certificate template: A shell or model of a certificate used to create new certificates.
- CRL distribution point: An attribute of a certificate that identifies where the CRL for a CA can be retrieved, can include URLs for HTTP, File, FTP, and LDAP locations.
- Delta CRL: A list of certificates revoked since the last base, or complete, CRL was published. Using Delta CRL reduces the traffic created when downloading CRLs.
- Authority Information Access(AIA): A path configured on a CA server that specifies where to find the certificate for a CA.
Standalone CA
Standalone CA is a server running Windows Server 2008 with the Active Directory Certificate Services role installed, but it has little Active Directory integration.
If your network consists of non-Windows devices, you need at least one standalone CA.
Enterprise CA
An enterprise CA is a server running Windows Server 2008 with the Active Directory Certificate Services role installed. Enterprise CAs integrate with Active Directory and offer several advantages to the PKI running in a domain environment.
The primary purpose of AD CS is to enhance the security of internal communication. If you want to secure Web Servers and Internet Email, you need a well-known external third-party CA.
When do you decide to use a certificate authority (CA) server on your own network?This is a complicated question, but I will share some points that I have learned along the road about when it makes sense to install a local certificate authority. In many situations, people deploy the Windows Active Directory Certificate Services role. Having centralized management with Group Policy is a requirement to scale the reach of the policies to many users and computers. One trick is to deploy certificates through Group Policy, which is especially helpful with device certificates.
One of the best examples is to configure a wireless network to require a computer (or device) certificate for access. This removes the risk of passing around passwords for accessing wireless networks. This would be applicable for organizations wishing to provide wireless access in an office setting to designated systems, instead of providing public access or using passwords.
Having a CA in place can also address the friendly reminders from Internet Explorer’s certificate warning messages. If the local CA certificates are trusted on the domain, replacing self-signed certificates can make a much more pleasant experience for internal users.
A certificate can also be the second factor for VPN access. If the VPN access policy checks for the device certificate on the computer in question, then that can be the additional factor outside of a username and password. Having multifactor authentication, of course, is much more secure than simply using a username and password (single factor), and having the computer certificate managed by authoritative policy allows additional protection.
Installing a CA won’t help in every situation, however. Any external-facing systems won’t benefit from using the certificates created with the internal solution, even if they are located on the internal network and serve content to the external networks. This can include Web services or anything that uses secure socket layer (SSL) communication.
| Stand-alone CA server | Enterprise CA server |
| AD not required | AD required, server must be a member server or domain controller |
| Can operate offline | Must operate online |
| Certificate requests must be approved manually | Certificate requets approved manually or automatically by using AD infomation |
| No Certification templates available | Certificate templates available |
| Certificates not published in AD | Certificate published in AD |
| Requester must enter identifying information in certificate request manually | Identifying information taken from AD |
| CA’s certificate distributed to clients manually | CA’s certificate distributed to clients automatically |
| CRL optionally published to Active directory | CRL published automatically to AD |
Online and offline CAs
A CA server is a critical component in a network’s security.
An offline CA isn’t connected to the network, which make it less vulnerable to attacks, but all certificates and CRLs must be distributed with removable media.
Root CA is the most critical and is the server typically configured for offline operation. An offline CA must also be a stand-alone CA. The root CA issues certificates only to CAs in the next level of hierarchy that can be accommodated by using removable media.
CA hierarchy
The root CA is the first CA installed in a network. If it’s an enterprise CA, its certificate is distributed to clients automatically via Group Policy. If it’s a stand-alone CA, manual configuration of group policies is required to distribute its certificate.
After clients are configured to trust the root CA’s certificate, they also trust the certificate of any CA that’s subordinate to the root.The root CA needs to grant issuing certificates only to subordinate CAs, which are trusted by the clients they issue access certificates to.
- Two level hierarchy include root CA and issuing CA.
Issuing CAs interact with clients to field cerificate requests and maintain the CRL.
- Threee level hierarchy is a common configuration and offers the most security. show as follow:

The Root CA issue certificates to intermediate CAs ( or Policy CAs), authorizing them to issue certificates to other CAs. The root CA and intermediate CAs can be stand-alone and operate in offline mode.
Certificate practice statement(CPS):
A document describing how a CA issues certificates. A CPS is not a required component of a PKI, but it should be developed as part of the planning process. The document is usually published on the Internet and every certificate the CA issues has a URL pointing to the CPS.
The CPS is installed by creating a CAPolicy.inf file and placing the file in the CA server’s %systemroot% directory before the AD CS role is installed.
Database path (default) : %systemroot%\system32\CertLog
Install the AD CS role
When you install Active Directory Certifcate Services there are four role services that can be implemented (you can install a combination of these):
• Certifcate Authority—Enables you to install a root or subordinate CA.
• Certification Authority Web Enrollment—Enables organizations to use digital certifcates for Web users who are not part of the organization’s domain and who have access to network resources through the Web (Internet and intranet access) and so are not directly authenticated through the network. This includes non-Microsoft operating systems such as Linux. Such users can request digital certifcates, which authorize them to use the Web resources.
• Online Responder—Enables the determination of the status of a user or device through the OCSP (Online Certifcate Status Protocol). This service is useful when using certifcate revocation lists (CRLs) creates too much overhead on a busy network. CRLs are sent out at
intervals and contain the full list of entities whose certifcates have been revoked, thus creating some network overhead. Online responder uses OCSP to check the status of only one client, which can improve the effciency of a network. It also enables quick identifcation of the status of a suspicious network user.
• Network Device Enrollment service —Enables routers and switches to enroll for certifcates from a CA.
Best practices dictate that the AD CS role should not be installed on a domain controller. AD CS should probably be the only role installed on the server. In win2008, the CA must be installed on a member server enterprise or datacenter edition.
Active directory certificate services step by step guide: https://technet.microsoft.com/en-us/library/cc772393%28v=ws.10%29.aspx
In the step to configure AD CS, one is “configure cryptography for CA”

• Select a cryptographic service provider (CSP)—This list box displays the CSPs already configured in Windows Server 2008. A CSP is a library of algorithms that perform cryptographic functions, such as creating hashes and encrypting and decrypting data.
• Key character length—This text box defines the number of bits that make up keys used in the cryptography algorithms. Generally, the longer the key, the more difficult it is to crack. However, longer keys also take more CPU resources to perform cryptographic functions.
• Select the hash algorithm for signing certificates issued by this CA—A hash algorithm is a mathematical function that takes a string of data as input and produces a fixed-size value as output. Hash values are used to verify that the original data hasn’t been changed and to sign the CA certificate and certificates issued by the CA.
• Use strong private key protection features provided by the CSP—If this check box is selected, cryptographic operations require the administrator to enter a password, which helps prevent unauthorized use of the CA and its private key.
After installation, use command certutil -viewstore to view the certificates saved on the local machine. click the certificate you would like to see, then click “click here to view certificate properties”.
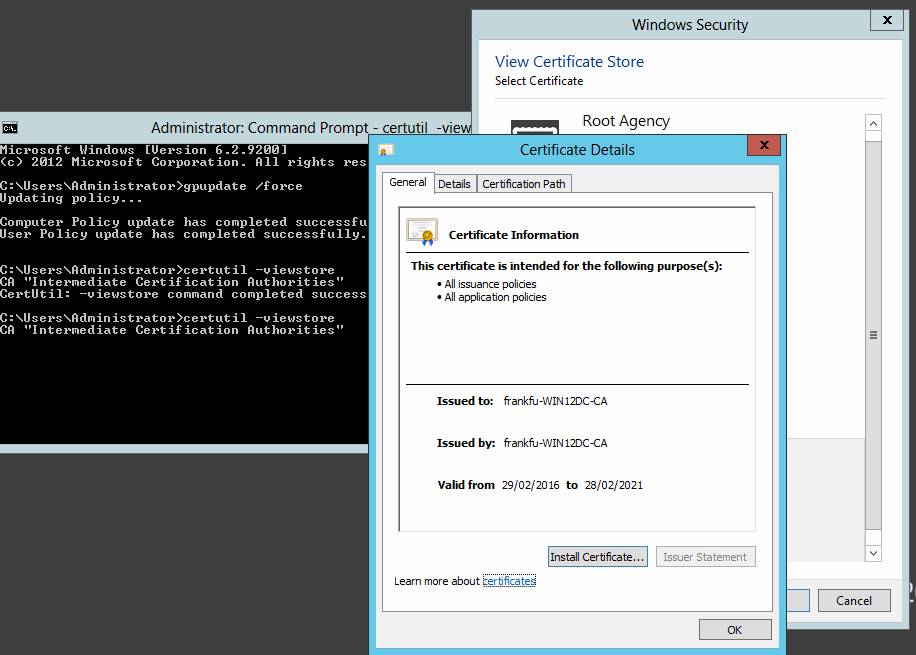
The issuer statement button is grayed out. If you publish a CPS, this button will becomes active and links to your CPS. click the detail tab, there are more information:
• Version—This field specifies the version of the X.509 standard the certificate uses. X.509 is an international standard that defines many aspects of a PKI, including certificate formats
• Signature algorithm—The hash algorithm used to sign the certificate.
• Issuer—The CA that issued the certificate. In this case, the certificate is self-signed, as all root CA certificates are.
• Subject—The device, computer, user, or other entity that has been issued the certificate. In this case, it’s the CA itself.
• Public key—Defines the algorithm and bit length for the public key.
• Key usage (not shown in the figure)—Specifies the purposes for which the certificate can be used. Examples are digital signature and certificate signing.
Configure a certification Authority
Configure a certificate templates
Three versions of templates
• Version 1 templates—Provided for backward compatibility; Windows Server 2003 Standard Edition and Windows 2000 Server support only version 1 templates. These templates can’t be modified or removed, and autoenrollment is not an option. Windows Server 2008 includes several version 1 templates. You can duplicate these templates, and then they’re converted to version 2 or 3 templates, which can be modified.
• Version 2 templates—Allow customization of most certificate settings and permit autoenrollment. They are supported by Windows Server 2003 Enterprise Edition and later.
• Version 3 templates—Provide advanced cryptographic functions; they can be issued only from Windows Server 2008 enterprise CAs and can be used only on Windows Server 2008 and Vista clients.
To issue Version 1 certs, you can use GPO to let computer request for this. Go to Computer Config–>Windows Settings–>Security Settings–>Public Key Policies–>Automatic Certificate Request Settings, those are only V1 capable.
If you are using custom V2 and V3, you have to do those through the options listed under Public Key Policies–>Certificate Services Client- Cert Enrollment Policy and Certificate Services Client- Auto-Enrollment. MS makes it confusing.
The recommended way to modify the template is to duplicate it first and then modify the duplicated one.
On 2008, in Server Manager, click Roles and then Active Directory Certificate services . Click Certificate Templates to list the available templates in the right pane.right-click the Certificate name and choose Duplicate Template.
On 2012, if you right click the certificate name, there is no Duplicate template. You right click on a blank area, choose manage to open Ceritificate Templates Console, then right click on the certificate name and choose duplicate template.
Note the following Tabs:
- General tab:
• Template display name/Template name—By default, these two fields have the same value, but they can be different. However, after the template has been created, you can’t change either name.
• Validity period—The length of time the certificate is valid if it’s not renewed.
• Renewal period—The time window before a certificate’s validity period expires in which the certificate can be renewed. For example, if a certificate is issued January 1, 2009 and has a validity period of 1 year and a renewal period of 1 month, the certificate can be renewed any time between December 1, 2009 and January 1, 2010. After a certificate is renewed, it’s valid for another length of time specified by the validity period.
• Publish certificate in Active Directory—When this check box is selected, information about the template is available throughout the network.
• Do not automatically reenroll if a duplicate certificate exists in Active Directory—When this check box is selected, if a Windows XP or later computer makes an enrollment request, a new enrollment request isn’t made if a duplicate certificate already exists in Active Directory. Certificates can be renewed, but duplicate certificates aren’t issued. - Superseded Templates tab: Certificate issued by this template supersede certificates issued by all templates added to this list.
example: if your duplicated template is named as EFS-2012 and you want it to replace the Basic EFS. Click Add, click Basic EFS in the Certificate templates list box, and then click OK. Now when a request for an EFS certificate is made, only the new EFS-2012 certificate is used. - Compatibility tab: Settings here may affect the settings in other tab. if you choose the “Windows XP/windows server 2003” in Certificate recipient option, then the For automatic renewal of smart card certificates, use the existing key if a new key cannot be created in the Request Handling tab will be inactive.
- Request Handling tab: Click the Purpose list arrow to view the options for certificates created with this template.
• For automatic renewal of smart card certificates, use the existing key if a new key cannot be created—When this check box is selected, this option helps prevent smart card renewal failures if a smart card is out of storage space for a new key.
• Do the following when the subject is enrolled and when the private key associated with this certificate is used:
1, Enroll subject without requiring any user input—This option is required for autoenrollment of computers and services. You can also select it if you want user autoenrollment to occur in the background without user interaction.
2, Prompt the user during enrollment—Users must respond to prompts during autoenrollment.
3, Prompt the user during enrollment and require user input when the private key is used-Users must enter a password during autoenrollment and each time their private keys are used. This option is the most secure but least user friendly. - Issuance Requirements:
• CA certificate manage approval—If selected, a CA manager must approve the certificate request before it’s issued.
• This number of authorized signatures—If enabled and the number of signatures is more than zero, certificate enrollment requests must be signed with a digital signature. If more than one signature is required, autoenrollment is disabled.
• Require the following for reenrollment—Two options are available. If “Same criteria as for enrollment” is selected, users must use the same process for renewal that’s required for initial enrollment. If “Valid existing certificate” is selected, renewal is automatic as long as the current certificate is valid. - Security Tab: By default, Domain Users group members have the Enroll permission. The Autoenroll permission must be set for users in the domain to autoenroll in the certificate.
Configure Cerficate Autoenrollment
When autoenrollment is configured, users and devices don’t have to make explicit certificate requests to be issued certificates.
Autoenrollment options are configured through group policies and the certificate template.
Steps to configure autoenrollment after you have installed an issuing CA:
1. Create a certificate template.
2. Set options as needed in the Issuance Requirements and Request Handling tabs of the Properties dialog box.
3. Configure the template to allow autoenrollment by setting the Autoenroll permission for the users or groups who should autoenroll for the certificate: configure the Security tab: click the domain users, then check the Autoenroll.
4. Configure the Certificate Services Client – Auto-Enrollment policy.
5. Make sure the Autoenrollment is enabled.
6. Add the template to the Certificate Templates folder under the CA server node.
Each step is illustrated bellow:
Step 1.
Create a certificate template.
Step 2.
Auto enrollment is configured for “certificate templates MMC snap-in” in the Request Handling, issuance requirements, and security tabs.
1. Request handling
- Enroll subject without requiring any user input : This option is required for autoenrollment fo computers and services. You can also select it if you want user autoenrollment to occur in the background without user interaction.
- Prompt the user during enrollment: Users must respond to prompts during autoenrollment.
- Prompt the user during enrollment and require user input when the private key is used: users must enter a password during auto enrollment and each time their private keys are used. ( most secure but least user friendly)
2. The issuance requirements tab has options for specificying enrollment requirements for certificates issued from the template:
- CA certificate manager approval : if enabled, a CA manager must approve the certificate request before it’s issued.
- This number of authorized signatures: if enabled and the number of signatures is more than zero, certificate enrollment requests must be signed with a digital signature. If more than one signature is required, autoenrollment is disabled.
- Require the following for reenrollment: Two options: if “Same criteria as for enrollment” is selected, users must use the same process for renewal that’s required for initial enrollment. If ” Valid existing certificate” is selected, renewal is automatic as long as the current certificate is valid.
3. (Step 3). Security tab: similar to the other security tab in most AD objects. Domain users goup members have the Enroll permission.

Step 4. Group Policy
Computer configuration/User configuration > Policies > Windows Settings >Security settings > Public Key Policies
The Certificate Services Client -Auto-Enrollment policy.
To configure autoenrollment Group Policy for a domain
- On a domain controller running Windows Server 2008 R2 or Windows Server 2008, click Start, point to Administrative Tools, and then click Group Policy Management.
- In the console tree, double-click Group Policy Objects in the forest and domain containing the Default Domain Policy Group Policy object (GPO) that you want to edit.
- Right-click the Default Domain Policy GPO, and then click Edit.
- In the Group Policy Management Console (GPMC), go to User Configuration, Windows Settings, Security Settings, and then click Public Key Policies.
- Double-click Certificate Services Client – Auto-Enrollment.
- Select the Enroll certificates automatically check box to enable autoenrollment. If you want to block autoenrollment from occurring, select the Do not enroll certificates automatically check box.
- If you are enabling certificate autoenrollment, you can select the following check boxes:
- Renew expired certificates, update pending certificates, and remove revoked certificates enables autoenrollment for certificate renewal, issuance of pending certificate requests, and the automatic removal of revoked certificates from a user’s certificate store.
- Update certificates that use certificate templates enables autoenrollment for issuance of certificates that supersede issued certificates.
- Click OK to accept your changes.
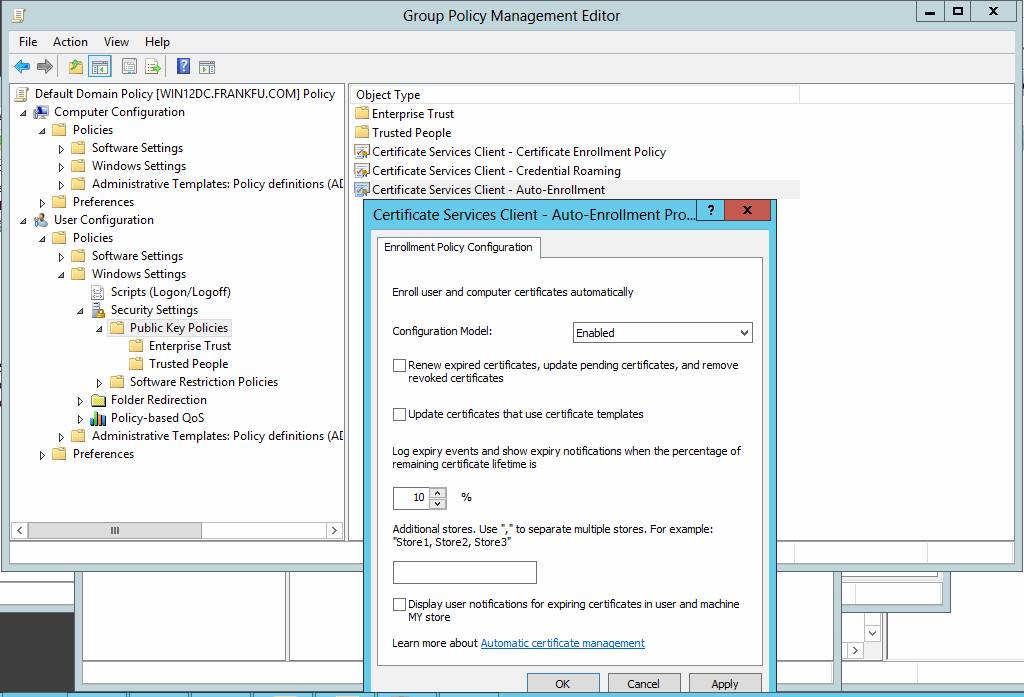
- Configuration Model—Options are Enabled, Disabled, and Not configured. If Enabled is selected, the Active Directory objects affected by the policy can autoenroll for certificates.
- Renew expired certificates, update pending certificates, and remove revoked certificates When this check box is selected, autoenrollment is extended so that certificates are renewed, updated, and removed (for revoked certificates) automatically.
- Update certificates that use certificate templates—When this check box is selected, certificates created with a certificate template can be updated through autoenrollment if the template changes.
- Log Expiry events and show expiry notification when the percentage of remaining certificate lift time is: Determines how much time can be left on a certificate’s lifetime before a notification is issued and an event is logged.
- Additional stores : speficy additional certificate stores that should be monitored for certificate expiration. The default store is
CurrentUser\My and LocalMachine\My stores.
Step 5. open Certification Authority MMC
Right click on the CA name(eg. frankfu-win12DC-CA, choose properties , then go to Policy Module tab, click the Properties, choose the “Follow the settings in the certificate template, if applicable. Otherwise, issue the certificate automatically.” This option enables the CA to autoenroll applicable templates, and this is the default option.So, normally there is no need to change it unless you want to disallow autoenrollment.
The other options ” Set the certificate request status to pending” accepts certificate requests but requries an administrator to issue the certificate manually in the certificate MMC.
Step 6.
Click the CA server node in certification Authority (frankfu-win12DC-CA), and then double-click the Certificate Templates folder. The listed templates represent the certificates this CA can issue. Right-click the Certificate Templates folder, point to New, and click Certificate Template to Issue. In the Enable Certificate Templates dialog box, click EFS-2008, and then click OK. Your CA is now ready to issue EFS certificates through autoenrollment.
How to set up auto enrol: http://www.vkernel.ro/blog/set-up-automatic-certificate-enrollment-autoenroll
Request a certificate with the certificate Snap-in
This is the manual enrollment.
To do so, make sure you’re logged on to the domain. Then right-click the Certificates folder under the Personal folder, point to All Tasks, and click Request New Certificate to start the Certificate Enrollment Wizard.
The Request Certificates window lists the certificates available with this method. If you click the “Show all templates” check box, other templates are listed but have a status of Unavailable.
Web Enrolment
Web enrollment is the main method for accessing CA services on a standalone CA because, as mentioned previously, autoenrollment and the Certificates snap-in can be used only with enterprise CAs.
To access the Certification Authority Web Enrollment role service, users simply open a browser and go to http://CAServer.domain/certsrv; CAServer is the name of the CA server, and domain is the domain name. For example, if your server name is win12dc, domain name is ABC.com, then input win12dc.ABC.com/certsrv.
The server with the Web Enrollment role service installed can be, but need not be, the CA server. A server configured for Web enrollment is called a registration authority or a CA Web proxy.
Steps to configure Web Enrolment:
First make sure you have installed Certification Authority Web Enrollment, IIS role service will also be installed.
1. IIS must have a Web Server Certificate. To request one, click Start, point to Administrative Tools, and click Internet Information Services (IIS) Manager.
2. In the left pane of IIS Manager, click the Server1XX node. In the middle pane, double-click Server Certificates.
3. In the Actions pane, click Create Domain Certificate to start the Create Certificate Wizard.
In the Distinguished Name Properties window, fill in the following information:
• Common name: server1XX.yourdomainname.com
• Organization: Your name
• Organizational unit: Your name
• City/locality: Your city
• State/province: Your state or province
• Country/region: Your country
4. Click Next. In the Online Certification Authority window, click Select, click The Authority you created before , and then click OK. In the Friendly name text box, type a name you like, eg server1xx.frankfu.com, and then click Finish.
5. In the left pane of IIS Manager, click the Sites node. Right-click Default Web Site and click “Edit Bindings…”.
6. In the Site Bindings dialog box, click Add.
7. In the Add Site Binding dialog box, click the Type list arrow and click https. Click the SSL certificate list arrow, click server1xx.frankfu.com, and then click OK. Click Close.
8. In the left pane of IIS Manager, click to expand Sites and Default Web Site, and then click CertSrv. In the middle pane, double-click SSL Settings. In the SSL Settings dialog box, click Require SSL. Notice the options under Client certificates. You can have the Web server ignore, accept, or require client certificates. If you want client computers to connect to the Web server to verify their identity, you would select Require. For now, leave the default Ignore selected.
9. Click Apply in the Actions pane, and then close IIS Manager.
To test your configuration,
1. log on to the domain from your Client computer. Open Internet Explorer, type https://server1XX.yourdomainname.com/certsrv in the Address text box, and press Enter. When prompted for a username and password, log on as salesperson1 with the UPN (salesperson1@yourdomainname.com) or yourdomainname\salesperson1 syntax.
The Web enrollment home page opens.
2. Click the Request a certificate link, and then click User Certificate. The User-Certificate -Identifying Information window is displayed, which informs you that no more information is required. However, you must install an ActiveX control, as indicated by the yellow information bar.
3. Click the yellow information bar at the top of the Web page and click Run ActiveX Control.
Click Run, click Allow, and then click Submit. (If you get an error message stating that the CA Web site must be configured to use HTTPS authentication, add the CA Web site to the Trusted Sites list in Internet Explorer.)
4. When asked whether you want to request a certificate now, click Yes. Click Allow in the Internet Explorer Security message box.
5. In the Certificate Issued window, click Install this certificate. In the Web Access Confirmation message box, click Yes. You see a message indicating the certificate has been installed.
Network device Enrollment service
Network Device Enrollment Service (NDES) allows network devices, such as routers and switches, to obtain certificates by using Simple Certificate
Enrollment Protocol (SCEP), a Cisco proprietary protocol. With this protocol, Cisco internetworking devices can request and obtain certificates to run IPSec, even if they don’t have domain credentials. The procedure for installing and configuring NDES involves the following steps:
1.Create a user for NDES and add it to the IIS_USRS group.
2.Configure a certificate template with enroll permissions assigned to the NDES user.
3.Install the NDES role service.
4.Create a public/private key pair, using the network device’s OS to enroll.
5.Forward the key pair to the registration authority on the server hosting NDES.
6.Submit a certificate request from the device to the NDES server.
Smart card enrollment
Smart cards are used to enhance security. Users can log on to a network by presenting the card to a station with a card reader and entering their PINs, much like using an ATM card. A user designated as an enrollment agent can enroll smart card certificates on behalf of users to simplify the process. However, enrollment agents can enroll on behalf of any user, including administrators, which could pose a security risk.
To mitigate the security concerns, Windows Server offers restricted enrollment agents. With this feature, administrators can configure smart card certificate templates to specify which users or groups an enrollment agent can enroll in the certificate. To do this, use the Restrict enrollment agents option in the Enrollment Agents tab of the CA server’s Properties dialog box. By default, enrollment agents are not restricted.
Configure the Online Responder
An online responder (OR) enables clients to check a certificate’s revocation status without having to download the CRL. To use an OR, you install the Online Responder role service when you install the CA role or later. You can install this role service on the same server as the CA role or a different server, and it requires the Web Server role service.
After the OR role service is installed, it must be configured with these steps:
1. Configure an OCSP Response Signing certificate template. This certificate is used to sign the response the OR provides to certificate revocation queries. (OCSP stands for Online Certificate Status Protocol.)
2. Configure the CA to support the online responder. An Authority Information Access (AIA) extension is configured on a CA to indicate the OR’s location.
3. Add the OCSP Response Signing Certificate template to the CA, and enroll the OR with this certificate.
4. Configure revocation for the OR, including the settings required for the OR to reply to certificate status requests.
Detailed steps:
1. In server manager, click the notification flag, and click the Configure active directory certificate service on the destination server link. The AD CS configuration starts, click next,then check the Online responder, then click next, then click configure, wait for completion and click close.
2. Open the Certification Authority console, expand the server node, Right click Certificate Templates and click manage. right-click the OCSP Response Signing template and click Duplicate Template.
3. In the General tab of New Template dialog box, type OCSP-2012 in the Template display name text box, and then click the Publish certificate in Active Directory check box.
4. Click the Security tab, and then click the Add button. In the Select Users, Computers, or Groups dialog box, click Object Types. Click the Computers check box, and then click OK. Type server1XX and click Check Names. Click OK.
5. Click the Enroll and Autoenroll permissions in the Allow column, and then click OK.
6. The next step is to add the template to the CA. In the left pane of Server Manager, click the CA server node. Right-click Certificate Templates, point to New, and click Certificate Template to Issue.
7. In the Enable Certificate Templates list box, click OCSP-2012, and then click OK.
8. Next, you must inform the CA of the online responder’s location. Right-click the CA server node and click Properties. Click the Extensions tab. Click the Select extension list arrow, and then click Authority Information Access (AIA).
9.In the “Specify locations from which users can obtain the certificate for this CA” list box, click the entry starting with http. Click the Include in the online certificate status protocol (OCSP) extension check box, and then click OK.
10. When you’re prompted to restart Active Directory Certificate Services, click Yes.
11. Now the OR server (Server1XX, in this case) must enroll in the signing certificate you configured earlier in this activity. You can do this by restarting the server or requesting it manually. The next activity goes through the steps to request the certificate manually so that the server doesn’t have to be restarted.
Revocation configuration
A revocation configuration tells the CA what methods are available for clients to access CRLs. To create a revocation configuration, you use the Active Directory Certificate Services snap-in, under the Roles node in Server Manager.
Almost finished configuring the online responder. The last task is creating the revocation configuration so that the CA can direct clients where and how to get their CRL.
1. open Server Manager.
2. click the tools, then click Online Responder Management. Right-click Revocation Configuration and click Add Revocation Configuration. In the Add Revocation Configuration Wizard’s welcome window, click Next.
3. In the Name the Revocation Configuration window, type ORServer1XX in the Name text box. The name should describe the online responder function and include the server name. Click Next.
4. In the Select CA Certificate Location window, leave the default selection of Select a certificate for an Existing enterprise CA, and then click Next.
5. In the Choose CA Certificate window, click Browse next to the Browse CA certificates published in Active Directory text box. The Select Certification Authority message box opens. Because there’s only one choice, click OK. The Online Responder Signing certificate is loaded automatically. Click Next.
6. In the Select Signing Certificate window , accept the defaults, and then click Next.
7. In the Revocation Provider window, click the Provider button. Select the entry beginning with “http,” if necessary, and then click Edit. Copy the path listed; you use it in the next step. Click Cancel.
8. Under the Delta CRLs text box, click Add. In the Add/Edit URL text box, type
http://server1XX.domainname.com/CertEnroll/w2k8adXX-SERVER1XX-CA.crl (or paste the path you copied in Step 7), and then click OK twice. In the wizard’s final window, click Finish.