Dynamic Access control gives administrators another method for securing access to files that’s more powerful than file and folder permissions based simply on group membership. Administrators can control file access by using complex criteria that can include file classification and user attributes.
For example, you can create a classification tag “Department” and give it value “Marketing”, then change the user’s organization to Marketing. You can make an DAC to state that ” Users with Department attribute set to Marketing have Modify access to all files belonging to the Marketing department.”, other users have read access.
The department and Title attributes are set in the Organization tab of the user account’s Properties dialog box.
Two way to configure DAC: manually or group policy.
Manually by setting up the DAC infrastructure and set permission condition
The domain functional level must be win2012 or higher, client must be windows 8 or later.
- User claims Active Directory attributes that are associated with a specific user.
- Device claims Active Directory attributes that are associated with a specific computer object.
- Resource attributes Global resource properties that are marked for use in authorization decisions and published in Active Directory. They are managed in Active Directory Administrative Center.
Claims make it possible for administrators to make precise organization- or enterprise-wide statements about users, devices, and resources that can be incorporated in expressions, rules, and policies.
Claim types: A claim type is a property of a user or computer used in a claim. E.g. a user account can use the value of its Job Title field in a claim to access an object that has an access condition set, such as “users with Title=Executive have read access “.
File Classification: this is not the required component of DAC, but it can make the DAC so powerful.
Central access policies: Central access policies consist of one or more central access rules and are used to configure resource permissions with group policies.
Central access rules : It set permissions on targeted resources and are deployed through central access policies. They can contain DAC permissions and regular NTFS permissions based on user accounts and group membership.
Conditional expressions are an enhancement to access control management that allow or deny access to resources only when certain conditions are met, for example, group membership, location, or the security state of the device. Expressions are managed through the Advanced Security Settings dialog box of the ACL Editor or the Central Access Rule Editor in the Active Directory Administrative Center (ADAC).
Expressions help administrators manage access to sensitive resources with flexible conditions in increasingly complex business environments.
Following figure displays the relationship of the terms above.

Steps:
1. Configure Resource Properties
a ) . In ADAC click Dynamic Access Control and double-click Resource Properties. You can see several pre-defined resource properties, which are disabled by default.
You can enable existing resource properties or create your own if none fit your needs. When you create a new one, you need following information:
- Display name.
- Value Type: available are Date time, Multi-valued choice, multi-valued text, ordered list, single-valued choice, text, and yes/no.
- Description
- Is used for authorization: if enabled, resource property can be used to determine access to a resource. If disabled, the resource property can not be used for authorization.
- suggested values: You can populate the resource property with a list of suggested values. If the resource property is named Business Unit, for instance, you can add suggested values such as office products, software, publishing and so forth. Not all value types can have suggested values.
b ). Resource properties must be a member of a resource property list for servers to download and use them.
To access resource property lists in ADAC, click dynamic access control and double click resource property lists. The Global resource Property list is defined by default and contains all resource properties. You can create new list and categorize resource properties for easier management.
c ). To specify which resource property list (other than Global Resource Property List) your servers should download, configure the Group policy.
If you don’t need to create new property list, you can skip this step, because all file servers with FSRM installed download resource properties from the Global Resource Property List.
Under computer configuration, Policies, Administrative templates, system, File Classification Infrastructure, configure the ” File Classification infrastructure: Specifiy classification properties list” policy. Then link the GPO to the OU that containing the server computer accounts.
Run the Update-FSRMClassificationPropertyDefinition PowerShell cmdlet on your file server.
2. Classifying files:
Always keep in mind that this is a feature on the file server, not on client machine.
check here: http://frankfu.click/microsoft/windows-2012/70-412-configure-advanced-winserver-2012r2/configure-advanced-file-services/
3. Configure claims:
Purpose: use account attributes in permission management.
Where: in ADAC, click Dynamic access control, then double click claim types. To create a cliam type, click New in tasks pane and click claim type. In the claim type window, click the attribute name. Eg. department, title, if you want to use these name as the criteria to manage files.
4. Configure Group Policy for claim support
a ). Let the DCs running win2012/R2 support claims and resource properties in file and folder permission conditions. Open GPO management editor, navigate to Computer Configuration, Policies, Administrative Templates, System, KDC. Open the policy named ” KDC support for claims, compound authentication and Kerberos armoring” and enable it.
b ). Let the client computers have claims support enabled: Computer Configuration, Policies, Administrative Templates, System, Kerberos, enable the policy “Kerberos client support for claims, compound authentication and Kerberos armoring“. The GPO must be linked to the domain or OU that contain the client computer account.
5. Setting Permission conditions
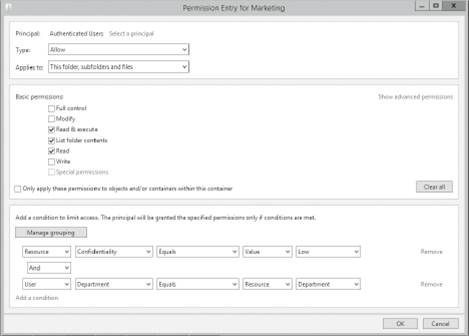
First share the resource folder, give full sharing permission ; give Administrator and local Administrator group full control NTFS permissions.
Next, set permission conditions. First , Click select a principal and add Authenticated Users, then give it the desired permission in the Basic permission section.
Now its time the set the condition: Use e. g. If the resource’s ” property >Classification > Confidentiality” has a value of Low and the User’s Department attribute equals to the resource’s “property >Classification >department” value, grant him/her read and execute permission.
Verify:
go to client computer, type whoami /claims
Use Group Policy with Central access Policies (CAP)
Central access policies consist of one or more central access rules, which containing both DAC and regular permissions. The central access rules in central access policies can be targeted at resources meeting specific criteria.
The difference between setting permissions conditions on folders manually and setting permission condition by central access policy:
- When you set manually, they act like NTFS with added conditions.
- When you use CAP, NTFS permissions are evaluated first, then permissions set with a CAP are evaluated. Of the two, most restrictive one wins. Therefore, when you using CAPs to deploy premissions, make sure the existing NTFS permissions are less restrictive, or else the CAPs may void. One way is set a baseline : Give authenticated users with Modify permission, and then further restrict access with CAP.
Deploy central access policies
Step1. Create one or more central access rules in the ADAC.
Step2. create a central access policy, and add one or more central access rules to the policy.
Step3. Deploy the central access policy with the Group policy tool.
Details:
Step1. In the ADAC, double-click Dynamic Access Control, and then double click Central Access Rules, then set following properties:
- Name: Specify a name of the central access fule.
- Description
- Target Resource: Specify the criteria to limit the rule’s scope, so that it affects only files with certain properties.
- CurrentPermissions: Specify the permissions that should be applied to the targeted resources, just as you do in the Advanced Security Settings dialog box for a folder or file. “use following permissions as proposed permissions”: does not actually apply permissions to the targetd resources but allows you to audit access to the resource as though the permissions were applied. This option enables you to test what-if settings with your permission stategy without causing access problems.
Step2. Create additional rules as needed, then create a central access policy, in the ADAC, click Dynamic Access control, then double-click central access policies, which has following properties:
- Name: specify the name of the central access policy.
- Description
- Member central access rules: Add the central access rules that should be deployed with this policy. A central access fule can be a member of more than one central access policy.
Step3. After creating rules and adding them to the policies. deploy them with GP:
Computer configuration> Policies > Windows Settings > Security Settings > File system. Right-click the Central Access Policy and click Manage Central Access Policies , then add the policies you want.
To deploy different central access policies to different servers, link GPO to different OUs.
Access-denied remediation
For uses who are denied access to files they need to perform their jobs, windows 2012 uses Access-denied assistance to help solve problem with file and folder access.
Access-denied assistance has following options:
- Customize the access-denied messages.
- Users can send email message to responsible file owner or an Administrator to request access to a resource.
- Administrators can create a distribution list for shared folders so that the folder owner is notified via E-mail
Configuration
1. Open the FRSM on the file server.
2. Righclick File server resource manager and click Configure Options.
3. Click the Access-Denied Assistance Tab. Click the “enable Access-denied assistance”.
4. In the message box, customize the message according to you situation. You can also include macros:
→ [Original File Path] : the path to the file on the server.
→ [Original File Path Folder] : the parent folder of the file, if applicable
→[admin email] : Configured in the Email Notification tab.
→[Data Owner email] : The email address of the person who owns the file
5. To allow users to request assistance or access to a folder, click the “configure Email requests” button, and then click “enable users to request assistance” check box. Then choose the info you want to include in the mail.
6. After Access-denied assistance is configured, you will see a message like bellow if you don’t have permission.
Deploy by group policy
You can enable Access-Denied Assistance either on a per-server basis or centrally via Group Policy.
Create a new GPO and make sure to target the GPO at your file servers’ Active Directory computer accounts as well as those of your AD client computers. In the Group Policy Object Editor, we are looking for the following path to configure Access-Denied Assistance:
\Computer Configuration\Policies\Administrative Templates\System\Access-Denied Assistance
- Customize message for Access Denied errors , enables us to create the actual message box shown to users when they access a shared file to which their user account has no access.
- Enable access-denied assistance on client for all file types policy should be enabled to force client computers to participate in Access-Denied Assistance. Again, you must make sure to target your GPO scope accordingly to “hit” your domain workstations as well as your Windows Server 2012 file servers.
Reference