BranchCache
Branch offices typically have slow connectivity to the central office and typically have limited infrastructure for security servers. When users access files over the slower WAN links, there might be a delay when opening files and when opening large files or many files at the same time, which can cause other programs to be slow or delayed. When using BranchCache, you are essentially creating a WAN accelerator where information is cached on branch computers or local servers. If the document is cached, it is accessed from the local branch office rather than going across a slower WAN link.
BranchCache supports the following protocols:
• HTTP or HTTPS
• SMB, including signed SMB traffic
• Background Intelligent Transfer Service (BITS)
BranchCache supports IPv4, IPv6, and end-to-end encryption methods such as SSL and IPsec.
BrancheCache can operate in one of two modes:
• Hosted cache mode
The hosted cache mode uses one or more dedicated servers to host the cache. If the content is not available in the hosted cache, the content will be retrieved over the WAN link and added to the hosted cache so that clients requesting the same content in the future will benefit. By default, BranchCache allocates five percent of the disk space on the active partition for hosting cache data. However, this size can be changed by using Group Policy or the netsh branchcache set cachesize command.
Benefits of Hosted cache mode: Hosted cache mode is best for branch offices that already have servers performing other functions, such as DC or DHCP server.
Advantages:
→ Increased availability of cached files
→Support for multiple subnets. Distributed cache mode works only in a single subnet, hosted cache mode works across subnets.
• Distributed cache mode
Distributed cache mode has the cache distributed among the local Windows 7 or later clients at the local site. Content on an individual client is shared with the other clients at the site. Distributed cache mode is designed for branch offices with fewer than 50 users that do not have a dedicated server in the branch office. BranchCache works across a single subnet only.
Works only in a single subnet.
Full transfer or partial transfer
Two version of the ocntent information: Version 1 is supported by Windows server 2008R2 and windows 7 or later. Version 2 is supported by winserver 2012 and windows 8 or later.
Version1, change made to a file requires the client to retrieve the entire file; version 2, only the changed part of the file is transfered.
Installation
To use BranchCache, you perform the following:
• For each web server or Application server (BITS) that you want to cache, you must install the BranchCache feature.
• For each file server(SMB protocol), you must install the BranchCache for Network Files role service on the file server that is hosting the data. In addition, you have to configure a hash publication for BranchCache and create BranchCache-enabled file shares.
• For the clients to use BranchCache, you must configure the clients using Group Policy or the netsh command.
• If you use the hosted cache mode, you just add the BranchCache feature to the computer running Windows Server 2012 that will be holding the hosted cache.
Install Branchcache on a file server
1. In Select Server Roles , under Roles , expand File and Storage Services , and expand File and iSCSI Services . Click to select the check boxes for File Server and BranchCache for Network Files . Click Next .
2. Configure the hash publication for BranchCache gropu policy: In the Group Policy Management Editor console, expand the following path: Computer Confi guration, Policies, Administrative Templates . Click Network, Lanman
Server . Double-click Hash Publication for BranchCache . The Hash Publication for BranchCache dialog box opens. In the Hash Publication for BranchCache dialog box, click Enabled
3. Set the branchCache support tag: In Server Manager , click Tools . Computer Management . The Computer Management console opens. Under System Tools , expand Shared Folders and click Shares .In the details pane, right-click a share, and then click Properties . The share’s Properties dialog box opens. In the Properties dialog box, on the General tab, click Offl ine Settings . The Offline Settings dialog box opens. Ensure that Only the fi les and programs that users specify are available offl ine is selected, and then click Enable BranchCache. Another way is in the File and storage services in Server manager, click share, right click the share and click properties.settings, enable branchCache on the file share.
Install on a web server or an application server
To install BranchCache, you can open Windows PowerShell and execute the following commands:
Install-WindowsFeature BranchCache
Restart-Computer
Then the web server role or an application using BITS take advantage of the branchcache service automatically.
configuration
Client configuration
BranchCache is disabled by default on client computers. To enable and configure BranchCache, you need to perform the following steps:
1. Enable BranchCache.
2. Enable the Distributed Cache mode or Hosted Cache mode.
step 1 and 2 can be configured here: open a group policy and navigate to Computer Configuration . Policies . Administrative Templates . Network , and then click BranchCache. Then Turn on BranchCache and set either the Distributed Cache mode or the Hosted Cache mode.
3. Configure the client firewall to allow BranchCache protocols: allow these predefined rules BrachCach-Content Retrieval (uses HTTP), BrachCach- Hosted cache Server (uses HTTPS), BrachCach-Peer Discovery (uses WSD): the third rule is required only for distributed cache mode.
These three steps can be done with a single command: netsh branchcache set service mode=hostedclient location=server name
To verify:
netsh brachcache show status all
To have brachcache cache all files: netsh brachcache smb set latency 0
The default latency is 80ms.
Configure a server for Hosted cache mode
The hosted cache server must be trusted by BranchCache clients, so we must install a certificate on the server that is trusted by the brachCache client.
Then use following steps:
- install the BrachCache feature by using cmdlet:
install-windowsFeature BrachCache - Import a certificate that is trusted by client computer
- Link the certificate to branchcache with the
netsh HTTP ADD SSLCERTcommand - Configure BrachCache clients to hosted cache mode.
Powershell
• Add-BCDataCacheExtension : Increases the amount of cache storage space that is available on a
hosted cache server by adding a new cache file.
• Clear-BCCache : Deletes all data in all data and hash files.
• Disable-BC : Disables the BranchCache service.
• Enable-BCDistributed : Enables BranchCache and configures a computer to operate in distributed
cache mode.
• Enable-BCHostedClient : Configures BranchCache to operate in hosted cache client mode.
• Enable-BCHostedServer : Configures BranchCache to operate in hosted cache server mode.
• Enable-BCLocal : Enables the BranchCache service in local caching mode.
• Export-BCCachePackage : Exports a cache package.
• Export-BCSecretKey : Exports a secret key to a file.
• Get-BCClientConfiguration : Retrieves the current BranchCache client computer settings.
• Get-BCContentServerConfiguration : Retrieves the current BranchCache content server settings.
• Get-BCDataCache : Retrieves the BranchCache data cache.
• Get-BCDataCacheExtension : Retrieves the BranchCache data cache extensions from a hosted
cache server.
• Get-BCHashCache : Retrieves the BranchCache hash cache.
• Get-BCHostedCacheServerConfiguration : Retrieves the current BranchCache hosted cache
server settings.
• Get-BCNetworkConfiguration : Retrieves the current BranchCache network settings.
• Get-BCStatus : Retrieves a set of objects that provide BranchCache status and configuration information.
• Import-BCCachePackage : Imports a cache package.
File classification infrastructure
File Server Resource Manager (FSRM) is a suite of tools that enables you to control and manage the quantity and type of data stored on a file server. It enables you to define how much data a person can store, define what type of files that a user can store on a file server, and generate reports about the file server being used.
File classification allows you to configure automatic procedures for defining a desired property on a file, based on the conditions specified in classification rules.
Old approache: Keyword search, descriptive filenames and folder names, indexing ( search based on file content )
To use file classification, you perform the following steps:
1. Define classification properties and values, which you can assign to files by running classification rules.
2. Create, update, and run classification rules, which are based assigning a single predefined property and value to files within a specified directory based on installed classification plug-ins.
3. When running a classification rule, reevaluate files that are already classified. You can choose to overwrite existing classification values, or add the value to properties that support multiple values. You can also use classification rules to declassify files that are not in the classification criterion anymore.
Classifiying files
First you need to install File Server Resource Manager, next, you need to enable or create classification properties that are applied by using classification rules.
Classification property is a file attribute containing a value that is used to categorize the data in a file or an aspect of file, usch as locaion or security level.
1. Enable or create a classification property: windows has predefined classification properties called “resource properties”, which can fulfill our most common need and locate in ADAC > Dynamic Access Control > Resource properties..
To enable the properties: in ADAC ( active directory administrative Centre) or set-adresourceproperty .
2. Synchronize the resource properties in AD with command: update-FsrmClassificationPropertyDefinition , this command causes FSRM to recognize resource properties you have enabled.
3. create a classfication rule to set the property in files containing the string.
File auditing
Most audit settings require you to enable only specific audit settings. However, object auditing is more complex. After you enable object access (using standard audit policy settings or using the detailed audit policy (specifically audit file system), you have to enable auditing on the specific object (including a folder or file) that you want to enable.
ENABLE OBJECT AUDITING
To audit account logon successes and failures, perform the following steps:
1. Open Server Manager .
2. Click Tools . Group Policy Management to open the Group Policy Management console.
3. Expand the Domain Controllers to show the Default Domain Controllers Policy . Then right-click the Default Domain Control Default Policy and click Edit . Group Policy Management Editor appears.
4. Expand Computer Confi guration, Policies, Windows Settings, Security Settings, Local Policies , and select Audit Policy .
5. Double-click Audit object access . The Audit a ccount l ogon e vents Properties dialog box opens.
6. Select Defi ne these policy settings and select both Success and Failure .
7. Click OK to close the Audit account logon events Properties dialog box.
The Auditing result is in EventViewer ID 4663, which is a object access event.
To use global object access to audit files, you must enable the following two settings:
• Computer Configuration\Windows Settings\Security Settings\Advanced Audit Policy\Audit Policies\Object Access\Audit File System
• Computer Configuration\Windows Settings\Security Settings\Advanced Audit Policy\Audit Policy\Global Object Access Auditing\File System
As you configure the Global Object Access Auditing, you have to configure the System Access Control List (SACL), where you define the principal that you want to monitor, the type of event (success, failure, or all), the permission that you want to monitor, and a condition.
Network file system
NFS takes part of a remote file system and mounts it or connects to a local file system. The client can then access the server’s files as if they were a local resource.
Similar to Windows, with UNIX and Linux, you log in and authenticate with an account name and password. The user is identified with a user identifier (UID) value and a group identifier (GID) . Whenever a file is accessed using NFS, the UID and GID are sent to the NFS server to see whether the user has the proper permissions to access.
For the Windows Server 2012 NFS server to grant the UNIX user access to the requested file, it must associate the UID and GID with a Windows or Active Directory account and use that account to authenticate the client. NFS uses Active Directory lookup and User Name Mappings to obtain user and group information when accessing NFS shared files.
Identity Management for UNIX enables you to integrate Windows users into an existing UNIX or Linux environment, including managing user accounts and passwords on Windows and UNIX systems using Network Information Service (NIS), and enables you to automatically synchronize passwords between Windows and UNIX operating systems. To use this method, you must install the Identity Management for UNIX using the Deployment Image
Servicing and management command-line tool, Dism.exe.
INSTALL THE IDENTITY MANAGEMENT FOR UNIX USING DISM.EXE
To install the Identity Management for UNIX using Dism.exe, on a Windows Server 2012 domain controller, perform the following steps:
1. Click Windows PowerShell to open the Windows PowerShell box.
2. To install the administration tools for Identity Management for UNIX, execute the following command: Dism.exe /online /enable-feature /featurename:adminui /all
When you are asked to restart the computer, type N .
3 . To install the Server for NIS, execute the following command: Dism.exe /online /enable-feature /featurename: nis /all
When you are asked to restart the computer, type N .
4 . To install Password Synchronization, execute the following command: Dism.exe /online /enable-feature /featurename:psync /all
5. When you are asked to restart the computer, type Y .
When you use Active Directory lookup, NFS searches the Active Directory database for the UID and GID values in the NFS file access request and uses the accounts associated with those values to authenticate the client.
When you install the Server for NFS role , it extends the Active Directory schema by adding UNIX attributes. These attributes can be set with Active Directory Users and Computers.
Create a NFS share
When you install the Services for NFS role service, an NFS Sharing tab is added to the properties of every volume and folder on the computer’s drives.
- Share this folder: this option enable the folder to be shared with NFS.
- Share Name text box, type the name that you want NFS clients to use when accessing the folder and select one of the encoding schemes from the Encoding drop-down list.
- Encoding: Determines the characters that can be used in file and directory names
- Authentication: Configure Kerberos authentication options and specify whether to allow unmapped user access and anonymous access. If you enalbe the “no server authentication” option, you can select “Enable unmapped user access”, doing so allows users of Linux and Unix system to access NFS share without authentication through AD
- permissions: Default is readonly. you can change to No access or Read-write. Or assign permissions by groups.
NFS data store
Starting with Windows Server 2012, Server for NFS can now be used with failover clustering so that you can deploy NFS while providing fault tolerance. The shared folder within a cluster is known as a NFS Data Store .
To create an NFS shared folder on a cluster, you need to install the following on each cluster node:
• The File Services role
• The Server for NFS role service
• The Failover Clustering feature
To create an NFS share to be used with the cluster, you need to choose an NFS Share–Quick or NFS Share–Advanced .
- The NFS Share–Quick is the quickest way to create an NFS file share. The Advanced profile allows you to set the folders’ owners for access-denied assistance, configure default classification of data in the folder for management and access polices, and enable quotas.
- If you want to use the NFS Share–Advanced, you need both the Server for NFS and File Server Resource Manager role servers installed.
Configure Advanced File storage
ISCSI target: Logical storage space made available to iSCSI clients by a server running the iSCSI target Server role service. The iSCSI target consists of one or more virtual disks.
iSCSI initiator: iSCSI initiator is the iSCSI client that sends iSCSI commands to the iSCSI target. Each iSCSI initiator is assigned an iSCSI qualified name (IQN) that the iSCSI target uses to give it access to iSCSI storage.
iSCSI qualified name (IQN) is an identifier that iSCSI targets and initiators use to identify the iSCSI device in an iSCSI connection. An IQN follows this format:iqn.yyyymm.reverse_domain_name:unique-device-name
- yyyy-mm is the month and year in which the naming authority acquired the domain name. Microsoft uses
iqn.1991-05 - Reverse domain name of the authority followed by a colon.
com.microsoft - The name of the iSCSI target or initiator.
Block-level storage: The iSCSI target server makes storage available to iSCSI initiators as block-level storage, which the storage client sees as a local drive. The storage can be formatted, an volumes can be created like any other local storage device.
File-level storage: The storage the client has access to only as file and folders. Typical example is windows file share.
LUN (iSCSI logical unit number): The iSCSI target makes storage available to iSCSI initiators as an iSCSI virtual disk, also called LUN.
In windows server 2012, the ability to define an iSCSI target on the Windows Server, essentially turning the server into a “SAN head”. Provisioning a Windows Server 2012 computer with lots of inexpensive storage can be a low cost route to a highly available SAN.
Two components make up the iSCSI target software in Windows Server 2012/R2:
- iSCSI target server: It gives iSCSI initiators access to shared storages.
- iSCSI target storage provider(optional): It provides Virtual disk service (VDS) and Volume shadow copy services (VSS) support to applications needing these services.
Steps for configuring iSCSI target:
1. Install the iSCSI target server role service and optionally the iSCSI target storage provider.
2. Create an iSCSI virtual disk
3. Create an iSCSI target and assign one or more iSCSI virtual disks to the target.
4. Connecting to the iSCSI Virtual Disk from another machine using iSCSI Initiator
Steps
open Server Manager and browse to File And Storage Services -> iSCSI under iSCSI Virtual Disks click Tasks-> New iSCSI Virtual Disk
This will launch the new iSCSI Virtual Disk Wizard, select the volume on which you wish to store the disk and press Next
Give the disk a meaningful name, in my case I was setting up a SQL cluster so this was going to be my Quorum disk
Once complete press Next
Enter a size for your disk and press Next once complete
On the iSCSI Target page select New iSCSI Target and press Next
Give the Target a meaningful name and press Next once complete
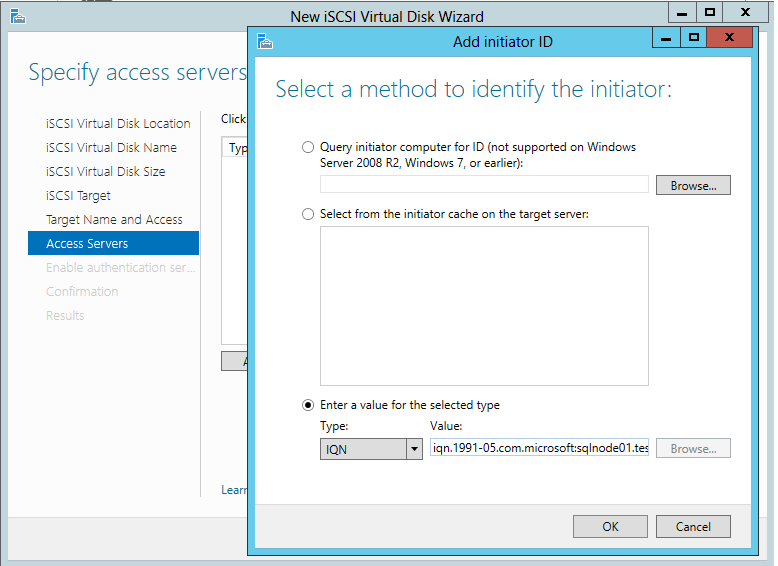
Now we need the IQN of the initiator, to get this logon to the client server you are connecting from and launch the iSCSI initiator control panel applet, if it prompts you to start the service click yes.
On the Configuration tab make a note of the Initiator Name
Or you can Select “Query initiator computer for ID”, only support win2012 or later.Back on the Target Server on the on the Access Servers page click Add
Now enter the IQN of the initiator in the box as shown..
Press ok and you will see the iSCSI initiator listed, once complete click Next
Since this is a lab I chose not to configure Authentication and just pressed Next and then Create.
Now switch over to the iSCSI initiator machine (in my case one of the SQL Nodes) and in the iSCSI initiator software click on the Discovery tab
Click Discover Portal and enter the DNS Name of the iSCSI Target server and press OK
Now click on the Targets tab and you should see the target listed, select it and click Connect
If the connection was successful you will see the status change to Connected as shown
That’s all there is to it, now open disk manager and bring the disk online


Reference: http://ixrv.blogspot.com.au/2012/12/creating-virtual-san-using-windows.html
The Internet Storage Name Service (iSNS)
An iSNS is an IP-based protocol used to communicate between iSNS clients and servers. iSNS is essentially a central storage location for iSCSI devices.
An iSNS client is an iSCSI initiator running the iSNS protocol that discovers iSCSI targets.
iSCSI initiators use iSNS by sending queries to the iSNS server to discover iSCSI targets and receive notifications about new iSCSI targets or targets that are no longer available. iSCSI targets use iSNS by registering with the iSNS server so that their status is available to iSCSI initiators.
implementating iSNS
You must configure an iSCSI initiator to register with the iSNS server. To register, add an iSNS server in the Discovery tab of the iSNS initiator properties box.
Discovery domain: let you limit which targets iSCSI initiators can discover and connect to. A discovery domain named Default DD is created automatically, and all registered iSCSI devices ara added to it. An iSCSI target can be discoverd by an initiator only if they are in the same discovery domain.
You can partition devices by creating discovery domain sets.
Tiered storage
New in WinServer2012R2storage, Combine the SSD with HDD. Windows keeps the most frequently accessed data on the faster SSD disks and less frequently accessed data to HDD.
You can click the “create storage tiers on this virtual disk” check box when you create a virtual disk. If the system did not recognize a disk as an SSD, use the following command to configure a Virtual disk as SSD:
set-physicalDisk diskname -MediaType SSD
new-storageTier SSDTier -MediaType SSD
new-storageTier HDDTier -MediaType HDD
get-command -module storage
More command: https://technet.microsoft.com/en-us/library/dn454972(v=wps.630).aspx
Data Deduplication
Data Deduplication Characteristics:
1) Transparent and easy to use: Deduplication can be easily installed and enabled on selected data volumes in a few seconds. Applications and end users will not know that the data has been transformed on the disk and when a user requests a file, it will be transparently served up right away. The file system as a whole supports all of the NTFS semantics that you would expect. Some files are not processed by deduplication, such as files encrypted using the Encrypted File System (EFS), files that are smaller than 32KB or those that have Extended Attributes (EAs). In these cases, the interaction with the files is entirely through NTFS and the deduplication filter driver does not get involved. If a file has an alternate data stream, only the primary data stream will be deduplicated and the alternate stream will be left on the disk.
2) Designed for Primary Data: The feature can be installed on your primary data volumes without interfering with the server’s primary objective. Hot data (files that are being written to) will be passed over by deduplication until the file reaches a certain age. This way you can get optimal performance for active files and great savings on the rest of the files. Files that meet the deduplication criteria are referred to as “in-policy” files.
a. Post Processing : Deduplication is not in the write-path when new files come along. New files write directly to the NTFS volume and the files are evaluated by a file groveler on a regular schedule. The background processing mode checks for files that are eligible for deduplication every hour and you can add additional schedules if you need them.
b. File Age: Deduplication has a setting called MinimumFileAgeDays that controls how old a file should be before processing the file. The default setting is 5 days. This setting is configurable by the user and can be set to “0” to process files regardless of how old they are.
c. File Type and File Location Exclusions: You can tell the system not to process files of a specific type, like PNG files that already have great compression or compressed CAB files that may not benefit from deduplication. You can also tell the system not to process a certain folder.
3) Portability: A volume that is under deduplication control is an atomic unit. You can back up the volume and restore it to another server. You can rip it out of one Windows 2012 server and move it to another. Everything that is required to access your data is located on the drive. All of the deduplication settings are maintained on the volume and will be picked up by the deduplication filter when the volume is mounted. The only thing that is not retained on the volume are the schedule settings that are part of the task-scheduler engine. If you move the volume to a server that is not running the Data Deduplication feature, you will only be able to access the files that have not been deduplicated.
4) Focused on using low resources: The feature was built to automatically yield system resources to the primary server’s workload and back-off until resources are available again. Most people agree that their servers have a job to do and the storage is just facilitating their data requirements.
a. The chunk store’s hash index is designed to use low resources and reduce the read/write disk IOPS so that it can scale to large datasets and deliver high insert/lookup performance. The index footprint is extremely low at about 6 bytes of RAM per chunk and it uses temporary partitioning to support very high scale
c. Deduplication jobs will verify that there is enough memory to do the work and if not it will stop and try again at the next scheduled interval.
d. Administrators can schedule and run any of the deduplication jobs during off-peak hours or during idle time.
5) Sub-file chunking : Deduplication segments files into variable-sizes (32-128 kilobyte chunks) using a new algorithm developed in conjunction with Microsoft research. The chunking module splits a file into a sequence of chunks in a content dependent manner. The system uses a Rabin fingerprint -based sliding window hash on the data stream to identify chunk boundaries. The chunks have an average size of 64KB and they are compressed and placed into a chunk store located in a hidden folder at the root of the volume called the System Volume Information, or “SVI folder”. The normal file is replaced by a smallreparse point , which has a pointer to a map of all the data streams and chunks required to “rehydrate” the file and serve it up when it is requested.
Imagine that you have a file that looks something like this to NTFS:
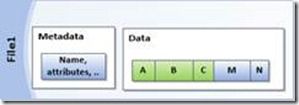
And you also have another file that has some of the same chunks:

After being processed, the files are now reparse points with metadata and links that point to where the file data is located in the chunk-store.

6) BranchCache™ : Another benefit for Windows is that the sub-file chunking and indexing engine is shared with the BranchCache feature . When a Windows Server at the home office is running deduplication the data chunks are already indexed and are ready to be quickly sent over the WAN if needed. This saves a ton of WAN traffic to a branch office.
Install
From the Add Roles and Features Wizard, under Server Roles, File and Storage Services, File and iSCSI Services and select Data Deduplication.
Click Next until the Install button is active, and then click Install. When complete click Close.
You can also use PowerShell to install it by using the following command:
PS C:\> Import-Module ServerManager
PS C:\> Add-WindowsFeature -name FS-Data-Deduplication
PS C:\> Import-Module Deduplication
Enable and configure deduplication on an existing volume
From the Server Manager dashboard, right-click a data volume and choose Configure Data Deduplication. The Deduplication Settings page appears.
Select the Enable data deduplication check box, enter the number of days that should elapse from the date of file creation until files are deduplicated, enter the extensions of any file types that should not be deduplicated, and then click Add to browse to any folders with files that should not be deduplicated.
Note: If you set MinimumFileAgeDays to 0, deduplication will process all files, regardless of their age. This is suitable for a test environment, where you want to exercise maximum deduplication. In a production environment, however, it is preferable to wait for a number of days (the default is 5 days), because files tend to change a lot for a brief period of time before the change rate slows. This allows for the most efficient use of your server resources.
Click Apply to apply these settings and return to the Server Manager dashboard
In Server Manager, under File and Storage Services, and Servers, right-click the server and select Deduplication Schedule to continue to set up a schedule for deduplication.
To enable deduplication on a volume, Using PowerShell command on the server. In this example deduplication is enabled on volume D.
PS C:\> Enable-DedupVolume D:
Optionally, set the minimum number of days that must pass before a file is deduplicated by using the following command.
PS C:\> Set-Dedupvolume D: -MinimumFileAgeDays 20
By now, Data deduplication has been setup and configured.
Observe the results of deduplication
Let’s use PowerShell to see the results of the data Deduplication.
1) on the Server console Click Windows PowerShell.
2) Type Start-DedupJob -Type Optimization -Volume D:, and then press ENTER.
3) Type Get-Dedupjob, and then press ENTER. Run this command every few seconds until there are no active jobs.
4) Type Get-DedupStatus, and then press ENTER.
You can also look at the properties of the volume from the Server Manager dashboard to show how much space you have saved.
Reference:
https://techcommunity.microsoft.com/t5/Storage-at-Microsoft/Introduction-to-Data-Deduplication-in-Windows-Server-2012/ba-p/424257