Issue 1
530 User <username> cannot log in.
 Login failed.
This problem occurs when one of the following scenarios is true:
- The Allow only anonymous connections security setting has been turned on in the Microsoft Management Console (MMC).
- The username does not have the Log on locally permission in User Manager.
- The username does not have the Access this computer from the network permission in User Manager.
- The Domain Name was not specified together with the username (in the form of DOMAIN\username).
RESOLUTION
Resolution 1
Warning When you configure the site to require a user name and password, credentials and data are sent across the network in plain text and are not encrypted in any way. Information is susceptible to interception. After you clear the Allow only anonymous connections check box, we recommend that you use Secure Socket Layer (SSL) for your FTP site.
To clear the Allow only anonymous connections security check box, follow these steps:
- Start the Internet Service Manager (ISM) ISM loads the Internet Information Server (IIS) snap-in for the Microsoft Management Console (MMC).
- Right-click the default FTP site folder, and then click Properties.
- On the Security Accounts tab, clear the Allow only anonymous connections security check box.
- Click OK.
Resolution 2
To give the username the “Log On Locally” permission, follow these steps:
Windows NT 4.0 servers
- In the Administrative Tools group, click User Manager for Domains.Note If the username is not a member of the default domain opened by User Manager, click the User menu, and then click Domain to specify the correct domain. If the username is a member of the local computer’s user list, type \\<computer_name> in the Domain text box.
- On the Policies menu, click User Rights.
- In the Rights drop-down list, click Log on Locally.
- Click Add, and add the appropriate username (or user group).
- Click OK two times.
Windows 2000 servers
To configure the Log on locally right on a stand-alone server, follow these steps:
- In the Microsoft Management Console (MMC), open the Local Computer Policy snap-in. To do this, follow these steps:
- Click Start, type MMC, and then click OK.
- Click Console, click Add/Remove Snap-in, and then click Add.
- Select Group Policy, and then click Add.
- Make sure that the Group Policy object says Local Computer, and then click Finish.
- Click Close, and then click OK.
- Grant users or groups the Log on locally right. To do this, follow these steps:
- Expand the following path in the MMC:
Local Computer Policy\Computer Configuration\Windows Settings\Security Settings\Local Policies\User Rights Assignment
- Double-click Log on Locally.
- Add any users or groups that will use Basic/Clear Text authentication.
- Expand the following path in the MMC:
Note Microsoft does not recommend that you install an IIS Web server on a Windows 2000 domain controller. The following steps describe how to configure Log on locally right by using Group Policy if it is necessary that you install an IIS Web server on a Windows 2000 domain controller.
To configure the Log on locally right on a domain controller, follow these steps:
- In MMC, open the Default Domain Controllers Policy snap-in. To do this, follow these steps:
- Click Start, type MMC, and then click OK.
- Click Console, click Add/Remove Snap-in, and then click Add.
- Select Group Policy, and then click Add.
- Click Browse.
- Double-click the domain controller for the domain.
- Double-click Default Domain Controllers Policy, and then click Finish.
- Click Close, and then click OK.
- Grant users or groups the Log on locally right. To do this, follow these steps:
- Expand the following path in the MMC:
Default Domain Controllers Policy\Computer Configuration\Windows Settings\Security Settings\Local Policies\User Rights Assignment
- Double-click Log on Locally.
- Add any users or groups that will use Basic/Clear Text authentication.
- Expand the following path in the MMC:
- Open a command prompt, type secedit /refreshpolicy machine_policy, and then close the command prompt to refresh the policy.
Resolution 3
To give the username the Access this computer from the network permission, follow the same steps that are outlined in Resolution 2, but select the Access this computer from the network advanced user right.
Resolution 4
Try using the command line FTP utility and specify the FTP username in DOMAIN\Username format when you log into the FTP Site. If this works, then you can either instruct all users to log on by using DOMAIN\Username format, or you can specify the default authentication domain that the FTP Service should use when authenticating accounts that do not exist locally and that were not entered in the DOMAIN\Username format. To do this you must make changes to the Metabase.
To specify a default logon domain so users do not have to type DOMAIN\Username when logging on to the FTP Server, you can either use the Windows Script Host (if it was installed during the Windows NT Option Pack setup) or the NTOP utility Mdutil.exe.
Both methods are described below.
To use the Windows Script Host method, use one of the following methods depending on the version of IIS that you are running:
Note In IIS 6.0, you can resolve this issue by modifying the metabase only when the FTP isolation type is “Isolated (Active Directory)” or if the UserIsolationMode property is set to 2.
IIS 6.0
- Change to the %Systemroot%\Inetpub\Adminscripts directory.
- Type the following:
Adsutil Set MSFTPSVC/DefaultLogonDomain “Domain Name”
Make sure when you type in the Domain Name that it is enclosed in quotation marks.
- Stop and restart the FTP Service.
IIS 5.0
- Change to the %Systemroot%\Inetpub\Adminscripts directory.
- Type the following:
Adsutil Set MSFTPSVC/DefaultLogonDomain “Domain Name”
Make sure when you type the Domain Name that it is enclosed in quotation marks.
- Stop the FTP Service, and then restart the FTP Service.
IIS 4.0
- Change to the %systemroot%\system32\inetsrv\adminsamples directory.
- Type the following:
cscript //h:cscript
This sets Cscript as the default WSH interpreter.
- Type the following:
Adsutil Set MSFTPSVC/DefaultLogonDomain “Domain Name”
Make sure when you type in the Domain Name that it is enclosed in quotation marks.
- Stop the FTP Service, and then restart the FTP Service.
If the Windows Script Host was not installed during the NTOP setup, use Mdutil.exe. as follows:
- Copy Mdutil.exe. from the Windows NT Option Pack compact disc to the %WINDIR%\System32\ directory.Make sure to copy Mdutil.exe. from the appropriate platform directory on the compact disc.
- Open a command prompt, and change to the %WINDIR%\System32 directory.
- Execute the command below replacing <DomainName> with the name of the accounts domain you want to authenticate your user against by default:
mdutil set msftpsvc/DefaultLogonDomain -utype UT_Server -dtype String -value <DomainName>
Make sure that <DomainName> is typed without quotes.
- When the command completes successfully, stop and restart the FTP Service.
Issue 2
The Error:
home directory inaccessible
Open IIS manager, select the ftp site, right lick on the FTP directory browsing, select basic settings…, click connect as… to set the user from domain, then test settings, make sure, all passed.
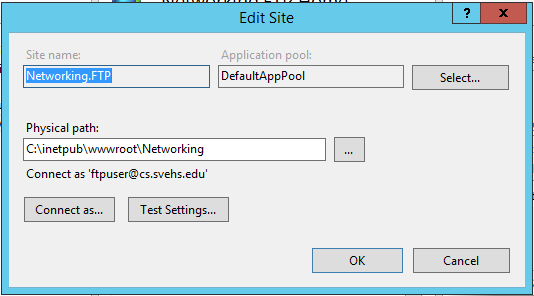
Make sure the user in the “Connect as” have read and write permission to the path listed above.
Issue 3
When I use FileZilla to connect to my FTP I get an error like this:
Response:	200 PORT command successful. Consider using PASV.
Command:	LIST
Error:	Connection timed out
Error:	Failed to retrieve directory listing
If you have a similar problem with Filezilla, and the problem persists even when the Windows Firewall is disabled, here is what you need to do:
- Open Filezilla, go to Edit -> Settings
- Click on Connection -> FTP: Choose Active
- Click on Connection -> FTP -> Active Mode: Select “Ask your operating system for the external IP address”
- Click on Connection -> FTP -> Passive Mode: Choose Fall Back to Active Mode
- Press OK.
References:
https://www.infinitywebhosts.com/billing/knowledgebase/26/FileZilla-FTP-Failed-to-retrieve-directory-listing-Error.html
https://support.microsoft.com/en-au/kb/200475