Export the users list
You may export the users info list for documentation purpose. Powershell would be a good tool to do this job.
Source: https://gallery.technet.microsoft.com/scriptcenter/Powershell-script-to-5edcdaea
#####################################################
# AUTHOR  : Victor Ashiedu
# WEBSITE : iTechguides.com
# BLOG    : iTechguides.com/blog-2/
# CREATED : 08-08-2014
# UPDATED : 19-09-2014
# COMMENT : This script exports Active Directory users
#           to a a csv file. v2.1 adds the condition to
#           ignore all users with the info (Notes) field
#           found on the Telephones tab containing the
#           word 'Migrated'.
###########################################################


#Define location of my script variable
#the -parent switch returns one directory lower from directory defined.
#below will return up to ImportADUsers folder
#and since my files are located here it will find it.
#It failes withpout appending "*.*" at the end

$path = Split-Path -parent "D:\Downloads\Export_AD_Users_to_CSV.v1.0\*.*"

#Create a variable for the date stamp in the log file

$LogDate = get-date -f yyyyMMddhhmm

#Define CSV and log file location variables
#they have to be on the same location as the script

$csvfile = $path + "\ALLADUsers_$logDate.csv"

#import the ActiveDirectory Module

Import-Module ActiveDirectory


#Sets the OU to do the base search for all user accounts, change as required.
#Simon discovered that some users were missing
#I decided to run the report from the root of the domain

$SearchBase = "DC=apm,DC=com"

#Get Admin accountb credential

$GetAdminact = Get-Credential

#Define variable for a server with AD web services installed

$ADServer = 'apmserver'

#Find users that are not disabled
#To test, I moved the following users to the OU=ADMigration:
#Philip Steventon (kingston.gov.uk/RBK Users/ICT Staff/Philip Steventon) - Disabled account
#Joseph Martins (kingston.gov.uk/RBK Users/ICT Staff/Joseph Martins) - Disabled account
#may have to get accountb status with another AD object

#Define "Account Status"
#Added the Where-Object clause on 23/07/2014
#Requested by the project team. This 'flag field' needs
#updated in the import script when users fields are updated
#The word 'Migrated' is added in the Notes field, on the Telephone tab.
#The LDAB object name for Notes is 'info'.

$AllADUsers = Get-ADUser -server $ADServer `
-Credential $GetAdminact -searchbase $SearchBase `
-Filter * -Properties * | Where-Object {$_.info -NE 'Migrated'} #ensures that updated users are never exported.

$AllADUsers |
Select-Object @{Label = "First Name";Expression = {$_.GivenName}},
@{Label = "Last Name";Expression = {$_.Surname}},
@{Label = "Display Name";Expression = {$_.DisplayName}},
@{Label = "Logon Name";Expression = {$_.sAMAccountName}},
@{Label = "Full address";Expression = {$_.StreetAddress}},
@{Label = "City";Expression = {$_.City}},
@{Label = "State";Expression = {$_.st}},
@{Label = "Post Code";Expression = {$_.PostalCode}},
@{Label = "Country/Region";Expression = {if (($_.Country -eq 'GB')  ) {'United Kingdom'} Else {''}}},
@{Label = "Job Title";Expression = {$_.Title}},
@{Label = "Company";Expression = {$_.Company}},
@{Label = "OU";Expression = {$_.DistinguishedName}},
@{Label = "Department";Expression = {$_.Department}},
@{Label = "Office";Expression = {$_.OfficeName}},
@{Label = "Phone";Expression = {$_.telephoneNumber}},
@{Label = "Email";Expression = {$_.Mail}},
@{Label = "Manager";Expression = {%{(Get-AdUser $_.Manager -server $ADServer -Properties DisplayName).DisplayName}}},
@{Label = "Account Status";Expression = {if (($_.Enabled -eq 'TRUE')  ) {'Enabled'} Else {'Disabled'}}}, # the 'if statement# replaces $_.Enabled
@{Label = "Last LogOn Date";Expression = {$_.lastlogondate}} |

#Export CSV report

Export-Csv -Path $csvfile -NoTypeInformation
Amend it to your environment use:
To customize this script, change the following:
1. line 21: amend location of your script, log and exported CSV report.
2. line 41: Amend the OU, this script can search recursively. if you want to export the whole domain’t user info, you can use only the domain name.
3. line 49: Amend the Active Directory DC you wish to connect to (This might be necessary in a Y2k3 AD domain with only one server running Active Directory web services
4. You might need to amend line 80 (This was specific to my project – User description was called “Directorate”). You might want to call it Description
Import Users in bulk
Step 1: Setup the csv file
There are only 5 fields in the csv file that are required for each user account, they are:
- firstname
- lastname
- username
- password
- ou
I will walk through adding a few users to my csv file

Above is a screenshot of my csv file setup with the required fields configured. It’s not a good security practice to set the same password for every account, mix it up some.
I’ve set the PowerShell script to set the accounts to require password change at next logon, another good security practice. This can be changed if you want to remove that option.
You can set each account to import into a specific OU. I’ve set two accounts to import into the default users OU then I set one account to import into a Marketing OU.
How do you find the OU path?
The OU path is the distinguishedName attribute, to find this open up Active Directory Users and Computers and browse to the OU you want to import to, then right click and select properties then select attribute editor.
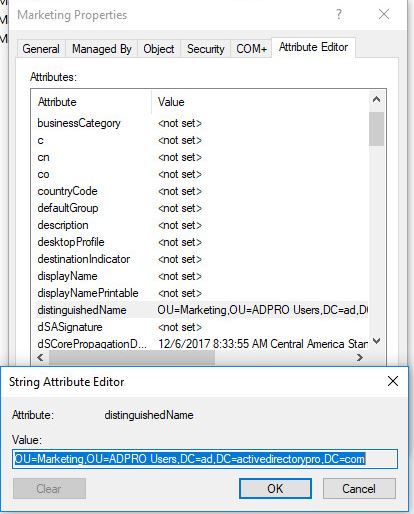
Copy the path into the OU column on the csv file.
At this point the csv file has the required fields, you can jump to step 2 (setting up the PowerShell script) or keep reading to setup optional fields for user accounts.
Setup User Optional fields
You may want to include some additional details for each account.
I’ve included some optional fields that are commonly used when setting up AD accounts. If there are fields you want to add that I have not provided, just add them to the csv file (you will also need to add it to the script)
- streetaddress
- city
- zipcode
- state
- county
- department
- telephone
- job title
- company

As you can see in the screenshot above I’ve entered info into the optional fields for 2 accounts.
Now save the csv file to an easy to remember location. I’ve put mine in c:\it\Final_NewAccounts2.csv
The path of the csv file will need to be entered into the powershell script. With the csv file setup I’ll move to step 2.
Step 2: Setup the PowerShell script
The only thing that needs to be modified in the script is the path to the csv file, and the UserPrincableName.
To modify the script just right click on the ps1 file and select edit. This will open the script in PowerShell ISE
Modify this section to the correct path of your csv file.
$ADUsers = Import-csv C:\it\Final_NewAccounts2.csv
Now modify line 42 and change the domain
-UserPrincipalName "[email protected]"
My domain is ad.activedirectorypro.com so I will update mine to
-UserPrincipalName "[email protected]"
Save the changes and move on to step 3.
Step 3: Run the PowerShell Script to import the accounts
At this point, the csv file should be setup with the users information and the Powershell script should be modified.
Now it’s time to execute the script.
Script:
# Import active directory module for running AD cmdlets
Import-Module activedirectory

#Store the data from ADUsers.csv in the $ADUsers variable
$ADUsers = Import-csv C:\it\bulk_users1.csv

#Loop through each row containing user details in the CSV file
foreach ($User in $ADUsers)
{
    #Read user data from each field in each row and assign the data to a variable as below

    $Username = $User.username
    $Password = $User.password
    $Firstname = $User.firstname
    $Lastname = $User.lastname
    $OU = $User.ou #This field refers to the OU the user account is to be created in
    $email = $User.email
    $streetaddress = $User.streetaddress
    $city = $User.city
    $zipcode = $User.zipcode
    $state = $User.state
    $country = $User.country
    $telephone = $User.telephone
    $jobtitle = $User.jobtitle
    $company = $User.company
    $department = $User.department
    $Password = $User.Password


    #Check to see if the user already exists in AD
    if (Get-ADUser -F {SamAccountName -eq $Username})
    {
        #If user does exist, give a warning
        Write-Warning "A user account with username $Username already exist in Active Directory."
    }
    else
    {
        #User does not exist then proceed to create the new user account

        #Account will be created in the OU provided by the $OU variable read from the CSV file
        New-ADUser `
            -SamAccountName $Username `
            -UserPrincipalName "[email protected]" `
            -Name "$Firstname $Lastname" `
            -GivenName $Firstname `
            -Surname $Lastname `
            -Enabled $True `
            -DisplayName "$Lastname, $Firstname" `
            -Path $OU `
            -City $city `
            -Company $company `
            -State $state `
            -StreetAddress $streetaddress `
            -OfficePhone $telephone `
            -EmailAddress $email `
            -Title $jobtitle `
            -Department $department `
            -AccountPassword (convertto-securestring $Password -AsPlainText -Force) -ChangePasswordAtLogon $True

     }
}
Find the user been disabled
This will be useful if you have a personal network drive for each user and want to archive them when the user leave the company.
First we need to find the user list:
Import-Module ActiveDirectory Search-ADAccount –AccountDisabled -UsersOnly |`
Select -Property Name,DistinguishedName | `
Export-CSV "C:\\DisabledADUsers.csv" -NoTypeInformation -Encoding UTF8
Pre-stage computer before deployment
When you deploy computers via MDT/WDS, it’s good ideal to prestage the computers and then the computer will sit in that OU and grab the config after deployment.
Import-Module ActiveDirectory

$AllComputers=import-csv -Path "c:\tmp\computers.csv"

ForEach ($computer in $AllComputers){ New-ADComputer -Name $computer.computer -path $computer.ou -Enabled $true }
The csv file will look like:
| computer | OU |
| LOAN-08 | OU=Loan,OU=Devices,DC=frankfu,DC=click |
| LOAN-09 | OU=Loan,OU=Devices,DC=frankfu,DC=click |
| LOAN-10 | OU=Loan,OU=Devices,DC=frankfu,DC=click |
| LOAN-11 | OU=Loan,OU=Devices,DC=frankfu,DC=click |
| LOAN-12 | OU=Loan,OU=Devices,DC=frankfu,DC=click |
| LOAN-13 | OU=Loan,OU=Devices,DC=frankfu,DC=click |
| LOAN-14 | OU=Loan,OU=Devices,DC=frankfu,DC=click |
| LOAN-15 | OU=Loan,OU=Devices,DC=frankfu,DC=click |
| LOAN-16 | OU=Loan,OU=Devices,DC=frankfu,DC=click |
| LOAN-17 | OU=Loan,OU=Devices,DC=frankfu,DC=click |
| LOAN-18 | OU=Loan,OU=Devices,DC=frankfu,DC=click |