Infrastructure requirement
In this lab, we are going to setup two server for the SCCM infrastructure.
- Server1: Domain Controller with all the FRSO.
- Server 2: SCCM and SQL server
Hardware :Processor – AMD Opteron, AMD Athlon 64, Intel Xeon with Intel EM64T support, Intel Pentium IV with EM64T support. The minimum processor speed expected is 1.4 GHz.
RAM – A minimum of 2 GB RAM is required.
Disk Space – A minimum of 50 GB hard disk space is a must.
Installing Prerequisite
In the first 3 steps ensure that you are logged on to the schema master domain controller (server1)with an account that is a member of the of Domain Admin, Schema Admin.
Step1. Create the system management container
Configuration Manager does not automatically create the System Management container in Active Directory Domain Services when the schema is extended. The container must be created one time for each domain that includes a Configuration Manager primary site server or secondary site server that publishes site information to Active Directory Domain Services.
On the Domain controller machine, click on Server Manager, Tools, click on ADSI Edit.
Right click ADSI Edit and click on Connect to. On the Connection Settings window, the naming context should be Default naming context. Do not change anything here, click on OK.
1. In the ADSI Edit Console, expand the Default Naming Context, right click CN=System, click on New and create an Object.
2. On the Create Object windows, select the class as container and click on Next.
3. Provide the value as System Management. Click on Next and click on Finish to close the wizard.
Step2. Grant the site server’s computer account the permissions that are required to publish site information to the container. The primary site server computer account must be granted Full Control permissions to the System Management container and all
its child objects.
1. Click on Server Manager, click on Tools, click on Active Directory Users and Computers. Click on View and click Advanced Features. Expand System, right click System Management and click on Delegate Control.
2. The primary site server computer account must be granted Full Control permissions to the System Management container. Click on Add, on select users,computers or groups window click on Object Types and check for Computers as object types. Click on OK. Type the name of the primary site server computer account and click on OK.
3. You must see the primary site server computer account listed under the users or groups. Click on Next.
4. On the Tasks to Delegate page, click on Create a custom task to delegate. Click on Next.
5. On the Active Directory Object Type window, select the option This folder, existing objects in this folder and creation of new objects in this folder. Click on Next.
6. We need to select the permissions to delegate, choose General, Property Specific and Creation/deletion of specific child objects. Under the permissions, click on Full Control. when you check the box for Full Control all the other permissions gets checked automatically. Click on Next and click on Finish to close the wizard.
7. Create an sccm account, we will create an account named sccmadmin, which is a member of Domain admin
Step3. Extending Active Directory Schema
To extend the Active Directory Schema using extadsh.exe utility, locate the extadsh.exe which can be found in \SMSSETUP\BIN\X64 of the configuration manager setup DVD. Hold the shift key on your keyboard and right click extadsh.exe and click on Copy as Path.
Launch the command prompt. Right click and click paste and hit enter. You should see the line Successfully extended the Active Directory Schema.
On the SCCM server (server2),
Step4. Server Role and click on Server Manager, click on Manage, click on Add Roles and Features. Click on Select a server from the server pool and click on Next.
1. Select Web Server (IIS) as the server role and click on Next.
2. You need to enable the following features for installing configuration manager 2012 R2 on Windows server 2012 R2
1) .Net Framework 3.5 Features [Install all sub features]
2) .Net Framework 4.5 Features [Install all sub features]
3) BITS
4) Remote Differential Compression
3. Under the Web Server Role(IIS), click Role Services, make sure following has been selected:
Common HTTP Features – Default Document, Static Content.
Application Development – ASP.NET 3.5, .NET Extensibility 3.5, ASP.NET 4.5, .NET Extensibility 4.5, ISAPI extensions.
Security – Windows Authentication.
IIS 6 Management Compatibility – IIS Management Console, IIS 6 Metabase Compatibility, IIS 6 WMI Compatibility, IIS Management Scripts and Tools.
Click next.
4. click on Specify an alternate source path and provide the path as D:\Sources\sxs (where D is the drive letter where the Windows Server 2012 R2 media is mounted).
Step5. Windows Assessment and Deployment Kit (Windows ADK) for Windows 8.1, or 10
The Windows Assessment and Deployment Kit (Windows ADK) is a collection of tools that you can use to customize, assess, and deploy Windows operating systems to new computers. The latest version out there is ADK 8.1 and you can find the download links at the end of the post.
Download the adksetup.exe, right click on the file and click on Run as Administrator. On the Specify Location page, choose the install path. Click on Next, then next.
On the License Agreement page, Click on Accept.
Select Deployment Tools, Windows Preinstallation Environment and User State Migration Tool. Click on Install. Wait for the completion and click close.
Note that the Windows PE is seperate part of ADK in ADK10, check below link to download both.
https://docs.microsoft.com/en-us/windows-hardware/get-started/adk-install
SQL Installation
Note, SQL Express does not work. The collation should be SQL_Latin1_General_CP1_CI_AS.
WSUS Installation
Choose WSUS Services and Database as these are the ones that are actually required. We will not select WID Database here. Click on Next.
Content Location Selection – In this folder the WSUS downloads and stores license terms for specific software updates in the update content folder. During the update synchronization process, Configuration Manager looks for applicable license terms in the content folder. If it cannot find the license terms, it will not synchronize the update. Provide a folder path and click on Next.
Database Instance Selection – Specify the database server where you want to store the WSUS database. Click on Check connection and you must see the message Successfully connected to server. Click on Next.
Click on Install.
After the WSUS installation, click on the Post-deployment configuration, which will create a Database. ( Some tutorials say DONT run this, but I found it will not create a Database in the SQL until you click the Post-deployment configuration) but don’t do further configuration, which are supposed to be done in SCCM.
Windows Firewall configuration
There are two parts of firewall configuration we need to consider: SQL server need to open ports 1433 and 4022 to SCCM server, so SCCM can create and update Database.
Client computer need to open the WMI, File and Printer sharing control, so SCCM could use client push to install the Configuration Manager 2012 R2 client. We would make use of group policy to achieve this:
You can link this GPO to a OU, but for simple operation, I will do it domain wide. Right Click on the domain and Create a GPO, name is as you like, then Right click on the policy that you created and click on Edit. Expand computer configuration, Windows settings, Security settings, Windows Firewall with advanced security. Right click on Inbound rules
and click on New Rule. Click on Predefined and select File and Printer Sharing. Click on Next. Make sure every options are ticked.
Problems
Database version
The SCCM set report that the database version is wrong, or the update is not up to date:
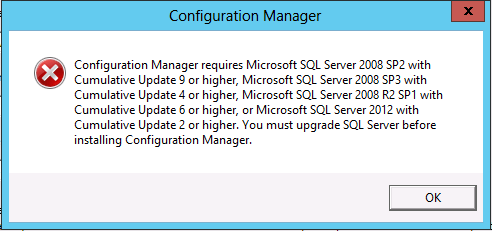
After checking the ConfigMgrSetup.log in C:\, searching for “fail”, found the following error:
ERROR: Failed to get Service Pack version for SQL Server <SCCM.lab.com>.  $$<Configuration Manager Setup><04-06-2017 00:41:21.037+420><thread=1376 (0x560)>
Failed to connect HKEY_LOCAL_MACHINE\SOFTWARE\Microsoft\Microsoft SQL Server\Instance Names\SQL registry key for reading on SQL Server [SCCM.lab.com].  $$<Configuration Manager Setup><04-06-2017 00:41:54.152+420><thread=1376 (0x560)>
WARNING: failed to retrieve port number for SCCM.lab.com.  $$<Configuration Manager Setup><04-06-2017 00:41:54.152+420><thread=1376 (0x560)>
After checking the Registry setting, there is no
HKEY_LOCAL_MACHINE\SOFTWARE\Microsoft\Microsoft SQL Server\Instance Names\SQL
key,
Then found the solution in https://blogs.technet.microsoft.com/microsoft_denmark_premier_field_engineering_config_manager_blog/2013/04/10/system-center-configuration-manager-2012-service-pack-1-fails-to-install-when-using-sql-server-2012-service-pack-1/
First go to start, SQL server configuration Manager.
Under SQL server configuration Manager, SQL Server Services, in the right pane right click SQL server, properties, advanced, check the Version value, note it down and replace the following version with that.
Created a .reg file with content:
Windows Registry Editor Version 5.00

[HKEY_LOCAL_MACHINE\SOFTWARE\Microsoft\Microsoft SQL Server\MSSQL11.MSSQLSERVER\MSSQLServer]


[HKEY_LOCAL_MACHINE\SOFTWARE\Microsoft\Microsoft SQL Server\MSSQL11.MSSQLSERVER\MSSQLServer]

[HKEY_LOCAL_MACHINE\SOFTWARE\Microsoft\Microsoft SQL Server\MSSQL11.MSSQLSERVER\\MSSQLServer\CurrentVersion]
"CurrentVersion"="11.0.3000.0"

[HKEY_LOCAL_MACHINE\SOFTWARE\Microsoft\Microsoft SQL Server\MSSQL11.MSSQLSERVER\MSSQLServer\SuperSocketNetLib]
"ProtocolList"=hex(7):74,00,63,00,70,00,00,00,6e,00,70,00,00,00,00,00

[HKEY_LOCAL_MACHINE\SOFTWARE\Microsoft\Microsoft SQL Server\MSSQL11.MSSQLSERVER\MSSQLServer\SuperSocketNetLib\Np]
"PipeName"="\\\\.\\pipe\\sql\\query"

[HKEY_LOCAL_MACHINE\SOFTWARE\Microsoft\Microsoft SQL Server\MSSQL11.MSSQLSERVER\MSSQLServer\SuperSocketNetLib\Tcp]
"TcpPort"="1433"
"Enabled"=dword:00000001

[HKEY_LOCAL_MACHINE\SOFTWARE\Microsoft\Microsoft SQL Server\MSSQL11.MSSQLSERVER\MSSQLServer\SuperSocketNetLib\Tcp\IPAll]
"TCPPort"="1433"

[HKEY_LOCAL_MACHINE\SOFTWARE\Microsoft\Microsoft SQL Server\Instance names]

[HKEY_LOCAL_MACHINE\SOFTWARE\Microsoft\Microsoft SQL Server\Instance names\SQL]
"MSSQLSERVER"="MSSQL11.MSSQLSERVER"

[HKEY_LOCAL_MACHINE\SOFTWARE\Microsoft\Microsoft SQL Server\MSSQL11.MSSQLSERVER\Setup]
"Version"="11.0.3000.0"
double click it, done!
WSUS could not be installed due to restart
Go to event Viewer, Windows Logs > System , in the right pane, click Filter Current Log…, check Error after Event level, Event ID 7041.
The MSSQL$MICROSOFT##WID service was unable to log on as NT SERVICE\MSSQL$MICROSOFT##WID with the currently configured password due to the following error:
Logon failure: the user has not been granted the requested logon type at this computer.

Service: MSSQL$MICROSOFT##WID
Domain and account: NT SERVICE\MSSQL$MICROSOFT##WID

This service account does not have the required user right "Log on as a service."

User Action

Assign "Log on as a service" to the service account on this computer. You can use Local Security Settings (Secpol.msc) to do this. If this computer is a node in a cluster, check that this user right is assigned to the Cluster service account on all nodes in the cluster.

If you have already assigned this user right to the service account, and the user right appears to be removed, check with your domain administrator to find out if a Group Policy object associated with this node might be removing the right.
There are 2 possible solutions to fix this issue :
1) By adding the account (NT SERVICE\MSSQL$MICROSOFT##WID) to log on as service using gpedit.msc. 2) implement the same solution using GPO.
1.Add account NT SERVICE\MSSQL$MICROSOFT##WID as log on as service using GPEDIT.MSC on local server
Open gpedit.msc using administrator account ,Computer Configuration—>Windows Settings—>Security Settings—>Local Policies—>User Rights Assignment
Go to properties of Logon as Service,click on Add user or Group,Enter NT SERVICE\MSSQL$MICROSOFT##WID ,click ok.
Restart the server and start installing WSUS role .
2) Implementing using GPO :
Go to your group policy management console,edit default domain policy
Computer Configuration—>Policies—>Windows Settings—>Security Settings—>Local Policies—>User Rights Assignment
After this you may find the SQL server is not running,because the setting overwrite the local settings, we have to add another name as well. As we used sccmadmin as the user.
In the SCCM installation, They will ask for specify the site database server detail:
To fix this error launch the SQL Server Configuration Manager, expand SQL Server Network Configuration. Click on Protocols for Instance (Instance is your Named Instance). On the right side pane, right click on the TCP/IP and click on Properties. Click on IP Addresses tab and scroll down to the bottom and under the IPALL, set TCP Port value to 1433. Click on Apply and after this change you must restart SQL Server
Issue: Reporting Services Catalog Database File Existence
C:\Program Files\Microsoft SQL Server\MSSQL11.MSSQLSERVER\MSSQL\DATA
move all the database files to another folder. the click rerun.
Issue:Collation
Description: Configuration Manager requires that you configure your SQL Server instance and Configuration Manager site database (if already present) to use the SQL_Latin1_General_CP1_CI_AS collation, unless you are using a Chinese operating system and require GB18030 support.
Setup.exe /QUIET /ACTION=REBUILDDATABASE /SQLCOLLATION=SQL_Latin1_General_CP1_CI_AS /INSTANCENAME=MSSQLSERVER /SQLSYSADMINACCOUNTS=Account Name
If this does not fix the issue, you probably need to remove and install the SQL again.
References
https://blogs.technet.microsoft.com/microsoft_denmark_premier_field_engineering_config_manager_blog/2013/04/10/system-center-configuration-manager-2012-service-pack-1-fails-to-install-when-using-sql-server-2012-service-pack-1/
How to Extend the Active Directory Schema Using ExtADSch.exe: https://technet.microsoft.com/en-us/library/bb680608.aspx