The cloud print will allow the Intune AAD devices to print on premises without domain join.
APP proxy
If your Printer server is not reachable from cloud, you will need to setup APP proxy:
Azure application proxy is a reverse proxy for publishing the NDES URL externally, and it does not need to open any ports on the corporate firewall.
Download the Azure AD Application Proxy connector
Perform the following steps to download the Azure AD Application Proxy connector. The setup file you download is copied to your App Proxy VM in the next section.
- Sign in to the Azure portal with a user account that has Enterprise administrator permissions in Azure AD.
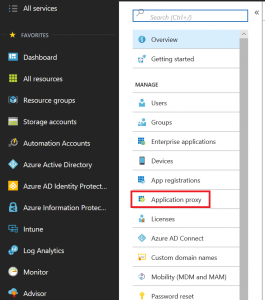
- Search for and select Azure Active Directory at the top of the portal, then choose Enterprise applications.
- Select Application proxy from the menu on the left-hand side. To create your first connector and enable App Proxy, select the link to download a connector.
- On the download page, accept the license terms and privacy agreement, then select Accept terms & Download.

Install and register the Azure AD Application Proxy connector
With a Server ready to be used as the Azure AD Application Proxy connector, now copy and run the setup file downloaded from the Azure portal.
- Copy the Azure AD Application Proxy connector setup file to your VM.
- Run the setup file, such as AADApplicationProxyConnectorInstaller.exe. Accept the software license terms.
- During the install, you’re prompted to register the connector with the Application Proxy in your Azure AD directory.
- Provide the credentials for a global administrator in your Azure AD directory. The Azure AD global administrator credentials may be different from your Azure credentials in the portal
Note: The global administrator account used to register the connector must belong to the same directory where you enable the Application Proxy service.
- If Internet Explorer Enhanced Security Configuration is turned on for the VM where you install the connector, the registration screen might be blocked. To allow access, follow the instructions in the error message, or turn off Internet Explorer Enhanced Security during the install process.
- If connector registration fails, see Troubleshoot Application Proxy.
- Provide the credentials for a global administrator in your Azure AD directory. The Azure AD global administrator credentials may be different from your Azure credentials in the portal
- At the end of the setup, a note is shown for environments with an outbound proxy. To configure the Azure AD Application Proxy connector to work through the outbound proxy, run the provided script, such as
C:\Program Files\Microsoft AAD App Proxy connector\ConfigureOutBoundProxy.ps1. - On the Application proxy page in the Azure portal, the new connector is listed with a status of Active, as shown in the following example:
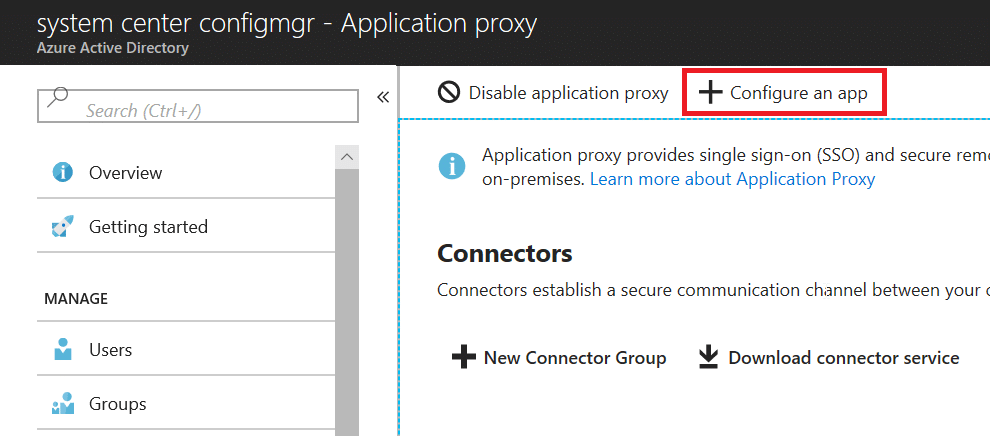
Logon the Azure portal, find Application Proxy:
Configure a APP:
- Give it a descriptive name, mine is nhsndes01, which was installed on the Network Device Enrolment Service server for SCEP profile.
- Internal Url: your domain name in the LAN,mine is nhsndes01.curri.com
- external url: this will be calculated based on the name and your microsoft Primary domain by Azure. Mine is https://intunendes-curriccom.msappproxy.net/
- Pre Authentication: Passthrough
The cloud printer Deploy command needs to be the format of:
Publish-CloudPrinter -Printer ‘OfficeCopier’ -Manufacturer ‘Kyocera’ -Model ‘Kyocera TASKalfa 8709’ -OrgLocation ‘{“attrs”: [{“category”: “country”,”vs”: “Australia”,”depth”: 0}, {“category”: “organization”,”vs”: “Melbourne City IT”,”depth”: 1}, {“category”: “site”,”vs”: “Melbourne,VIC”,”depth”: 2}, {“category”: “building”,”vs”: “Building A”,”depth”: 3}, {“category”: “floor_number”,”vn”: 1,”depth”: 4}]}’ -Sddl ‘O:BAG:SYD:(D;;LCSWSDRCWDWO;;;S-1-5-21-2947324296-3710180578-3658794359-1142)(D;OIIO;RPWPSDRCWDWO;;;S-1-15-3-1024-4044835139-2658482041-3127973164-329287231-3865880861-1938685643-461067658-1087000422)(A;;SWRC;;;WD)(A;;SWRC;;;AC)(A;CIIO;RC;;;AC)(A;OIIO;RPWPSDRCWDWO;;;AC)(A;CIIO;RC;;;CO)(A;;LCSWSDRCWDWO;;;BA)’ -DiscoveryEndpoint ‘https://mopriadiscoveryservice-xxxxx.msappproxy.net/mcs’ -PrintServerEndpoint ‘https://enterprisecloudprintservice-studentsnossalhsvicedu.msappproxy.net/ecp’ -AzureClientId xxxxxxxx-xxxx-xxxx-xxxx-xxxxxxx -AzureTenantGuid xxxxx-xxxx-xxxx-xxxx-xxxxxxxx -DiscoveryResourceId ‘https://mopriadiscoveryservice-xxxxx.msappproxy.net/mcs/’
- Make sure you used the quotation mark.
- Also if you copy the SDDL from the powershell console, make sure you delete the line break.
Troubleshooting
Install-Package system.data.sqlite -providername nuget
Problem 1:
Install-Package : Dependency loop detected for package ‘System.Data.SQLite’.
Solution:
Install-Package System.Diagnostics.DiagnosticSource -RequiredVersion 4.5.1 -Provider nuget
https://github.com/MicrosoftDocs/windowsserverdocs/issues/3633
Add UPN suffix which is reflecting the Azure tenant Primary domain:
Go to the Azure portal, click Azure Active Directory, under Tenant information:

If the solution is deployed to a non-routable domain (e.g. mydomain.local), the Azure AD domain (e.g. domainname.onmicrosoft.com, or one purchased from third-party vendor) needs to be added as a UPN suffix to on-premises Active Directory. This is so the exact same user who will be publishing printers (e.g. admin@domainname.onmicrosoft.com) can be added in the security setting of the database file.
Problem 2:
Server Error in ‘/mcs’ Application. Runtime Error Description: An application error occurred on the server. The current custom error >settings for this application prevent the details of the application error from being >viewed remotely (for security reasons). It could, however, be viewed by browsers running >on the local server machine.
Details: To enable the details of this specific error message to be viewable on remote >machines, please create a tag within a “web.config” configuration file >located in the root directory of the current web application. This tag >should then have its “mode” attribute set to “Off”.
Solution:
Go to the IIS wwwroot folder, (C:\inetpub\wwwroot ), open web.config, Added below into <configuration> </configuration>, note that the off, true are case sensitive.
  <system.web>
    <customErrors mode="Off"/>
    <compilation debug="true"/>
    <authentication mode="None"/>
  </system.web>
Problem 3:
The located assembly’s manifest definition does not match the assembly reference.
Solution:
Turned out to be the command “Install-Package system.data.sqlite -providername nuget” Installed different version of system.data.sqlite.core, system.data.sqlite.linq, system.data.sqlite.ef6.
You can find them under C:\Program Files\PackageManagement\NuGet\Packages, for me they were mix of 1.0.113.0 and 1.0.113.1.
Make sure System.Data.SQLite.x.x.x.x, System.Data.SQLite.Core.x.x.x.x , System.Data.SQLite.EF6.x.x.x.x, System.Data.SQLite.Linq.x.x.x.x are with consistent version.
Reference
https://docs.microsoft.com/en-us/windows-server/administration/hybrid-cloud-print/hybrid-cloud-print-deploy