Prerequisites( deployment server and transport server):
- DNS
- Active Directory Domain Services( AD DS): A WDS server must be either a member of an AD DS domain or DC for an AD DS. Install AD DS first, then click Run the active Directory Domain Services Installation Wizard (dcpromo.exe).
- DHCP ( dynamic host configuration protocol)
- NTFS volume: the WDS image store requires NTFS volume.
- (transport server) Local Administrator Group Credentials. The server must be a member of the local administrators group in order to perform the installation tasks and other server tasks required.
- (transport server) PXE provider: If WDS is running on the same server as DHCP:
- > WDSUTIL /set-server /DHCPoption60:yes
- > WDSUTIL /set-server /usedhcpports:no
- not listen on port 67.
Prerequisites( client):
- Able to do a PXE boot.
- Be a member of a domain users group.
- at least 512MB RAM
- Meet the requirement for the operating system in the install image.
Note: After installation, if the service can not be started, give the system a restart.
Four types of image:
We need at lease one boot image and one install image.
- Boot image: Client boot into a boot image first, then install the operating system in this environment. Guidelines:
- The boot menu can have up to 13 bot images
- The .wim file name can not have spaces
- We can use Windows server 2008 Boot.wim file
- Double-byte character(CJK, Chiness, Janpanese,Korean) sets don’t always display properly
- Install image: Typically the operating system image.
- Discover image: Used for the system that does not support PXE. Can create it by right-click a boot image,select Create Discover Boot image.
- Capture image: Usually a custom install image. Can be created by right-click boot image, select Create capture Boot Image.
Discovery image
To convert the discover image to a bootable .ISO image, you first must download and install the Windows Assessment and Deployment Kit (ADK) for Windows 8. ADK is a set of tools
provided by Microsoft to customize, assess, and deploy a Windows operating system to new computers. It is located at Microsoft’s Download Center. Then use the oscdimg.exe command
to create the .ISO image.
INSTALL THE WINDOWS ASSESSMENT AND DEPLOYMENT KIT (ADK)
To install the ADK, perform the following steps:
1. Start the Windows Assessment and Deployment Kit by double-clicking adksetup.exe.
2. On the Specify Location page, leave the default settings, and then click Next.
3. When you are prompted to join the Customer Experience Improvement Program (CEIP), click Next.
4. On the License Agreement page, click Accept.
5. With the Deployment Tools and Windows Preinstallation Environment (Windows PE) already selected, click Install.
6. When the installation is complete, click Close.
CREATE A BOOTABLE ISO IMAGE
After you have installed the ADK for Windows 8, perform the following steps to create a bootable ISO Image:
1. Create a folder named C:\WinPE_x64\ISO.
2. Copy the contents of the C:\Program Files (x86)\Windows Kits\8.0\Assessment
and Deployment Kit\Windows Preinstallation Environment\amd64\Media folder to C:\WinPE_x64\ISO.
3. Create the C:\WinPE_x64\ISO\Sources folder.
4. Copy the discover image to the C:\WinPE_x64\ISO\Sources folder.
5. Rename the discover.wim fi le in the C:\WinPE_x64\ISO\Sources folder to boot.wim.
6. Copy the etfsboot.com fi le from the C:\Program Files (x86)\Windows Kits\8.0\Assessment and Deployment Kit\Deployment and Imaging Tools\amd64\Oscdimg
folder to the C:\WinPE_x64 folder.
7. Create the bootable ISO by running the following command:
oscdimg -b"c:\WinPE_X64\etfsboot.com" -n C:\WinPE_X64\ISO C:\WinPE_X64\WinPE_X64.iso
Volume Activation
After deploying the windows hosts /server, the next job would be activating them.
Volume Activation(VA) provides the capability for volume licensing. With VA you use a Multiple Activation Key(MAK) or Key Management Service(KMS) to activate the operating system. Organizations are issued Volume License Keys(VLKs), which are used with volume licensing products. It does not apply to or interact with invoicing or billing processes.
Key Management Service(KMS) enables volume activation within an organization’s own network.
Multiple Activation Key activates the product on a system on a one-time basis. MAK use Microsoft’s hosted Activation services.
Volume Activation needs to be properly planned during the deployment process, since upgrades and changes will affect the volume licensing.
KMS configuration involves the following tasks:
- Configuring KMS hosts
- Software license Manage(Slmgr.vbs) is used to configure volume activation. It can be run locally or remotely. Make sure it won’t be prohibited by system by “Run as Administrator”.
- Syntax: slmgr.vbs tragetComputerName [usrename] [password]
- Allowing WMI(Windows management instrumentation) traffic through windows firewall: for multiple subnets, allow the following connections, ASync-In, DCOM-In, WMI-in, allow remote access in the scope. These can be configured in Windows Firewall with Advanced Security Settings.
- Installing KMS hosts
- ENable KMS functionality: slmgr.vbs /ipk <KMSkey> ( One key can active up to 6 hosts on a network, which includes 1 initial KMS host and 5 others).
- Active online, use slmgr.vbs /ato
- Active over phone: slui.exe 4
- slmgr.vbs /dli check the KMS count.
- Aditional command.
- slmgr.vbs /skms <kms_FQDN>:<port>–Manually assign KMS host
- slmgr.vbs /chms– enable auto-discovery for KMS client
- slmgr.vbs /sai–change activation interval
- slmgr.vbs /sri–change activation renewal interval
- slmgr.vbs /cdns–disable DNS publishing
- /sdns–enable DNS publishing
- Configuring DNS permissions
- Configuring KMS clients
Command about the WDS
- Install WDS-Deployment server:
ServerManagerCmd -install WDS - Install WDS-transport server:
ServerManagerCmd -install WDS-Transport - Uninstall WDS:
ServerManagerCmd -remove WDS - Create a bootable ISO:
1. Create a folder named C:\WinPE_x64\ISO.
2. Copy the contents of the “C:\Program Files (x86)\Windows Kits\8.1\Assessment and Deployment Kit\Windows Preinstallation Environment\amd64\Media” folder to
“C:\WinPE_x64\ISO”.
3. Create the “C:\WinPE_x64\ISO\Sources” folder.
4. Copy the discover image to the “C:\WinPE_x64\ISO\Sources” folder.
5. Rename the discover.wim file in the C:\WinPE_x64\ISO\Sources folder to boot.wim.
6. Copy the etfsboot.com file from the “C:\Program Files (x86)\Windows Kits\8.0\Assessment and Deployment Kit\Deployment Tools\amd64\Oscdimg” folder to the C:\WinPE_x64 folder.
7. Create the bootable ISO by running the following command:
CD "c:\Program Files (x86)\Windows Kits\8.0\Assessment and Deployment Kit\Deployment Tools\amd64\Oscdimg"
oscdimg -b"c:\WinPE_X64\etfsboot.com" -n C:\WinPE_X64\ISO C:\WinPE_X64\WinPE_X64.iso
Note that there is no space between the -b and “c:\…”
wdsutil
You cannot install and configure Windows Deployment Services by using Windows PowerShell. Instead, the wdsutil command is used for managing the Windows Deployment Services server.
- To add a boot image, use the following command:
wdsutil /Add-Image /ImageFile:"C:\Data\Boot.wim" /ImageType:Boot - To add an install image, use the following command:
Wdsutil /Add-Image /ImageFile:"C:\Data\Install.wim" /ImageType:Install - /add – Adds prestaged computers, images, or image groups.
- /approve-AutoAddDevices – Approves computers that are pending administrator approval.
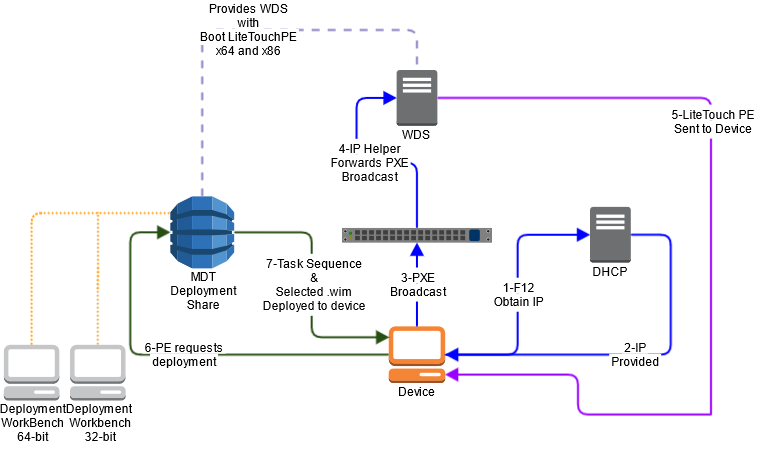
MDT: With MDT, we can customise the install image, and automate the process of the deployment, the way how does WDS and MDT work together is shown bellow.
See this article for more about MDT.