Managing Zones
You might need to spread the DNS load if you have domains and subdomains defined in a zone. If your network has frequent changes to IP addresses and hosts coming online and going offline often, you might need to change zone transfer settings for standard zones and configure zone scavenging to delete stale resource records.
Zone delegation
Zone delegation is transferring authority for a subdomain to a new zone, which can be on the same server or another server. Typically, you use zone delegation when a business unit in an organization is large enough to warrant its own subdomain and has the personnel to manage its own DNS server for the subdomain.
You might have noticed a zone called _msdcs.company.top_domain on the DNS server. Every Windows domain zone has an _msdcs subdomain, which holds all the SRV records for Microsoft-hosted services, such as the global catalog, LDAP, and Kerberos. In the forest root domain, this subdomain is delegated to a new zone on the same server, not on a different server.
Another zone should be taken notice, ” _msdcs” zone under the company.top_domain folder is grayed out, indicating it has been delegated. It contains a single NS record pointing to the server it has been delegated to.
The reason _msdcs is created as a subdomain is so that Windows clients and other clients specifically looking for a Microsoft service can query DNS for the service in the _msdcs subdomain. Remember: It’s possible for non-Microsoft OSs to be operating in the same domain, and they might offer some of the same services, such as Kerberos and LDAP.
The reason _msdcs is delegated to a separate zone in the forest root domain is to change the zone’s replication scope from domain wide to forest wide. Because the forest root contains specialized functions, such as global catalog servers, replication of this domain’s SRV records to the entire forest is critical. If the _msdcs subdomain isn’t delegated to its own zone, the records it contains are replicated according to the parent zone’s setting, which is often only domain wide, not forest wide.
Aside from using zone delegation in Active Directory, you can use it when you have a domain with several subdomains. Delegation can reduce the handling burden.
Zone scavenging
Windows clients usually delete their DNS records only when they release or renew their IP addresses, not when they shut down.
Over time, these “stale” resource records can degrade server performance, provide incorrect information to DNS queries, and generally make DNS less reliable and efficient. To prevent stale resource records from accumulating in the DNS database, you need to enable scavenging.
Scavenging is the process of scanning the records in each zone and deleting stale records.
Enabling Scavenging:
Scavenging must be enabled in two places to occur, server level and zone level.
First, it must be enabled on the server, which allows scavenging to occur on all zones it’s enabled on. To do this, right-click the server icon in DNS Manager, click Properties, and click the Advanced tab. Then click the “Enable automatic scavenging of stale records” check box. “Scavenging period: x days” means how often the server check if there are stale records(records after refresh-interval, see bellow).
Second, enable it on zones. You can do this for all zones at once by right-clicking the server icon and clicking Set Aging/Scavenging for All Zones. If you choose this option, you can set scavenging parameters for all zones at once. Scavenging parameters include No-refresh interval and Refresh interval.
Scavenging parameters set at the zone level override those set at the server level. To open the configuration box, right-click a zone and click Properties, click the General tab, and then click the Aging button.
By default, scavenging is disabled. When it’s enabled, the server checks the zone file for stale records periodically and deletes those meeting the criteria for a stale record.
The options in the Zone Aging/Scavenging Properties dialog box are as follows:
• Scavenge stale resource records—When this check box is selected, scavenging is enabled for the zone. Remember that scavenging must be enabled on the server in the Advanced tab of the DNS server’s Properties dialog box. By default, scavenging on the server isn’t enabled.
• No-refresh interval—To prevent DNS record timestamps from being updated too often, the No-refresh interval timer starts when a DNS record has been updated (refreshed). During this interval, DNS doesn’t accept a timestamp change to the record. Timestamp changes can occur, for example, when a computer renews its IP address lease from DHCP, but no actual changes to DNS data occur. The No-refresh interval prevents excessive replication of DNS data because even a timestamp change requires record replication. The default No-refresh interval setting is 7 days.
• Refresh interval—After the No-refresh interval expires, the Refresh interval timer begins. During this interval, timestamp changes are accepted.
• If the Refresh interval timer expires, the record is considered stale and available for scavenging.
• If the record is refreshed during this period, the No-refresh interval timer begins again.
The default Refresh interval setting is 7 days.
For example, if the no-refresh interval and refresh interval are both 7 days, the Scavenging period is 7 days and happens on every wednesday.

• The zone can be scavenged after (automatically calculated by the system)—This setting is the earliest time and date that zone data can be scavenged. It’s based on the current time and date plus the refresh interval. To see this information, you must have the Advanced View setting enabled in DNS Manager.
The process by which DNS records are aged and scavenged isn’t obvious from reading descriptions of the No-refresh interval and Refresh interval timers, so a step-by-step example is in order, in which these timers are set to their default 7 days:
1. A DNS client computer gets a new IP address from a DHCP server and registers an A and a PTR record with the DNS server. Each record has its own set of timers, so the interval timers in this example apply to both the A and PTR records.
2. The No-refresh interval timer starts, and no timestamp refreshes are accepted for the record for 7 days.
3. The No-refresh interval timer expires.
4. The Refresh interval timer starts, and record refreshes are accepted for 7 days.
5. The computer doesn’t refresh the DNS records, and it’s shut down 1 day after the Refresh interval starts and isn’t started again.
6. The Refresh interval timer expires.
7. The scavenging process deletes the expired DNS record.
As mentioned, you must also enable scavenging on the server in the Advanced tab of its Properties dialog box first.
exampleFrom : https://blogs.technet.microsoft.com/networking/2008/03/19/dont-be-afraid-of-dns-scavenging-just-be-patient/
Scavenging setup
Scavenging will help you clean up old unused records in DNS. Since “clean up” really means “delete stuff” a good understanding of what you are doing and a healthy respect for “delete stuff” will keep you out of the hot grease. Because deletion is involved there are quite a few safety valves built into scavenging that take a long time to pop. When enabling scavenging patience is required. It will work just fine, but not today!
Scavenging is set in three places on a Windows Server:
- On the individual resource record to be scavenged.
- On a zone to be scavenged.
At one or more servers performing scavenging.
It must be set in all three places or nothing happens.
Scavenging settings on a Resource Record
To see the scavenging setting on a record hit View | Advanced in the DNS MMC then bring up properties on a record.
Scavenging gets set on a resource record in one of three ways. The first is by someone coming in here, checking the “Delete this record when it becomes stale” checkbox and hitting apply. When you hit apply the time of day will be rounded down to the nearest hour and applied as the timestamp on the record. Static records have a timestamp of 0 indicating do not scavenge.
The second is when a record gets created by a client machine registering using dynamic DNS. Windows clients will attempt to dynamically update DNS every 24 hours. All DDNS records get set to scavenge. When a record is first created by a client that has no existing record it is considered an “Update” and the timestamp is set. If the client has an existing host record and changes the IP of the host record this is also considered an “Update” and the timestamp is set. If the client has an existing host record with the same IP address then this is considered a “Refresh” and the timestamp may or may not get changed depending on zone settings. More on this later.
The third way to set scavenging on records is by using DNScmd.exe with the /ageallrecords switch. Let’s pause here for a few moments to consider a few important words: All, Records, Delete, Stuff. If you actually run this command against a zone it will truly set scavenging and a timestamp on all records in the zone including static records that you never want to be scavenged. Because of the time it takes scavenging to do it’s thing people find this command and get tempted to give it a try. Do not. It will delete stuff. Have patience instead.
Once a timestamp is set on a record it will replicate around to all servers that host the zone. There is one caveat to this. If scavenging is not enabled on the zone that hosts the record then it will never scavenge so the timestamp is essentially irrelevant. The timestamp may get updated on the server where the client dynamically registers but it will not replicate around to the other servers in the zone.
Scavenging Settings at the Zone
Before a server will even look at a record to see if it will be scavenged the zone must have scavenging enabled. To access the scavenging settings for a zone right click the zone, select properties then on the general tab hit the “Aging” button. This screen is universal for the zone. If you view it on any DNS server where this zone is replicated it will be the same.
When you first set scavenging on a zone the timestamp seen at the bottom (reload zone if you don’t see it) will be set to the current time of day rounded down to the nearest hour plus the Refresh interval. This also gets reset any time the zone is loaded or any time dynamic updates get enabled on the zone.
The “zone can be scavenged after” timestamp is the first of your safety valves. It gives clients time to get their record timestamp updated before the big axe swings. Since new record timestamps are not replicated while zone scavenging is disabled this also gives replication time to get things in order.
Refresh and No-Refresh intervals
The next safety valves are the Refresh and No-refresh intervals. Both of these must elapse before a record can be deleted.
The No-refresh interval is a period of time during which a resource record cannot be refreshed. Recall from earlier that a refresh is a dynamic update where we are not changing the host/IP of a resource record, just touching the timestamp. If a client changes the IP of a host record this is considered an “update” and is exempt from the No-refresh interval. The purpose of a No-refresh interval is simply to reduce replication traffic. A change to a record means a change that must be replicated.
After the (Record Timestamp) + (No-refresh interval) elapses we enter the Refresh interval. The refresh interval is the time when refreshes to the timestamp are allowed. This is the time when good things must happen. The client is allowed to come in and update it’s timestamp. This timestamp will be replicated around and the No-refresh interval begins again. If for some reason the client fails to update it’s record during the refresh interval it becomes eligible to be scavenged. Will it disappear immediately? Probably not but it is certainly possible.
Note: When setting Refresh and No-Refresh intervals be sure to allow enough time for clients to get several registration attempts during a Refresh interval. Failure to do so could allow a record to become eligible for scavenging simply from a failed refresh attempt.
One last thing before we leave the zone setting behind. If you right click on your server you will see the option to “Set Aging/Scavenging for All Zones…”. Selecting this will take you to a screen similar to the one above. What does this do? This sets the default settings that will be used if a new zone is created by this server. Unless you check the subsequent box “Apply these settings to the existing Active Directory-integrated zones” it will not touch existing zones.
Scavenging settings on the Server
So you now have a resource resource record set to scavenge and a zone set to scavenge. All that is left is for somebody to come along, check all the timestamps and delete some stuff. This is done by any server that hosts the AD integrated zone.
Setting scavenging on the server is done by right clicking the server in the MMC, selecting properties, going to the advanced tab and checking the “Enable automatic scavenging of stale records” checkbox.
The Scavenging Period is how often this particular server will attempt to scavenge. When a server scavenges it will log a DNS event 2501 to indicate how many records were scavenged. An event 2502 will be logged if no records were scavenged. Only one server is required to scavenge since the zone data is replicated to all servers hosting the zone.
Tip: You can tell exactly when a server will attempt to scavenge by taking the timestamp on the most recent 2501/2502 event and adding the Scavenging period to it.
Although you can set every server hosting the zone to scavenge I recommend just having one. The logic for this is simple: If the one server fails to scavenge the world won’t end. You’ll have one place to look for the culprit and one set of logs to check. If on the other hand you have many servers set to scavenge you have many logs to check if scavenging fails. Worse yet, if things start disappearing unexpectedly you don’t want to go hopping from server to server looking for 2501 events.
To facilitate strict control over which server is scavenging for a zone you can use DNSCmd.exe to specify exactly which servers may scavenge. For example the following command will make it so that only 192.168.1.1 and 192.168.1.2 DNS servers are allowed to scavenge on the contoso.com zone:
DNSCmd . /ZoneResetScavengeServers contoso.com 192.168.1.1 192.168.1.2
With the server now scavenging, zones enabled for scavenging, and resources records set what actually happens when the server does it’s thing?
The scavenging process and final safety valves
When the last 2501/2052 event + the server scavenging period comes around the server is going to make a scavenging attempt. You can also manually initiate an attempt by right clicking the server and selecting “Scavenge Stale Resource Records”. Note that manually making an attempt in no way bypasses the safety valves. These are the final safety valves before we “delete stuff”:
- Is scavenging enabled on the zone? Pretty self explanatory.
- Is dynamic update enabled on the zone? If it’s not there is a good chance timestamps will be old enough that mass deletions can occur.
- Is the scavenging server listed as one of the “Scavenge Servers” for the zone?
- Are we past the “zone can be scavenged after” timestamp on the zone? This gives the clients and AD replication to get things squared away before we start.
Has it been longer than a refresh interval since this zone was last replicated in Active Directory? If scavenging gets enabled on a server that has replication issues this will prevent it from tombstoning a bunch of records that may be perfectly fine on other servers.
If all of the above checks are good then the zone is ready to be scavenged. At this point the scavenging server checks the timestamp on each individual resource record. If the current date/time is greater than the timestamp + No-refresh + Refresh then the record is deleted.
My best practices
Here is how I set scavenging up on a preexisting zone. This procedure is designed for maximum safety. Using default settings this process can take as long as 4-5 weeks (2 weeks Sanity phase, 2-3 weeks for Enable phase)
Setup phase
- Turn off scavenging on all servers. To confirm scavenging won’t inadvertently run use the DNSCmd /ZoneResetScavengeServers to confine scavenging to a single server then ensure this server has scavenging disabled.
- Turn on scavenging on the zones you wish to scavenge. Set the refresh and No-refresh intervals as desired. If you want things to scavenge more aggressively I would recommend lowering the No-refresh interval at the cost of some replication traffic. Leave the refresh at the default.
Add today’s date plus the Refresh and No-Refresh intervals. Come back in a few weeks when this time has elapsed. Seriously you can’t rush this.
Sanity check phase
Sift through your DNS records looking for any records older than the Refresh + No-Refresh interval. If you see any then something has gone wrong with the dynamic registration process and it must be corrected before proceeding. A thorough check at this point is the most important step in setup
Things to check if you find old records:
- Does an IPConfig /registerdns work?
- Who is the owner of the record (see security tab in the record properties)?
- Was the record statically created by an admin then later enabled for scavenging? If so you may need to delete the record to clear ownership and run an IPConfig /registerdns to get it updated.
- Is the server replicating OK with AD?
Do not proceed unless you can explain any outdated records. In the next phase they will be deleted.
Enable phase
The final step is to actually enable scavenging. Enable scavenging on the single server you used the /ZoneResetScavengServers command on.
Once enabled create a new test record and enable it for scavenging. Then map out the point in time when this record will disappear. Here is how:
- The result will be your “eligible to scavenge” time. The record will not disappear at this time though. It’s just eligible.
- Add the refresh interval
- Start with the timestamp on the record
- Add the no refresh interval
- Check your DNS event logs for 2501 and 2502 events to find what hour the DNS server is doing a scavenging run.
Take your “eligible to scavenge” time, find the most recent 2501/2502 event and add the server’s Scavenging Period (from server properties | advanced tab) to it. This is the point in time when the test record you just created will disappear.
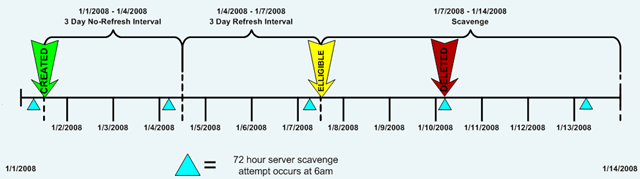
Lets look at an example with the following assumptions:
- Zone is set to a 3 day Refresh and a 3 day No-Refresh interval
- Server Scavenging period is set to 3 days
- Last DNS Event id 2501 or 2502 occurred at 6am on 1/1/2008
- We have a record with a timestamp of 1/1/2008 at 12:00 noon
Given these assumptions you can rub your temples for a bit and predict that the record will be deleted at approximately 6am on 1/10/2008.
Once scavenging is enabled you can check back periodically to look for the 2501 and 2502 events to see how things are going. You can also come back at the predicted date and time and see if your test record disappeared.


zone replication and update
With standard zones, there aren’t a lot of options for how zone data is stored, except perhaps the path and the filename. Active Directory– integrated zones, however, do have some storage configuration options.
Zone replication is the transfer of zone changes from one DNS server to another. For a standard zone, zone replication is called “zone transfer.” When DNS is in- stalled on a domain controller, zone data is replicated automatically to other DCs.
With standard zones, you need to create secondary zones on each DNS server that will host the zone. With Active Directory–integrated zones, a zone is created only once on a DC, and the zone is created automatically on every other DC in the zone replication scope.
The advantages an Active Directory–integrated zone has over a standard zone:
• Automatic zone replication—When DNS is installed on a new domain controller, zones are replicated to the new DNS server automatically. Standard zones require manual configura- tion of zone transfers.
• Multimaster replication and update—Multiple domain controllers can be configured as primary DNS servers, and changes can be made on any of these domain controllers. Multimaster replication provides fault tolerance because no single server is relied on to make DNS changes.
• Secure updates—DNS can be configured to allow dynamic DNS updates only from DNS clients that have authenticated to Active Directory. This option prevents rogue clients from introducing false information into the DNS database.
• Use permissions to restrict which users can modify zone data—You can control which users or groups can change zone data by changing the permissions to the zone in the Security tab of the zone’s Properties dialog box.
• Efficient replication—Replication of Active Directory–integrated zones can target only the DNS record properties that have changed and can target specific DNS servers to replicate with.
Active Directory Zone Replication Scope
The zone replication scope determines which partition the zone is stored in and which DCs the zone information is replicated to.
Right click the Zone name, properties > General > Replication: All DNS Servers in this domain > Change button.
• To all DNS servers running on domain controllers in this forest—Stores the zone in the forest-wide DNS application directory partition ForestDNSZones. This partition is created when DNS is installed on the first DC in the forest.
• To all DNS servers running on domain controllers in this domain—Stores the zone in the domain-wide DNS application directory partition DomainDNSZones. It’s the default option for new zones.
• To all domain controllers in this domain (for Windows 2000 compatibility)—Stores the zone in the domain partition, which is used to store most Active Directory objects. DNS zone information is replicated to all other DCs in the domain, regardless of whether the DNS Server role is installed. This option is the only one available for Windows 2000 DCs and should be selected if DNS information must be replicated to Windows 2000 DNS servers.
• To all domain controllers in the scope of this directory partition—A custom DNS application partition must be created before selecting this option, and the partition must use the same name on each DC hosting DNS that should participate in replication. Use this option to limit which DNS servers receive zone data to control replication traffic. By default, this option is grayed out and disabled until you have created a custom DNS application directory partition.
The “To all domain controllers in the scope of this directory partition” option for configuring the zone replication scope requires additional explanation and configuration.
Normally, you want zones to be replicated to all other DCs that are DNS servers, but in some circumstances, you might want to limit replication to specific DCs. For example, you have set up a zone for testing purposes to be used by only a few departments in an Active Directory site that has three DCs. You can limit replication to just these three DCs so that zone data doesn’t have to travel across WAN links when the zones aren’t needed by users in other sites.
To limit replication to specific DCs, create a custom DNS application directory partition on each DC that the zone should be replicated to. The partition must have the same name on each DC. After you create the custom partition, the option to replicate to specific domain controllers in the Change Zone Replication Scope dialog box is enabled. To create a custom DNS applica- tion directory partition, use one of the following commands:
• At a PowerShell prompt, run the Add-DnsServerDirectoryPartition cmdlet.
• At a command prompt, enter the dnscmd.exe /CreateDirectoryPartition command. (Be aware that dnscmd.exe might be deprecated in future versions of Windows Server)
Dynamic Updates
As mentioned, a major advantage of using Active Directory–integrated zones is the ability to limit dynamic updates to only verified domain members.
Dynamic updates can be configured in one of three ways:
• Allow only secure dynamic updates—Available only for Active Directory–integrated zones, this option ensures that the host initiating the record creation or update has been authenti- cated by Active Directory.
• Allow both nonsecure and secure dynamic updates—Both authenticated Active Directory clients and non–Active Directory clients can create and update DNS records. This option isn’t recommended because it allows rogue clients to create DNS records with false information. A rogue DNS client can impersonate a server by updating the server’s A record with its own IP address, thereby redirecting client computers to a fraudulent server.
• Do not allow dynamic updates—All DNS records must be entered manually. This option helps secure the environment, but on a network with many hosts that must be accessed by name and on networks using DHCP, it’s an administrative nightmare. However, this option does work well for a DNS server that manages names for public resources, such as Web and mail servers with addresses that are usually assigned statically and don’t change often.
Zone transfer
Zone transfers typically use TCP port 53, and most DNS queries from a client to a server use UDP port 53. If zone transfers must occur through a firewall, be sure to open TCP port 53 to allow master and slave servers to communicate.
• Only to servers listed on the Name Servers tab—If you have added servers to the Name Servers tab, zone transfers are allowed to all of them.
• Only to the following servers—You can list the servers by name or IP address you want to allow zone transfers to.
• Notify—Clicking the Notify button opens a dialog box where you can add servers to notify of zone changes. If you use this option, zone transfers occur much sooner than the default polling period because they take place right after a change has happened. By default, it’s disabled.
Timing intervals of zone transfers in the Start of Authority tab.
• Refresh interval—Specifies how often a secondary DNS server attempts to renew its zone information. When the interval expires, the server requests the SOA record from the pri- mary DNS server. The serial number in the retrieved SOA record is then compared with the serial number in the secondary server’s SOA record. If the serial number has changed, the secondary server requests a new copy of the zone data. After the transfer is completed, the refresh interval begins anew. The default value is 15 minutes. If notification is configured, the DNS server attempts to renew its zone information when it receives a notification and resets the Refresh interval timer.
• Retry interval—The amount of time a secondary server waits before retrying a zone transfer that has failed. This value should be less than the Refresh interval timer and defaults to 10 minutes. The Retry interval timer begins after the Refresh interval expires if the primary server can’t be contacted or the zone transfer fails.
• Expires after—The amount of time before a secondary server considers its zone data obsolete if it can’t contact the primary DNS server. If the Refresh interval timer expires without a successful zone transfer, this timer begins. If it expires without contacting the primary DNS server or without a successful zone transfer, the DNS server stops responding to queries. This value must be higher than the Refresh interval and Retry interval combined; the default is 1 day. This timer prevents a secondary server from responding to the DNS queries with data that might be stale.
Full Versus Incremental Zone transfer
Forwarder
Traditional forwarder: Basically means “if DNS server can not resolve the query, forward it to this address”. Similar to the function of default route in routing system. Right click the server node in DNS manager, click properties, then Forwarders tab.
Conditional forwarder enables administrators to forward queries for particular domains to particular name servers and all other unresolved queries to a different server.
Situations when use forwarder:
- When the DNS server address for the target domain is known.
- Only one DNS server in a network should make external queries: All other DNS servers forward the query to this DNS server.
- When a forest trust is created: configure conditional forwarders in the forest root name servers of both forests that point to each other.
The order the DNS server attempts to resolve DNS queries when conditional forwarder is configured:
- From locally stored zone resource records
- From the DNS cache
- From conditional forwarder
- From traditional forwarder
- Recursively by using root hints.
Note: root hints are not used if a traditional forwarder is configured because after the forwarder is queried, the recursive lookup process is complete.
Reference: understanding DNS forwarding, https://technet.microsoft.com/en-us/library/cc730756%28v=ws.11%29.aspx
Only the client computers in the Active Directory domain can register records in the zone
If you install DNS server on a non-DC, then you are not able to create AD-integrated zones. DNS update security is available only for zones that are integrated into AD DS. When you directory-integrate a zone, access control list (ACL) editing features are available in DNS Managerso that you can add or remove users or groups from the ACL for a specified zone or resource record.
http://technet.microsoft.com/en-us/library/cc771255.aspx
http://social.technet.microsoft.com/Forums/en-US/winserverNIS/thread/9b041bbc-07654eed-
bd1cd65027f05e9f/
http://blogs.msmvps.com/acefekay/2012/11/19/ad-dynamic-dns-updates-registration-rulesof-
engagement/
1. Active Directory’s DNS Domain Name is NOT a single label name (“DOMAIN” vs the minimal requirement of”domain.com.” “domain.local,” etc).
2. The Primary DNS Suffix(In property of my computer) MUST match the zone name that is allowing updates. Otherwise the client doesn’tknow what zone name to register in.
You can also have a different Conneciton Specific Suffix in addition to thePrimary DNS Suffix to register into that zone as well.
3. AD/DNS zone MUST be configured to allow dynamic updates, whether Secure or Secure and Non-Secure.
For client machines, if a client is not joined to the domain, and the zone is set to Secure, it will not register either.
4. You must ONLY use the DNS servers that host a copy of the AD zone name or have a reference forwarder for efficient Internet resolution. .
5. The domain controller is multihomed (which means it has more than one unteamed, active NIC, more thanone IP address, and/or RRAS is installed on the DC).
6. The DNS addresses configured in the client’s IP properties must ONLY reference the DNS server(s) hostingthe AD zone you want to update in. This means that you must NOT use an external DNS in any machine’s IP property in an AD environment.
You can’t mix them either. That’s because of the way the DNS Client side resolver service works.
Even if you mix up internal DNS and ISP’s DNS addresses, the resolver algorithm can still have trouble asking the correct DNS server. It will ask the first one first. If it doesn’t get a response, it removes the first one from the eligible resolvers list and goes to the next in the list. It will not go back to the first one unless you restart the machine,restart the DNS Client service, or set a registry entry to cut the query TTL to 0. The rule is to ONLY use yourinternal DNS server(s) and configure a forwarder to your ISP’s DNS for efficient Internet resolution.
This is the reg entry to cut the query to 0 TTL:
The DNS Client service does not revert to using the first server …The Windows 2000 Domain Name System (DNS) Client service (Dnscache) follows a certain algorithm when it decides the order in which to use the DNSservers …
http://support.microsoft.com/kb/286834
For more info, please read the following on the client side resolver service:
DNS, WINS NetBIOS & the Client Side Resolver, Browser Service, Disabling NetBIOS, Direct Hosted SMB(DirectSMB), If One DC is Down Does a Client logon to Another DC, and DNS Forwarders Algorithm if you have multiple forwarders.http://msmvps.com/blogs/acefekay/archive/2009/11/29/dns-wins-netbios-amp-the-clientside-resolver-browserservice-disabling-netbios-direct-hosted-smb-directsmb-if-one-dc-isdown-does-a-client-logon-to-another-dcand-dns-forwarders-algorithm.aspx
7. For DHCP clients, DHCP Option 006 for the clients are set to the same DNS server.
8. If using DHCP, DHCP server must only be referencing the same exact DNSserver(s) in it’s own IP properties in order for it to ‘force’ (if you setthat setting) registration into DNS. Otherwise, how would it know which DNSto send the reg data to?
9. If the AD DNS Domain name is a single label name, such as “EXAMPLE”, and not the proper format of”example.com” and/or any child of that format, such as “child1.example.com”, then we have a real big problem.
DNS will not allow registration into a single label domain name.
This is for two reasons:
1. It’s not the proper hierachal format. DNS is hierarchal, but a single label name has no hierarchy.
It’s just a single name.
2. Registration attempts causes major Internet queriesto the Root servers. Why? Because it thinks
the single label name, such as “EXAMPLE”, is a TLD(Top Level Domain), such as “com”, “net”, etc.
It will now try to find what Root name server out therehandles that TLD. In the end it comes back to itself and then attempts to register. Unfortunately it doe NOTask itself first for the mere reason it thinks it’s a TLD.
(Quoted from Alan Woods, Microsoft, 2004):
“Due to this excessive Root query traffic, which ISC found from a study that discovered Microsoft DNS serversare causing excessive traffic because of single label names, Microsoft, being an internet friendly neighbor and wanting to stop this problem for their neighbors, stopped the ability to register into DNS with Windows 2000SP4, XP SP1, (especially XP,which cause lookup problems too), and Windows 2003. After all, DNS ishierarchal, so therefore why even allow single label DNS domain names?”
The above also *especially* Applies to Windows Vista, &, 2008, 2008 R2, and newer.
10. ‘Register this connection’s address” on the client is not enabled under the NIC’s IP properties, DNS tab.
11. Maybe there’s a GPO set to force Secure updates and the machine isn’t a joined member of the domain.
12. ON 2000, 2003 and XP, the “DHCP client” Service not running. In 2008/Vista and newer, it’s the DNSClient Service. This is a requirement for DNS registration and DNS resolution even if the client is not actuallyusing DHCP.
13. You can also configure DHCP to force register clients for you, as well as keep the DNS zone clean of old orduplicate entries. See the link I posted in my previous post.
GlobalNames Zones
GlobalNames Zones can be used to resolve single label name. The primary reason to include a GNZ in DNS is to support legacy applications using NetBIOS names after migrating to an IPv6 network in a multi-domain forest. IPv6 does not support NetBIOS names.
A significant difference between a GNZ and WINS is that GNZ does not support automatic registration of client. In other words, you must manually create all of the records in the GNZ. So, GNZ isn’t intended to replace WINS, but instead to aid in the retirement of WINS.
GNZ records are CNAME records that point to an A( AAAA) record contained in the primary zone. The CNAME record is created in the specialized GlobalNames zone.
A GNZ is not really needed in a single-domain forest, due to how the DNS suffix search order is used. Adding suffixes for one or two domains may be acceptable solution, In multiple-domain environment, adding too many suffixes can affect the performance of the client because each suffix must be searched.
If a GNZ is used instead, the suffix search list does not need to be added to all clients.
Enable the GNZ:
dnscmd servername /config /enableglobalnamessupport 1
after the command is enterred, the screen will display :
registry property EnabledGlobalNamesSupport successfully reset
Command completed successfully
Then you can create a primary zone called GlobalNames. You can also designate a GNZ as ADI (Active Directory Intergrited) zone.
Configuring Round-Robin DNS
As you have seen, you can configure round-robin load-balancing for MX records and SRV records by creating multiple records with the same priority. You can also configure round-robin load-balancing for regular host records. In addition, you can configure load-balancing among servers running mirrored services. With a mirrored service, data for a service running on one server is duplicated on another server (or servers). For example, you can set up an FTP server or a Web server on servers that synchronize their content with one another regularly. Then config- ure DNS with multiple host records, using the server’s name in both records but with each entry configured with a different IP address.
This process is called round-robin DNS because each IP address is placed first in the list an equal number of times. Hosts receiving the DNS response always attempt to use the first address listed. You can improve the results of round-robin DNS by configuring a shorter TTL on the three A records so that remote DNS servers don’t cache IP addresses for an extended period. By default, the round-robin option is enabled on Windows DNS serv- ers, but you can disable it in the Advanced tab of the DNS server’s Properties dialog box
Useful command:
- Ipconfig /flushdns :Delete all DNS query responses that have been cached on the local DNS client.
- Ipconfig /displaydns: Displays all the currently cached query responses on a DNS client.
- Ipconfig /registerdns: Force registration or refresh of a client’s DNS records on the Preferred DNS server.
- Clear DNS server cache on client: dsncmd /clearcache
- Add Preferred DNS server: netsh int ip set dns “adaptername” static ipaddress
- Add alternate DNS servers: netsh int ip add dns “adaptername” index=indexnumber ipaddress Indexnumber is 2 or greater
- Install DNS in FUll version of Win2008: servermanagercmd.exe -install DNS
- Install DNS in server Core(Case sensitive): start /w ocsetup DNS-Server-Core-Role
- net stop DNS: stop DNS service on server
- net start DNS
- Accept zone transfer requests from any name servers: dnscmd /zoneresetsecondaries bentech.local /nonsecure
- dnscmd <ServerName> /ZoneAdd <ZoneName> {/Primary|/DsPrimary|/Secondary|/Stub|/DsStub} [/file <FileName>] [/load] [/a <AdminEmail>] [/DP <FQDN>]
Parameters:
- <ServerName>: Optional. Specifies the DNS host name of the DNS server. You can also type the IP address of the DNS server. To specify the DNS server on the local computer, you can also type a period (.) If nothing specified, means local.
- /ZoneAdd: Required. Adds a zone.
- <ZoneName>: Required. Specifies the fully qualified domain name (FQDN) of the zone.
- /Primary|/DsPrimary|/Secondary|/Stub|/DsStub :Required. Specifies the type of zone. /DsPrimary and /DsStub specify an Active Directory–integrated zone type.
- /file :Required for /Primary. Specifies a file for the new zone. This parameter is not valid for the /DsPrimary zone type.
- <FileName> :Required for /Primary. Specifies the name of the zone file. This parameter is not valid for the /DsPrimary zone type.
- /load :Loads an existing file for the zone. If this parameter is not specified, default zone records are created automatically. This parameter does not apply to /DsPrimary.
- /a :Adds an administrator e-mail address for the zone.
- <AdminEmail>:Specifies the administrator e-mail name for the zone.
- /DP :Adds the zone to an application directory partition. You may also use one of the following:
- /DP /domain—For a domain directory partition (replicates to all DNS servers in the domain).
- /DP /forest—For a forest directory partition (replicates to all DNS servers in the forest).
- /DP /legacy—For a legacy directory partition (replicates to all domain controllers in the domain). This setting supports domains that have legacy Windows 2000 Server domain controllers.
- <FQDN>: Specifies the FQDN of the directory partition.
- Eg: Add a primary zone: dnscmd /zoneadd zonename /primary
Add secondary zone: dnscmd /zoneadd zonename /secondary master_ipaddress
- Refresh the zone file : dnscmd /zonerefresh zonename
- List the DNS zones on client: dnscmd /enumzones
- list all the zone records: dnscmd /zoneprint zonename
- Adding A record: dnscmd /recordadd zonename hostname A ipaddress
- Adding NS records: dnscmd /recordadd zonename @ ns servername
- Adding MX records: dnscmd /recordadd zonename @ MX priority servername
- Adding PTR records: dnscmd /recordadd zonename lowIP PTR FQDN
- Adding AAAA records: dnscmd /recordadd zonename hostname AAAA ipaddress
- Reloading a zone file on a standard DNS server( From %systemroot%\system32\dns): dnscmd /zonereload zonename
- Use group policy to apply the DNS suffix.
- Use Regedit.exe Hkey_local_machine\system\currentControlSet\Services\Tcpip\Parameters\Domain Click “Domain” in right pane.Then type the suffix.
To prevent from appending the DNS suffixes, we should “Dot terminate” the FQDNs. For example, nslookup server01.bentech.net.
Global query block is causing a DNS server to fail a query with error code Name Error exists in the DNS database for WPAD
You will find some DNS records are blocked by design, WPAD and ISATAP are two by default in windows servers. In this scenario, you will receive a NXDOMAIN (non-existence domain) result.
Source:  DNS
Category: None
Type: Error
Event ID: 6268 (7600 on windows 2012R2)

Description: The global query block list is a feature that prevents attacks on your network by blocking DNS queries for specific host names.  This feature has caused the DNS server to fail a query with error code NAME ERROR for wpad.contoso.com. even though data for this DNS name exisits in the DNS database.  Other queries in all locally authoritative zones for other names that begin with labels in the block list will also fail, but no event will be logged when further queries are blocked until the DNS server service on this computer is restarted.
To manipulate this method,
- Open the Registry Editor and navigate to
HKEY_LOCAL_MACHINE\SYSTEM\CurrentControlSet\Services\DNS\Parameters - Double-click on the GlobalQueryBlockList value to open the editor.
- Highlight the wpad entry and press the delete key
- Click ‘OK’ and ‘OK’ again to return to the main window
- Restart the ‘DNS Server’ service
https://support.microsoft.com/en-us/help/2003485/dns-event-dns-event-6268-caused-the-dns-server-to-fail-a-query