In this example we have two folder for testing, I:\data\test_sync and I:\data\test_sync2. We need these two folder to be synced every 4 seconds ( you can adjust the time according to your need), the shorter time interval , the more system resource it will consume, you will also need to consider the transport speed, make sure the first data transmission can be finished before the second sync start.
Note, Always keep in mind that synchronization can not take place of backup!!!
Step1. Choose the source and destination folder.

Step2, Set the event to trigger the synchronization. 
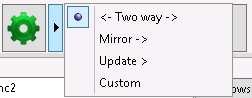
Step3. Set the method to use:
FreeFileSync is able to detect moved files on one side and can quickly apply the same move on the target side during synchronization instead of a slow copy and delete. To make this work FreeFileSync requires database files (sync.ffs_db) to compare the current file system state against the time of the last synchronization.
The Two-Way variant already creates database files, therefore detection of moved files is always active.
The Mirror variant however does not need the database files to find synchronization directions, so detection of moved files is not available by default. If you don’t mind the creation of the database files you can enable this feature by selecting the Detect moved files checkbox.
Note
- Detection of moved files is not yet possible when synchronizing a folder pair for the first time. Only beginning with the second sync the database files are available to determine moved files.
- Detection is not supported by all file systems. Most notably, certain file moves on the FAT file system cannot be detected. Also virtualized file systems, e.g. a mounted WebDAV drive, might not support move detection. In these cases FreeFileSync will automatically fall back to copy and delete.
- Two way, no matter which folder content is changed, it will be copied to the other one.
- Mirror:
By now, you can synchronise two folder just by click the Synchronise button.
If you want to create a real time synchronise job, continue with step4.
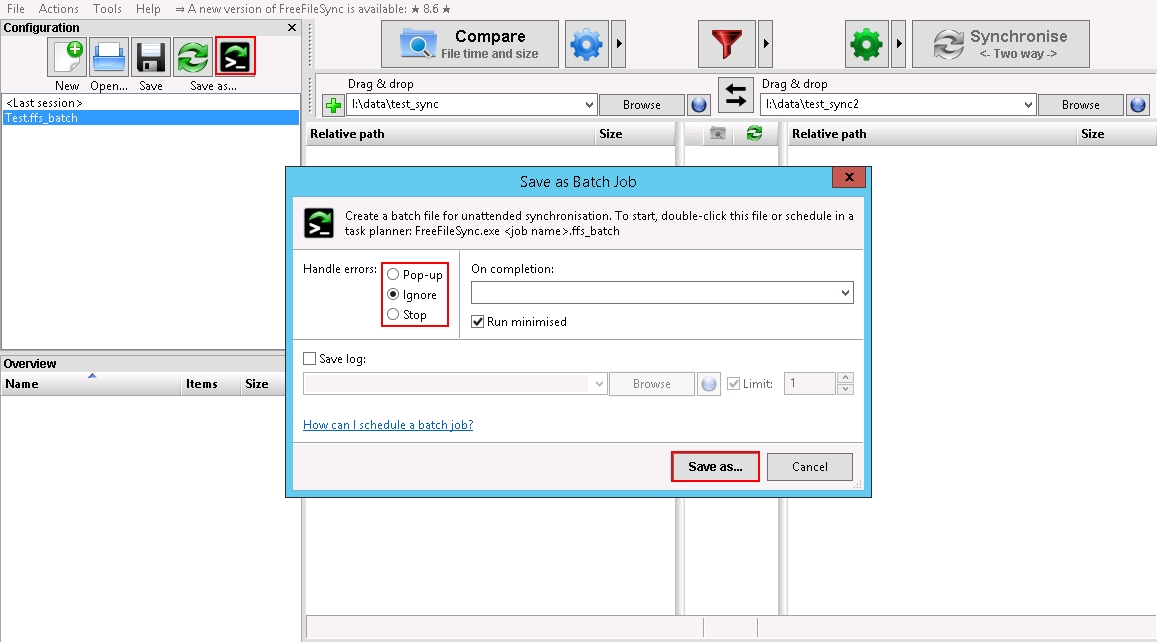
Step4. Save as batch file, click the Menu ” File” > “save as batch job”. or click the button on the tool bar. Choose the handle errors method , action on completion, then click “save as…”, take a note of the path, you will use it in step5.
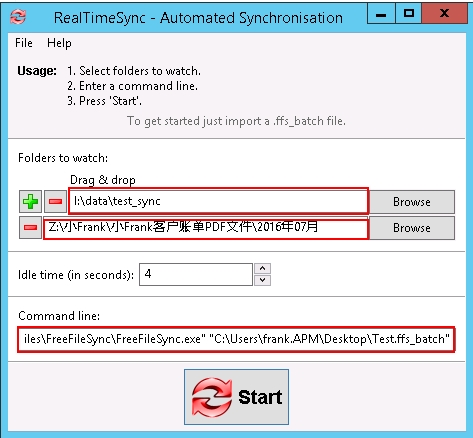
Step5 Click the RealTimeSync. button which is in the same folder with the FreeFileSync. First choose the folders to watch.
Idle time: means sync interval you like, if you choose 4 second, means every 4 second the software will check if there is a change on the watched files. If there is a change, it starts sync, if not, check it in 4 seconds later.
Command Line: there should be at least two parameters, the path of the FreeFileSync.exe , and the path of the batch file you created in step4.
![]()
Step6. testing
- Create a text file test1.txt in I:\data\test_sync, wait for 4 seconds, and check the other folder, it should be copied to the other folder.
- Then do some change ( type a couple of words) in the test1.txt file and check if the change happen in the other folder.
- Delete the file in folder, and wait for 4 seconds, it should be deleted in the other folder as well.
Official website:
http://www.freefilesync.org/