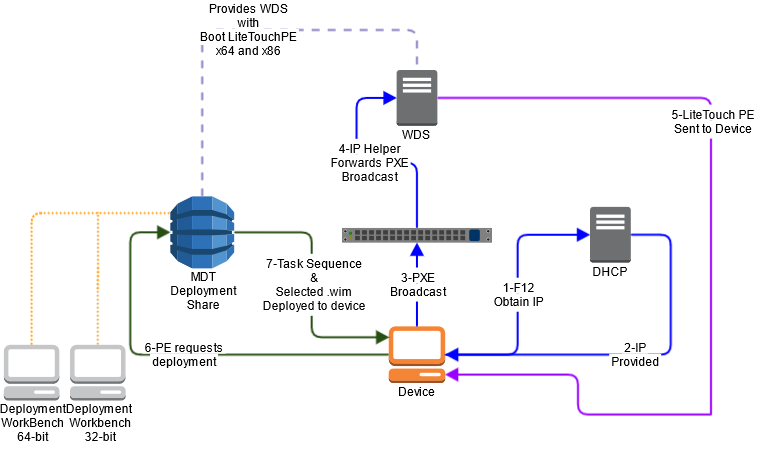
Before get touching with MDT, you should know how does WDS works, because MDT must work together with WDS. See this article here: frankfu.click/microsoft/windows-2012/deploying-windows-services.html
MDT
The Microsoft Deployment Toolkit (MDT) is a “solution accelerator” used for designing and creating operating system and application deployment. It is typically used in concert with the Windows Automated Installation Kit (WAIK) to produce highly customized and automated deployment solutions.
Following image illustrate how do they work together:
Note that you need to manually add the Boot LiteTouch PE to the WDS server, MDT does not do this automatically. To do this go to the WDS, Boot images, right click on the Boot Images, click “Add Boot image…“
Then right click the server node, click “property” go to Boot tab, select the default boot image under default boot image (optional).
Also Note that the specific version of the software (MDT, ADK, Windows) must match with each other.
Install MDT and create deployment share
A new Microsoft Deployment Toolkit section is created. Launch the Deployment Workbench (New)
Right click Deployment Shares in the left navigation and select New Deployment Share:
Change the deployment share path or leave defaults and click Next:
Change the deployment share name or leave defaults and click Next:
DeploymentShare$
Change the deployment share description or leave defaults and click Next:
Review and uncheck each of the default options and click Next:
Review and click Next:
Click Finish:
Open Computer Management. Expand Local Users and Groups and right click Users to select New User:
A local user account with rights to the MDT share will be very beneficial for deployments. Create a local user, set password never expires, and enter a password that can be safely stored in plain text without much risk (not a super secretive password):
By default the deployment share is created with Everyone Full Control permissions. To review, find the deployment folder, right click and go to the Sharing tab. Click Advanced Sharing:
Click Permissions:
Note Everyone is added by default with Full Control (security is controlled by NTFS permissions on the folder):
On the Security tab of the share, note that Users have Read & Execute, List Folder Contents, and Read NTFS permissions. This is perfect for our newly created MDT user to access the share during deployments:
Back in the Deployment Workbench, right click the new deployment share and select Properties.
Under the Rules section, drop the following block of options at the end of the [Default] section, automatic domain join can be put here ( I created a user called domain.join with only enough permission to put into a ou called devices):
JoinDomain=frankfu.click
DomainAdmin=domain.join
DomainAdminDomain=frankfu
DomainAdminPassword=P@ssw0rd!
MachineObjectOU=OU=Devices,DC=frankfu,DC=click
SkipComputerName=YES
SkipDomainMembership=YES
SkipUserData=YES
SkipCapture=YES
DoCapture=NO
SkipLocaleSelection=YES
SkipTaskSequence=NO
SkipTimeZone=YES
SkipApplications=YES
SkipSummary=YES
SkipBDDWelcome=YES
TimeZone=255
TimeZoneName=A.U.S. Eastern Standard Time
| 255 | A.U.S. Eastern Standard Time | (GMT+10:00) Canberra, Melbourne, Sydney |
After you’re fairly experienced with MDT, you can read up and review all of the CustomSettings.ini options in various documentation articles and blogs online. Once each option has been added, click Edit Bootstrap.iniin the bottom right:
Under the [Default] section, drop the following block of options:
[Settings] Priority=Default [Default] DeployRoot=\\MDT01\DeploymentShare$
UserID=domain.join
UserDomain=frankfu.click
UserPassword=P@ssw0rd!
KeyboardLocale=en-US
SkipBDDWelcome=YES
Close the Notepad document and you will be prompted to save changes.
Click Save:
Click Apply to save changes to CustomSettings.ini for the deployment share:
Click OK:
Next, we’ll import the Operating System images (WIM) for Windows Server 2012 R2. To do this, I will very handily double click to Mount the volume license ISO:
The next drive letter available for my MDT server was E:\ so the installation media is now mounted using that drive:
![]()
In the Deployment Workbench, right click Operating System and select Import Operating System:
Select Full set of source files and click Next:
Type E:\ to use the recently mounted ISO. Click Next:
Enter a destination directory name (I typically just clean up the default name that was detected). Click Next:
Click Next:
Upon completion (typically a couple minutes) click Finish:
Typically, I do some cleanup since I won’t need most of the WIM files imported. For now, I’ll delete the three WIM files and leave Server Datacenter. To do so, select each file, right click and select Delete:
I’ll select Completely delete and click Next:
Click Next:
Click Finish:
Next, I’ll rename to clean up the WIM file name to “Windows Server 2012 R2 Datacenter.wim”:

Right click Task Sequence and select New Task Sequence:
Enter DEPLOY-WS2012R2 for the Task sequence ID and a name to be selected using the deployment wizard, “Deploy Windows Server 2012 R2” for example. Click Next:
Select Standard Server Task Sequence from the drop-down and click Next:
Select the Operating System from the list and click Next:
Your choice to enter a product key, or do this later. Click Next:
Enter a name, organization, and home page. Click Next:
Enter a password that you don’t mind having stored in plain text as this is kept within the Unattend.xml file. The administrator password can always be changed post-deployment. Click Next:
Click Next:
Click Finish:
Next, we’ll modify the task sequence to enable Windows Updates. Right click the new task sequence and select Properties:
Under the State Restore section, there are two entries for Windows Update which are both disabled by default. Highlight each of these tasks and click the Options tab:
Uncheck Disable this step to enable the step.
Repeat for the second Windows Update entry:
Uncheck Disable this step and both tasks should now be enabled. This will come in hand later when we start slipping in applications to the task sequence. Click OK to save all changes to the task sequence:
Optionally (and highly recommended), the default Microsoft Solutions Accelerator background can be replaced by using an identically sized and bit depth BMP file in the following location: C:\Program Files\Microsoft Deployment Toolkit\Samples\Background.bmp:
- Right Click on the Deployment share and select properties
- Click the Windows PE x86 Settings Tab (Or 64 Bit tab depending on what you are changing)
- Under Windows PE Customizations, you should see a Custom background bitmap file box. Browse to your image (C:\Program Files\Microsoft Deployment Toolkit\Samples\Background.bmp) you want to use
- Hit Apply and then OK
Finally, let’s package everything up to create a LiteTouch ISO file for booting. In the Deployment Workbench, right click the deployment share and select Update Deployment Share. Once the deployment share has been updated the first time, the LiteTouchPE_x64.iso files are created under the \\DeploymentShare\Boot folder
Time zone and time zone name: https://blog.brankovucinec.com/2014/10/20/microsoft-time-zone-index-values/
domain Join User Permission
To let a normal user join domain without excessive permission, we can use delegation:
- Click Start, click Run, type dsa.msc, and then click OK.
- In the task pane, expand the domain node.
- Locate and right-click the OU that you want to modify, and then click Delegate Control.
- In the Delegation of Control Wizard, click Next.
- Click Add to add a specific user or a specific group to the Selected users and groups list, and then click Next.
- In the Tasks to Delegate page, click Create a custom task to delegate, and then click Next.
- Click Only the following objects in the folder, and then from the list, click to select the Computer objects check box. Then, select the check boxes below the list, Create selected objects in this folder and Delete selected objects in this folder.
- Click Next.
- In the Permissions list, click to select the following check boxes:
- Reset Password
- Read and write Account Restrictions
- Validated write to DNS host name
- Validated write to service principal name
- Click Next, and then click Finish.
Whenever you use this user to join a computer into the domain, the computer object will be moved into the OU where you delegated the permission.
Applications deployment
- Create a folder for each application as the MDT only allow you to select a folder when you import a MSI package
- the install command is in the below format:
msiexec.exe "Creative Cloud Packager.msi" /quiet /norestart /qn
Injecting Drivers Based On Target Computer Model
The Driver folder can e huge if you have multiple models to deploy, which will take a lot of extra disk space.
The driver injection happens before the Operating system installation, so we can add an extra step to determine the model of the target machine and only inject the driver for that model.
Depends on the Driver folder structure, you may need to get the info you need to select the correct driver.
In my example, I have Acer laptops, and Lenovo laptops below the “Out-of-Box Drivers” Folder, then there are a couple of models under each Vendor.
Step1. Use command WMIC csproduct GET vendor to get the Vendor name, eg. I got Acer here. then use WMIC csproduct GET name to get the model name, eg. I got TravelMate Spin B118-RN.
Step2. Under the Out-of-Box Drivers folder in the DeploymentWordbench, create a folder named Acer, then a subfolder called TravelMate Spin B118-RN under Acer.
Step3. In the Deployment Workbench, go to Task Sequence, right click the Task sequence created by you, click Properties, then click Task sequence tab, click the Add button, point to General, Set Task Sequence Variable, Give it a name called “Drivers Path”, In the Description ( optional) type Only inject the Drivers for the correct model.In the Task sequence variable type DriverGroup001, Value: %make%\%model%. The %make% and %model% variables will be determined at deploy time when a WMIC query is run to determine the manufacturer and model of the target computer. move this step just above Inject Drivers under Preinstall.
In my environment we only maintain one windows image version, so I did not create folder structure like Make\Windows x\model, where x is your windows version number.
If there is only one vendor in your environment, you can skip the folder level of make, use model only to make it simple, the value for DriverGroup001 will be %model%. If you have windows version, you may need to keep folder structure as Make\windows 10\model, then the value for DriverGroup001 will be %make%\windows 10\%model%
Step4. Stop injecting All drivers: Go to Inject Drivers under Preinstall, select “Nothing” under “Choose a selection profile”. Click OK
Step5. Then go to the Deployment Share, right click the MDT Deployment Share name and update it.
Step6. Go to the WDS and import the boot image updated in step5.
Capture image with WDS and deploy with MDT
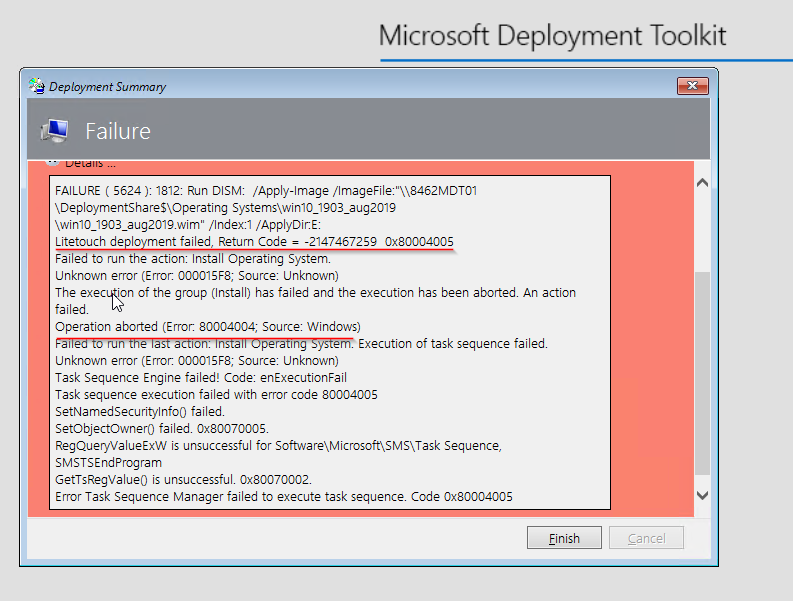
You may come across with the capture issue in MDT either due to script bug or something, in this case, you want to do an old way capture via WDS by building a reference machine, syspreping it and shutdown. Create a capture image from the boot image which is of version of your reference machine, note that you need a second drive to store the capture image.
When you got the reference image ready from a WDS, if you import it to MDT by selecting “Custom image file”, you will get an Error during OS install: “Litetouch deployment failed, Return Code=-2147467259 0x80004005, failed to run the action: Install Operating System. Unknown error……….operation aborted error:80004004”.
This could be due to different image metadata, the correct way is choose ” Windows Deployment Services images“:
Open the deployment share and open up “Operating Systems”
Right click on the folder you wish to have your WDS images in and select “Import Operating System“
Select “Windows Deployment Services images“
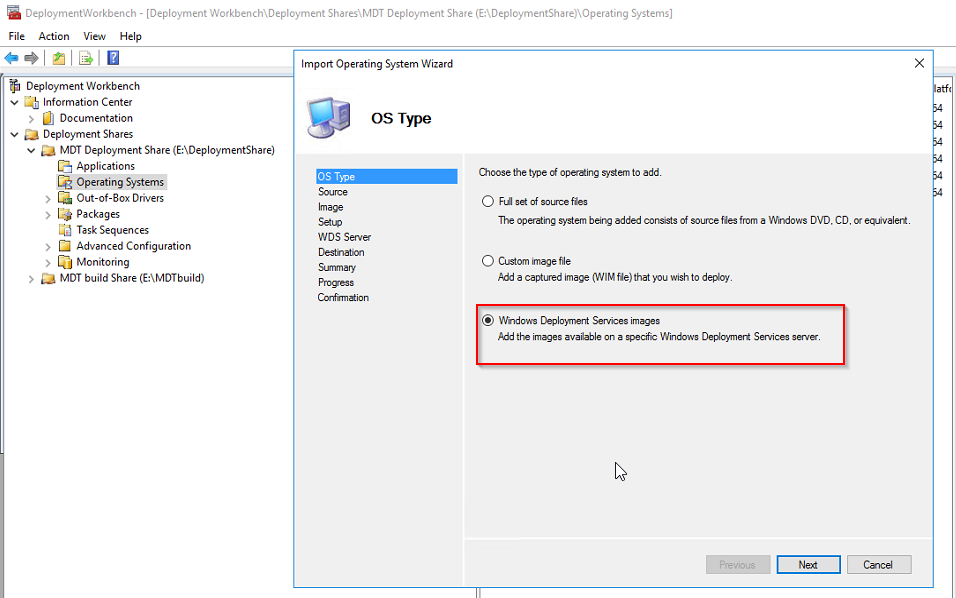
Input the name of your WDS server, then click next until finish, you will find new image name like “image_name in WDS group groupname”
Then you can deploy it with the Task Sequences.
Deploy Script
Copy the script file-name.ps1 to MDTDeploymentShare\Scripts folder. Add a task of type Run Command Line 1. Move the task to the desired location using the arrows then edit the properties: name the task 1. In the Command line enter powershell.exe -file "%ScriptRoot%\file-name.ps1". In the Start in indicate %ScriptRoot% then validate by pressing the Apply button and OK .
Deploy file
If you want to copy a file to the desktop, put the file you want to deploy in the Deployment share, such as DomainJoiner-SchoolAdmin.exe.
Add a step in the task sequence, Run command line:
cmd /c xcopy.exe "%deployroot%\DomainJoiner-SchoolAdmin.exe" "%OSDISK%\Users\Public\Desktop" /Q /H /E /I /Y
Install a fresh windows without domain join
If you want to disable domain join only for one task sequence, after the “Install Operating System”, create a Step “Run command line”
In the command line, add below command
cmd.exe /c del %OSDisk%\Windows\Panther\unattend.xml /s