set up an iSCSI LUN with thin provisioning on my Synology NAS
Overview
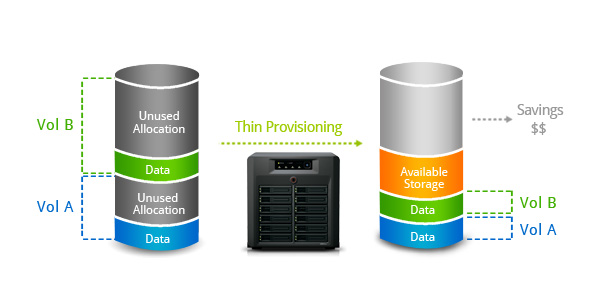
Thin provisioning is the act of using virtualization technology to provide storage on-demand-allocation and over-subscription capability to maximize storage utilization. On-demand allocation of blocks of data versus the traditional method of allocating all the blocks up front makes storage space consumption only happens when the data is physically created. Besides, over-subscription is a mechanism that allows a server to view more storage capacity than has been physically reserved on the storage array itself. Synology NAS supports thin provisioning with both on-demand-allocation and over-subscription could help you enhance storage efficiency, and lower your TCO.
This article will guide you through the process of enabling thin provisioning iSCSI LUN on your Synology NAS
1. Before you start
Before you start to share data within the Internet, make sure you have completed the following tasks:
- Hardware installation for Synology NAS.
- Software installation for Synology DiskStation Manager (DSM, web-based operating system of Synology NAS)
- Setting up a volume and create a shared folder
Refer to Quick Installation Guide for more information about hardware and software installation. You can also see Synology NAS User’s Guide (available at Synology’s Download Center) for a general idea about topics related to this article.
2. Create iSCSI LUN
This section will help you to create an iSCSI LUN on your Synology NAS.
-
- Go to Storage Manager > iSCSI LUN tab, click Create and the iSCSI LUN Creation Wizard will appear.

-
- Under Choose a LUN type, select iSCSI LUN (Regular Files) and click Next.

-
- Under Set up iSCSI LUN Properties, you can set values for:
- Name: Customize the name of the iSCSI LUN.
- Location: Choose a volume for the iSCSI LUN.
- Thin Provisioning: Select Yes.
- Capacity (GB): Input a value in Gigabytes for the capacity of your iSCSI LUN.
- iSCSI Target mapping: You may Create a new iSCSI target, Map existing iSCSI targets, or None.
- Under Set up iSCSI LUN Properties, you can set values for:

-
- Click Next
- If you have selected Create a new iSCSI target in the previous step, you will be directed to the Create a New iSCSI target menu
- If you have selected None, you will need to confirm the settings on the next page
- For this tutorial, we will map the iSCSI LUN with thin provisioning to an existing target.
-
- In the Map existing iSCSI targets pages, tick the target you wish the LUN to reside on, and click Next.

-
- In the confirm settings page, if everything is correct, click Apply.

-
- Your iSCSI LUN will be created.

For more information about iSCSI LUN and Target, please click the question mark icon at the top right corner of Storage Manager.
Connect to the LUN In windows 2012
We need the IQN of the initiator, to get this logon to the server you are connecting from and launch the iSCSI initiator control panel applet, if it prompts you to start the service click yes.
Now switch over to the iSCSI initiator machine (in my case one of the SQL Nodes) and in the iSCSI initiator software click on the Discovery tab
Click Discover Portal and enter the DNS Name (or IP address) of the iSCSI Target server and press OK

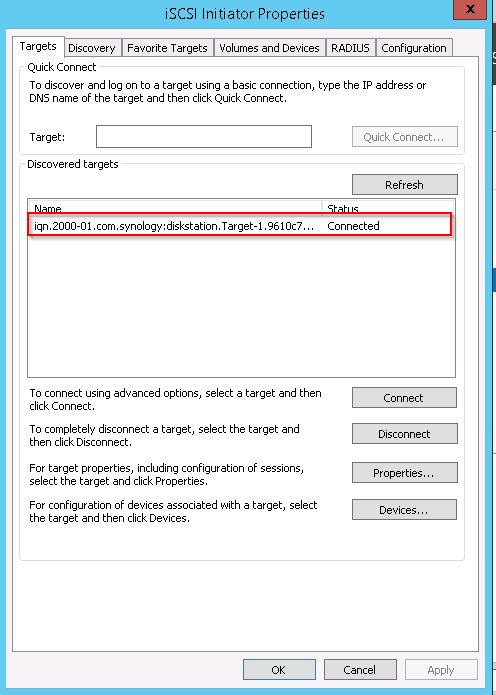
Now click on the Targets tab and you should see the target listed, select it and click Connect

If the connection was successful you will see the status change to Connected as shown.
now open disk manager and bring the disk online:

How to Setup and use ISCSI target on Linux
1, On CentOS, install iscsi-initiator-utils by yum install iscsi-initiator-utils
On ubuntu, apt-get install open-iscsi
2. Use the vi command to set node.startup to automatic.
 vi /etc/iscsi/iscsid.conf

 [...]
 node.startup = automatic
 [...]
3.iscsiadm -m discovery -t st -p 192.168.0.227
-m, –mode opspecify the mode. op must be one of discoverydb, node, fw, host iface or session.If no other options are specified: for discoverydb and node
-t : –type=type
type must be sendtargets (or abbreviated as st), slp, isns or fw.
SendTargets A native iSCSI protocol which allows each iSCSI target to send a list of available targets to the initiator.
-p, –portal=ip[:port]Use target portal with ip-address ip and port. If port is not passed in the default port value is 3260.
4. Find the ISCSI target name:
iscsiadm -m node
iqn.2000-01.com.synology:storage-01.Target-1.1f366c1c09
5. Use the iscsiadm command to log on to an iSCSI target.
iscsiadm -m node --targetname "iqn.2000-01.com.synology:storage-01.Target-1.1f366c1c09" --portal "192.168.10.137:3260" --login

...
[ 2029.583982] sd 1:0:0:0: [sdf] Attached SCSI disk
sdf is the new disk
You can either format it as a single disk, or add it to a volume group. Find it here: http://frankfu.click/linux/basic/device-filesystem-administration.html
Reference
https://www.synology.com/en-us/knowledgebase/DSM/tutorial/Virtualization/How_to_set_up_and_use_iSCSI_target_on_Linux
https://linux.die.net/man/8/iscsiadm