Concept
In a typical WSUS setup, the WSUS server downloads patches, security updates, bug fixes, and other updates from the Microsoft Update servers, and then distributes these updates to Windows computers after they have been approved. This means updates are downloaded from the Internet only once to the WSUS server instead of once for each computer .
Advantage:
• Centralized control over Microsoft product updates
• Reduced Internet bandwidth usage
• Only approved updates are installed
• Easy to determine which patches and updates have been applied
Windows update
In Windows Server 2012/R2, Windows Update is disabled by default . For a server, this option isn’t recommended because some updates require a system restart, and you probably don’t want your server to restart without you being aware of it.
Kinds of update:
- Important updates usually solve a security or reliability issue in Windows.
- Recommended updates make minor improvements to Windows but aren’t critical to security or reliability.
- Microsoft updates is used for other Microsoft products, such as office.
Ways to install update:
• Install updates automatically—Windows checks for updates on the Microsoft update servers periodically, and when updates are found, they’re downloaded in the background. Updates are installed automatically during the maintenance window, a time configured for performing maintenance tasks. It’s set at 2:00 a.m.
• Download updates but let me choose whether to install them. Windows alerts you in the notification area that updates are ready to install.
• Check for updates but let me choose whether to download and install them.
Requirements for storage:
• WSUS database—This database stores the WSUS configuration data and update metadata, along with information about WSUS client interactions. All WSUS servers require a WSUS database. The default database is the built-in Windows Internal Database (WID), which is essentially a light version of a SQL database with no management interface. Using the WID database is recommended unless you’re already running a SQL server for other applications or plan to deploy WSUS with network load balancing (NLB). The database requires a minimum of 2 GB free space on the volume where it’s stored.
• Local file system storage—In most situations, you want to store the actual update files on the local WSUS server and configure clients to download updates from the WSUS server.
However, when client computers have a faster connection to the Internet than to the WSUS server (perhaps in some branch office arrangements), you can opt to store only update metadata in the WSUS database and have clients download approved updates directly from the Microsoft Update servers.
Before install the WSUS.
System prerequisite: https://docs.microsoft.com/en-us/windows-server/administration/windows-server-update-services/plan/plan-your-wsus-deployment
The WSUS may require significant RAM for the SQL to be running , see picture attached, it may use several GB when doing cleanup or indexing.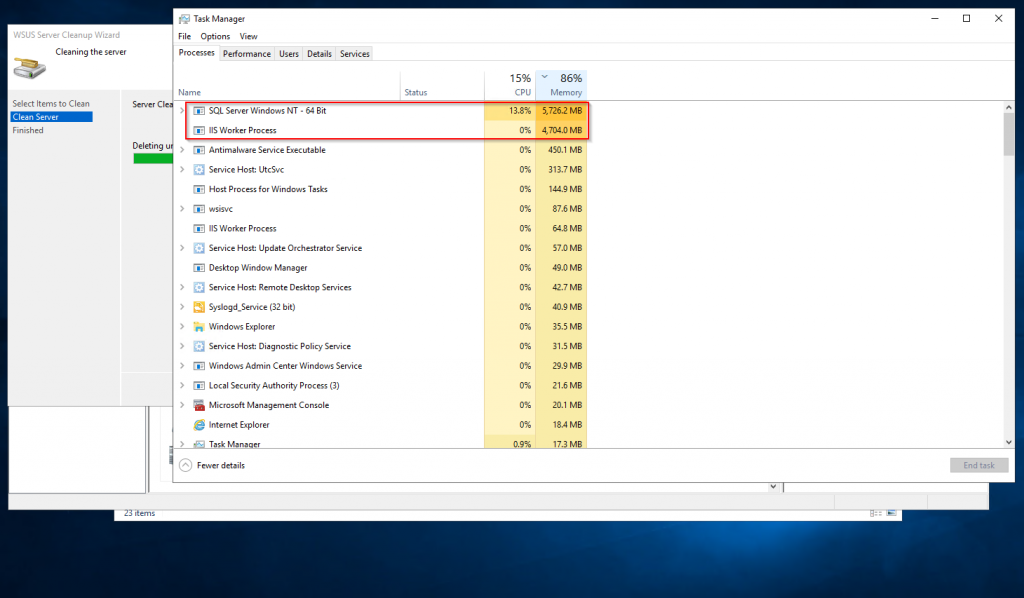
A WSUS server using the recommended hardware can support a maximum number of 30,000 clients.
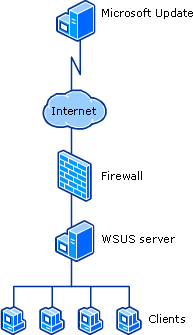
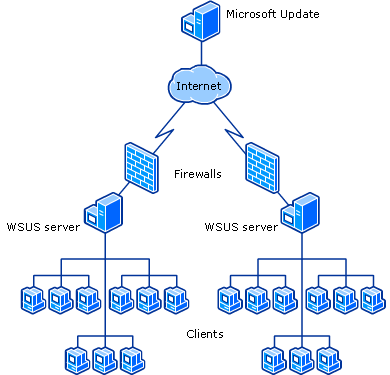
WSUS can be installed as a single-server solution, supporting from a few dozen to several hundred clients at a single site, or a multiple-server solution, providing update services to large multiple-site enterprises.
- In the single-server solution(small medium company), the WSUS server is deployed in the company intranet and communicates directly with Microsoft Update servers. Client computers then contact the WSUS server to download and install approved updates.
- For a multiple-server solution (large company), a single WSUS server is configured to contact Microsoft Update servers to get updates and then distributes updates to additional WSUS servers located on different parts of the network. Client computers can then contact the nearest WSUS server to download updates.
Security concern:
No mater which mode, WSUS server to server and server to client communications should be set up to use the secure Sockets Layer (SSL). WSUS uses the HTTPS protocol on TCP port 443 by default to collect updates from Microsoft Update servers and between WSUS servers in a multiple-server deployment.
You can configure WSUS in one of two modes:
• Autonomous mode: Offers distributed management, default option. approval of updates is done on each WSUS server.
• Replica mode: Offers central management. An administrator maintains client groups and approves updates on the server that connects to Microsoft Update and the information is inherited by downstream WSUS servers.
Both modes have the upstream WSUS servers share updates with the downstream servers during synchronization.
Connections
WSUS upstream and downstream servers will synchronize on the port configured by the WSUS Administrator.
By default, these ports are configured as follows:
- On WSUS 3.2 and earlier, port 80 for HTTP and 443 for HTTPS
- On WSUS 6.2 and later (at least Windows Server 2012), port 8530 for HTTP and 8531 for HTTPS
The firewall on the WSUS server must be configured to allow inbound traffic on these ports.
Configuration after instalaion
When you first open the WSUS management console, a wizard guides you through these tasks:
• Choose the upstream server. Decide whether to get updates from the Microsoft Update servers on the Internet or another WSUS server.
+If this is the first WSUS server, you select Microsoft Update servers.
+If there’s already one or more WSUS servers on your network, you can have the new server synchronize updates with an existing WSUS server.
• Configure network settings, such as whether WSUS should use a proxy server when synchronizing.
• Specify which languages the updates should include.
• Select the products the WSUS server should collect updates for.
• Specify the update classifications that should be synchronized; for example, you can choose whether the server should get critical updates, security updates, definition updates, service packs, drivers, tools, and so forth.
• Configure updates to occur automatically or manually.
Some of these tasks are done in the Update Services console, and others use Group Policy to configure WSUS clients remotely:
• Create computer groups.
• Assign computers to groups.
• Configure Windows Update on client computers.
• Configure WSUS synchronization and approval rules.
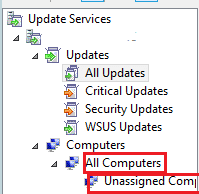
1. Create computer groups.
Two default groups: All Computers and Unassigned Computers. The All Computers group always contains every computer that has contacted the WSUS server. When a client computer contacts the WSUS server, it’s added to both groups by default.
2. Assign computers to groups
Open the Update Services console, click Options in the left pane and then Computers in the center pane.
Two options: “Use the Update Services console” (which specifies server-side targeting) and “Use Group Policy or registry settings on computers” (which specifies client-side targeting).
• Update Services console—This method is called server-side targeting because the action takes place at the WSUS server. Server-side targeting is enabled by default. After creating custom groups, simply move computer accounts from the Unassigned Computers group to the custom group. To use this method, select the “Use the Update Services console” option.
• Group Policy—This method, client-side targeting, is the preferred one. To use it, you must have a domain controller in your network, and clients must be domain members. The term “client-side targeting” is used because the Group Policy setting changes the relevant Registry setting on client computers that are in the scope of the group policy in Active Directory. The affected Registry setting instructs the client to add itself to the specified group. The Group Policy setting called “Enable client-side targeting” is in “Computer Configuration, Policies, Administrative Templates, Windows Components, Windows Update”.
• Local Group Policy—You can use the Local Group Policy Editor (gpedit.msc) to configure clients for client-side targeting. This option is satisfactory only for small networks with no domain controller because you have to change the settings on every computer.
3. Configure update on client via GP
Configure Group Policy for the domain
To configure Automatic Updates using group policies, perform the following steps on a domain controller or any computer that has Group Policy Management console:
1. Open Server Manager.
2. Click Tools > Group Policy Management.
3. Using the Group Management console, open Group Policy Object Editor for a group policy.
4. In Group Policy Object Editor, expand Computer Configuration, expand Policies, expand Administrative Templates, expand Windows Components, Windows Update.
5. In the details pane, click Configure Automatic Updates. The Configure Automatic Updates page appears.
6. Click Enabled, and then select one of the following options:
• Notify for download and notify for install: Notifies a logged-on administrative user prior to the download and prior to the installation of the updates.
• Auto download and notify for install: Automatically begins downloading updates and then notifies a logged-on administrative user prior to installing the updates.
• Auto download and schedule the install: Automatically downloads the updates and allows you to schedule when to perform the installation. If selected, you must also set the day and time for the recurring scheduled installation.
If any updates require a restart to complete the installation, Windows will restart the computer automatically. (if a user is signed in to the computer when Windows is ready to restart, the user will be notified and given the option to delay the restart.) Note: starting Windows 8, you can set updates to install during automatic maintenance instead of using a specific schedule tied to Windows Update. Automatic maintenance will install updates when the computer is not in use, and avoid installing updates when the computer is running on battery power. If automatic maintenance is unable to install updates within days, Windows Update will install updates right away. Users will then be notified about a pending restart. A pending restart will only take place if there is no potential for accidental data loss. You can specify schedule options in the GPME Maintenance Scheduler settings, which are located in the path, PolicyName > computer Configuration > Policies > Administrative Templates > Windows components > Maintenance Scheduler > Automatic Maintenance Activation Boundary. See the section of this reference titled: Maintenance Scheduler settings, for setting details.
• Allow local admin to choose setting: Specifies that local administrators are allowed to use Automatic Updates in Control Panel to select a configuration option of their choice. Note! This option is not supported on Windows 10.
7. Click OK to change your options and close Configure Automatic Updates page.
The next policy to configure is “Specify intranet Microsoft update service location,” which has the following settings:
• Not Configured, Enabled, Disabled—If this policy is enabled, client computers download approved updates from the specified WSUS server. If it’s disabled or not configured, client computers download updates from the Microsoft Update servers on the Internet (unless automatic updates are disabled).
• Set the intranet update service for detecting updates—You specify the URL to the WSUS server in the format http://WSUSServer:8530; WSUSServer is the name of the Windows Server 2012/R2 server with the WSUS role installed and configured. You should also specify the port number 8530, the default port WSUS uses. If you’re using HTTPS for updates, the default port is 8531.
• Set the intranet statistics server—Specify the server to collect update statistics from WSUS clients, same as above.
Other settings worth noting include the following:
• Automatic Update Detection Frequency: Specifies how frequently the Windows Update client checks for new updates. The default is a random time between 17 and 22 hours.
• Allow Automatic Updates Immediate Installation: Specifies whether Windows Updates will immediately install updates that don’t require the computer to be restarted.
• Turn On Recommended Updates Via Automatic Updates: Determines whether client computers install both critical and recommended updates.
• No Auto-Restart for Scheduled Automatic Installations: Specifies that if a computer needs a restart, it will wait for a user to perform the restart.
• Re-Prompt for Restart Scheduled Installations: Specifies how often the Windows Update client prompts the user to restart the computer.
• Delay Restart for Scheduled Installations: Specifies how long the Windows Update client waits before automatically restarting.
• Reschedule Automatic Updates Scheduled Installations: Specifies how long Windows Update waits after a reboot before continuing with a scheduled installation that was missed previously.
• Enable Client-Side Targeting: Specifies which group the computer is a member of.
• Enables Windows Update Power Management to Automatically Wake up the System to Install Scheduled Updates: If a computer supports Wake On LAN, it automatically starts up and installs an update at the scheduled time.
• Allow Signed Updates from an Intranet Microsoft Update Services Location: Specifies if Windows will install an update that is signed even if the certificate is not from Microsoft.
• Always automatically restart at the scheduled time enables restarts soon after updates are installed, instead of 3 days later.
By default in Windows 8 and Windows Server 2012, if the installation of important updates requires a system restart, one will be forced 3 days after their installation. The restart timer begins counting down only when a user is able to see it, helping prevent unintentional data loss in the middle of the night. More details about this default behavior are discussed in this blog post.
If you would instead like to force restarts following update installation, similar to Windows 7 / Windows Server 2008 R2 and earlier, you can enable the new “Always automatically restart…” policy. When the policy is enabled, a restart timer will always begin immediately after Windows Update installs important updates, instead of multiple days later.
The restart timer cannot be postponed once started, but the policy lets you configure the countdown timer to any value between 15 and 180 minutes. When the timer runs out, the restart will proceed even if the machine has signed-in users.
Note: If the group policy No auto-restart with logged on users for scheduled automatic updates installations is enabled, then the new “Always automatically restart…” policy has no effect.
Note: In Windows 8 and Windows Server 2012, the Delay Restart for scheduled installations continues to have no effect.