Step 1. Connect the Volume on the SAN to the NAS system.
1. Before the installaion:on NexentaStor: show lun

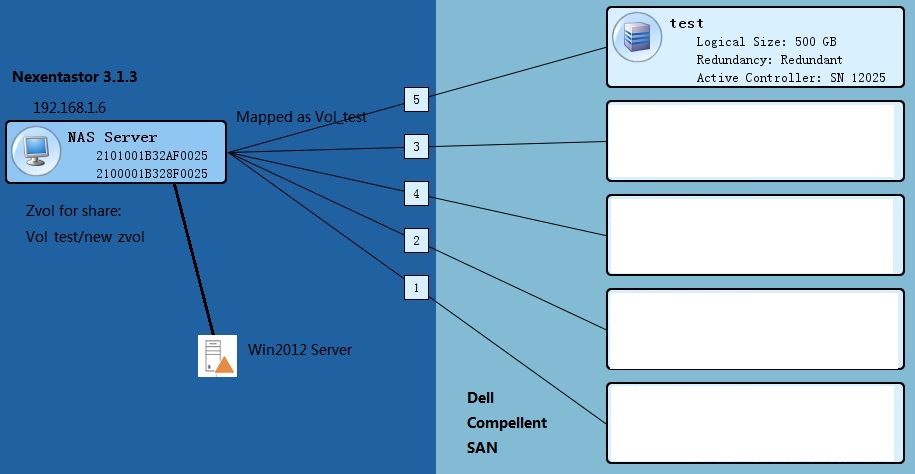
2. In the Dell compellent create new volumes named “test”, then click “map volume to server” and map it to the NAS.
Then on NexentaStor, use “show appliance” command, then choose syslog > dmesg
Sep 26 14:24:27 Melbourne scsi: [ID 583861 kern.info] sd7 at scsi_vhci0: unit-address g6000d310002ef9000000000000000009: conf f_sym
Sep 26 14:24:27 Melbourne genunix: [ID 936769 kern.info] sd7 is /scsi_vhci/disk@g6000d310002ef9000000000000000009
Sep 26 14:24:27 Melbourne genunix: [ID 408114 kern.info] /scsi_vhci/disk@g6000d310002ef9000000000000000009 (sd7) online
Sep 26 14:24:27 Melbourne genunix: [ID 483743 kern.info] /scsi_vhci/disk@g6000d310002ef9000000000000000009 (sd7) multipath status: degraded: path 17 fp2/disk@w5000d310002ef905,5 is online
Sep 26 14:24:27 Melbourne genunix: [ID 530209 kern.info] /scsi_vhci/disk@g6000d310002ef9000000000000000009 (sd7) multipath status: optimal: path 18 fp0/disk@w5000d310002ef907,5 is online: Load balancing: round-robin
Sep 26 14:24:27 Melbourne genunix: [ID 530209 kern.info] /scsi_vhci/disk@g6000d310002ef9000000000000000009 (sd7) multipath status: optimal: path 19 fp0/disk@w5000d310002ef905,5 is online: Load balancing: round-robin
Sep 26 14:24:27 Melbourne genunix: [ID 530209 kern.info] /scsi_vhci/disk@g6000d310002ef9000000000000000009 (sd7) multipath status: optimal: path 20 fp2/disk@w5000d310002ef907,5 is online: Load balancing: round-robin
show lun now, you may not see the new attached lun. wait for about 20 minutes for the system to initialize.use
show lun
nmc:/$ setup volume createThe prompts guide you through a series of selections.
2. Enter a volume name at the prompt.
Example:
Volume: vol1
3. Create a group of devices for the volume by selecting one or more
options from the list using the arrow keys. Then press Enter.
Example:
Group of devices: (Use SPACEBAR for multiple selection)
c1t1d0
4. Select a redundancy type.
The number and type of options listed vary depending upon the
selections in Step 3. Options include: pool, mirror, RAID-Z1, RAIDZ2, and RAID-Z3.
Example:
Group redundancy type:
pool
5. Select a compression algorithm setting for this dataset. Press Enter
to accept the default, on.
6. Confirm the request to create the volume by typing y.
Example:
Create volume ‘vol1’? y
Step 2 create a Zvol for share
ZVOL
A zvol is a virtual block device on a volume. In effect, it is a LUN that is remotely accessible through the protocols supported by SCSI Target plugins. The zvol can be managed, compressed, replicated, have snapshots taken of it, and so on.
Creating a ZVOL
To provision storage over iSCSI or FC, you must create a zvol on an existing volume.
To create a zvol, using NMV:
1. Click Data Management > SCSI Target.
2. In the ZVOLS panel, click Create.
3. In the Create a New ZVOL window, fill in the required fields and click Create.
To create a zvol, using NMC:
1. Type:
nmc:/$ setup zvol create
2. Follow the prompts to enter the volume name, size, and other properties:
nmc@Melbourne:/$ setup zvol create
<Enter>   <help|-h> <?>
nmc@Melbourne:/$ setup zvol create
zvol name    : Zvol_test
zvol pathname must start with a name of the volume, and can only contain alphanumeric characters as well as underscore ('_'), das
('.') and forward slashes ('/'). The available volumes are: Vol_BBS, Vol_CMS, Vol_VID, Vol_WWW, Vol_test. Use forward slash '/' t
volume or folder name from the (new) block device name, for instance: Vol_BBS/new_zvol

nmc@Melbourne:/$ setup zvol create
zvol name    : Vol_test/new_zvol
zvol size    : 300GB
block size   : 128K
compression  : on
Create a thinly provisioned (sparse) device 'Vol_test/new_zvol', with no initial reservation? Note that a thinly provisioned virtl and then grows up to 300GB. (Press Yes to create a sparse device, No to allocate the entire specified size (300GB) right now)

PROPERTY                      VALUE
name                          Vol_test/new_zvol
size                          300G
volume                        Vol_test
usedbyrefreservation          0
reservation                   none
volsize                       300G
referenced                    16K
zvol_name                     new_zvol
checksum                      on
dedup                         off
readonly                      off
nms:hold
logbias                       latency
primarycache                  all
nms:swap                      no
nms:description
used                          16K
volume_name                   Vol_test
copies                        1
mountpoint
usedbydataset                 16K
size_bytes                    322122547200
size                          307200
compression                   on
usedbysnapshots               0
volblocksize                  128K
compressratio                 1.00x
available                     488G
mlslabel                      none
sync                          standard
usedbychildren                0
refreservation                none
secondarycache                all
creation                      Mon Sep 26 15:30 2016
Now we need to share the Zvol:
nmc@Melbourne:/$ setup zvol Vol_test/new_zvol share2. In the ZVOLS panel, click View.
3. In the View ZVOLs window, click the name of the ZVOL.
4. Choose the Vol_test/new_zvol, then click share button.
5. Click Save.

Step 3 Create a Target Portal Groups
The purpose of Target Portal Groups is to limit visibility of Targets to the IP addresses of any/all Target Portal Groups they are members of (and not to IPs they are not). Unfortunately, as of NexentaStor 3.1.3, COMSTAR, the SCSI target mode framework utilized by Nexenta, does not properly obey the purpose of TPGs. Targets that exist and are limited to specific Target Portal Groups still are visible to clients attempting to connect to other IPs on the system rather than those that are part of the TPG. This is a known issue, but will not affect the ability to follow this guide. Also, it is still a best practice to create these TPGs for when they do become functional.
TPG Configuration (NMC)
As of NexentaStor 3.1.3, it is not possible to manipulate Target Portal Groups in NMC. They must be configured in the web GUI.
TPG Configuration (NMV)
To configure, mouse-over “Data Management” and then click on “SCSI Target”―on the resulting page, click on the “Target Portal Groups” link in the iSCSI box on the left of the interface. If you’ve never configured a Target Portal Group before , you can click the link “here” at the end of the “You can create a new one here.” sentence to get to the creation page.
Enter a name and IP address of the nexentastore’s host machine, then click create.
Create a iSCSI target
through a set of menus. Here is how it starts:
Leaving “Target Name” empty automatically generates a valid IQN, and “Target Alias” is merely an unused label to assist with identification by human administrators on the NexentaStor appliance and is not required for operation. When it gets to the “Target Portal Groups” section, type in “tpg0” (Your own name created before, without quotes), or whatever you labeled the first Target Portal Group,
This will create the iSCSI Target (it can take a minute to complete this action, be patient.
Then use command : show iscsi target
You will see the iqn.1986-03.com.sun:xxxxxxxxxxxxxxxxxxxxxxxxxxxxxxxx which can be used to connect from other host.
we will use windows 2012 server as the client and iSCSI initiator to connect to the LUN:
Problems. Nexenta Community 3.0.3 / 3.0.4 Web UI Stops Working!
nmc@Melbourne:/$ destroy volume Vol_test
Destroy volume 'Vol_test' and destroy all associated shares (including nfs, cifs, rsync, ftp, and webdav shares (if any)) ?  Yes

SystemCallError: cannot open 'Vol_test': volume I/O is currently suspended
nmc@Melbourne:/$ zpool
  pool: Vol_test
 state: UNAVAIL
status: One or more devices are faulted in response to IO failures.
action: Make sure the affected devices are connected, then run 'zpool clear'.
   see: http://www.sun.com/msg/ZFS-8000-JQ
 scan: none requested
config:

        NAME                                     STATE     READ WRITE CKSUM
        Vol_test                                 UNAVAIL      0     0     0  insufficient replicas
          c4t6000D310002EF9000000000000000009d0  UNAVAIL      0     0     0  cannot open
use command:
nmc@Melbourne:/$ setup volume Vol_test clear-errors