Services
Important services list bellow:
To manage these services on Windows 7:
ways in Other OS
- Click Start > Control Panel.
- Click Administrative Tools.
- Click Services.
- Double-click Services.
- Scroll down and select VMware NAT Service.
- Right-click the highlighted line and choose Properties.
- Click the Stop button.
- In the Startup type list, select Disable or Manual.
- Click OK.
Follow the steps shown below for your host operating system. On a Windows host, you can choose to disable the service completely or to set it to start only when Windows 2000
- Click Start, then choose Settings>Control Panel>Administrative Tools>Services.
- Scroll down and select VMware NAT Service.
- Right-click the highlighted line and choose Properties.
- Click the Stop button.
- In the Startup type list, select Disable or Manual.
- Click OK.
Windows XP Home
- Click Start, then choose Settings>Control Panel.
- Click Performance and Maintenance.
- Click Administrative Tools.
- Double-click Services.
- Scroll down and select VMware NAT Service.
- Right-click the highlighted line and choose Properties.
- Click the Stop button.
- In the Startup type list, select Disable or Manual.
- Click OK.
Windows XP Professional or Windows Server 2003
- Click Start, then choose Settings>Control Panel.
- Click Administrative Tools.
- Click Services
- Double-click Services.
- Scroll down and select VMware NAT Service.
- Right-click the highlighted line and choose Properties.
- Click the Stop button.
- In the Startup type list, select Disable or Manual.
- Click OK.
Windows 8 and 8.1
- Open Control Panel by swiping in from the right edge of the screen, tapping Search (or if you’re using a mouse, pointing to the upper-right corner of the screen, moving the mouse pointer down, and then clicking Search), entering Control Panel in the search box, and then tapping or clicking Control Panel.
- Go to Administrative Tools > Services.
- Scroll down and select VMware NAT Service.
- Right-click the highlighted line and choose Properties.
- Click the Stop button.
- In the Startup type list, select Disable or Manual.
- Click OK.
Linux
- As root, rerun the configuration script.
vmware-config.pl- Deselect NAT for all virtual networks. By default, NAT is selected for vmnet8. The screen prompts and your responses should look similar to those in the following example:
Would you like to skip networking setup and keep your old settings as they are?
(yes/no) [yes]no
Do you want networking for your virtual machines? (yes/no/help) [yes]yes
Would you prefer to modify your existing networking configuration using the
wizard or the editor? (wizard/editor/help) [editor]wizard
The following bridged networks have been defined:
. vmnet0 is bridged to eth0
Do you wish to configure another bridged network? (yes/no) [no]
Do you want to be able to use NAT networking in your virtual machines? (yes/no)
[yes]no
Removing a NAT network for vmnet8.
1. VMware NAT Service:
This service let host machine provide NAT for the virtual networks, so if your VM’s network is on option “NAT”, the VM can get Internet connection if host has Internet connectivity.
2. VMware DHCP service:
In order to make networking configuration easy, a DHCP server is automatically installed when you install VMware Workstation. Virtual machines running on the network with the NAT device can dynamically obtain their IP addresses by sending out DHCP requests. The DHCP server on the NAT network, which is also used in host-only networking configurations, dynamically allocates IP addresses. VMware Workstation always uses a Class C address for NAT networks.
3. VMware Workstation Server:
VMware Workstation Server is a service that runs on the Workstation host system. Remote Workstation users connect to VMware Workstation Server when they run shared virtual machines on the host system.
On a Windows host, VMware Workstation Server is the VMware Workstation Server service. On a Linux host, it is VMware-workstation-server.
When you install Workstation, virtual machine sharing and remote access are enabled by default and VMware Workstation Server starts when the host system starts. When Workstation starts, it connects to VMware Workstation Server by using the credentials of the currently logged in user.
Remote Workstation users connect to VMware Workstation Server through HTTPS port 443 on the host system. You can change the VMware Workstation Server port when you install Workstation and after Workstation is installed by modifying the Shared VMs Workstation preference.
Shared virtual machines appear under the Shared VMs item in the virtual machine library. If virtual machine sharing is disabled, or if the current user does not have permissions to connect to VMware Workstation Server, the Shared VMs item is inactive.
If you click the Shared VMs item when virtual machine sharing is disabled, Workstation returns a message that explains how to enable virtual machine sharing. If the Shared VMs item is inactive because the current user does not have the proper permissions, a login dialog box appears and you can log in as a user who can connect to VMware Workstation Server.
This service also let your VMs run in background, without it, system will pop up window ask you want to Power off the VMs , but no run in background option, with this service running, one extra option “Run in background” will be in the pop up window.
Bridged mode
When you set a network adapter of a VMware Player (workstation) machine in the Bridged mode, by default it automatically chooses which physical network adapter to bridge to. This can cause issues if you have multiple network adapters installed on the physical system, in which case it can choose the wrong one. Shown as bellow:
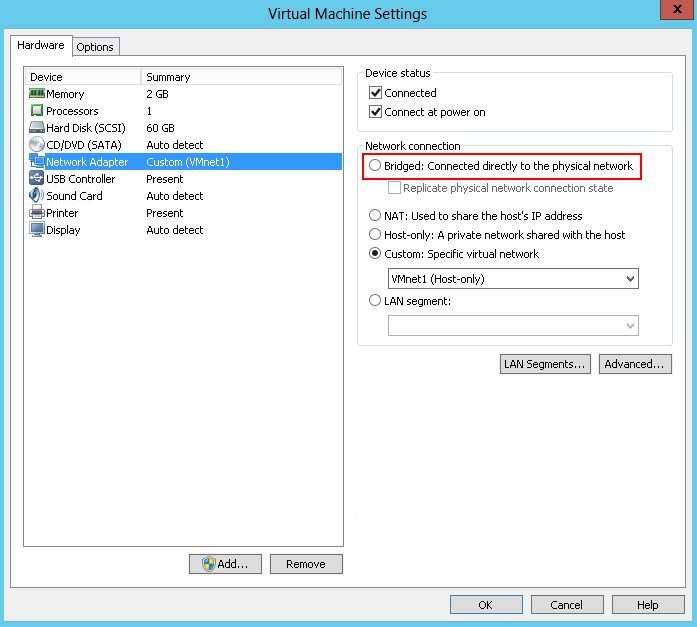
Step1. To solve this, its better to assign a network to the Bridged mode and use that network.go to the Edit > Virtual Network Editor…
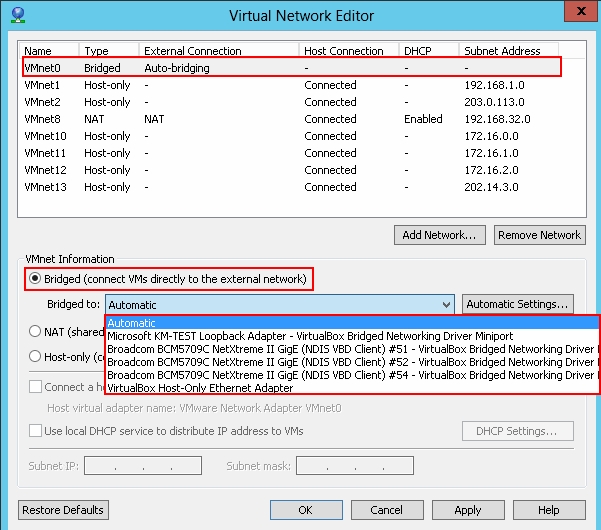
Choose a network then choose “Bridged”, in the bridged to: choose the physical adapter you want to bridge to.
Step2. Then go back to the VM setting, and use custom, and choose the network you configured in step1.