Introducing to ASDM
Cisco Adaptive Security Device Manager (ASDM) is a Java-based GUI tool that facilitates the setup, configuration, monitoring, and troubleshooting of Cisco ASAs. The application hides the complexity of commands from administrators and allows streamlined configurations without requiring extensive knowledge of the ASA CLI. It works with SSL to ensure secure communication with the ASA. It also provides quick-configuration wizards and logging and monitoring functionality that is not available using the CLI.
Preparing for ASDM
To enable access to the ASDM, the ASA requires some minimal configurations. Specifically, ASDM is accessed using a Secure Socket Layer (SSL) web browser connection to the ASA Web Server. SSL encrypts the traffic between the client and the ASA Web Server.
At a minimum, the ASA requires that a management interface be configured. The management interface depends on the model of ASA. On an ASA 5505, the management interface consists of an inside logical VLAN interface (VLAN 1) and a physical Ethernet port other than Ethernet 0/0. All other ASA models have a dedicated Layer 3 management 0/0 interface available.
Specifically, to prepare for ASDM access on an ASA 5505, the following must be configured:
- Inside logical VLAN interface – Assign the Layer 3 address and the security level.
- Ethernet 0/1 physical port – By default it is assigned to VLAN 1, but must be enabled.
- Enable the ASA Web Server – Disabled by default.
- Permit access to the ASA Web Server – By default, the ASA operates in a closed policy; therefore, all connections to the HTTP server are denied.
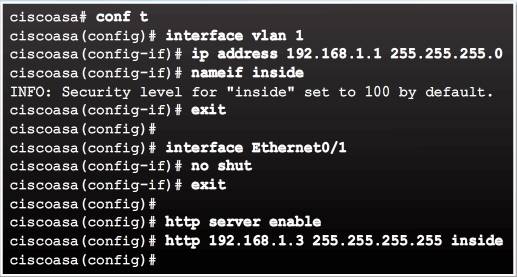
The example in Figure 1 configures the logical management inside interface with IP address 192.168.1.1. It enables Ethernet 0/1, enables the ASA HTTP server, and permits access from an inside host with IP address 192.168.1.3.
Note: To remove and disable the ASA HTTP server service, use the clear configure http global configuration mode command
Starting ASDM
To start ASDM, enter the management IP address of the ASA in a web browser from a permitted host. The permitted host must establish a connection through a browser to the inside interface IP address using the HTTPS protocol.
Note: The example on this page assumes that ASDM has never been accessed.
Select Continue to this website to launch the ASDM window.
The ASDM launch window is displayed, providing two options:
- Run Cisco ASDM as a local application – This provides the Install ASDM Launcher option to connect to the ASA from the host’s desktop using SSL. The advantage of doing so is that one application can be used to manage several ASA devices, and an Internet browser is not required to start ASDM.
- Run Cisco ASDM as a Java Web Start application – This provides the Run ASDM option to run the ASDM application. Using an Internet browser is required to establish a connection. ASDM is not installed on the local host. The Run Startup Wizard option can be selected instead. It provides a step-by-step initial configuration similar to the CLI Setup Initialization wizard.
In this example, Run ASDM is selected. Depending on the browser settings, several security warnings may appear.
Note: If security warnings appear, it is because the certificate on the ASA is self-signed. As long as the address that appears in the dialog box is the address of the ASA it is safe to accept the local certificate. These security warnings may not appear if ASDM has been previously accessed.
ASDM then displays the Cisco ASDM-IDM Launcher. The launcher requests a username and password. Because none were initially configured, leave these fields blank and click OK.
Next, the Cisco Smart Call Home window is displayed. Select the desired option and click OK.
Finally, the ASDM Home page displays.
ASDM Home Page Dashboards
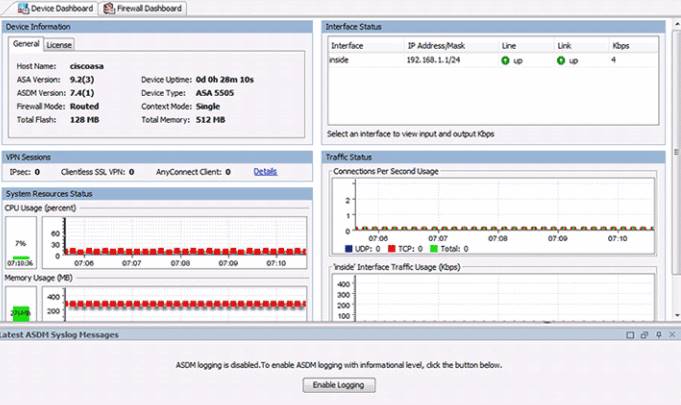
The Cisco ASDM Home page displays important information about the ASA. Status information in the Home page is updated every 10 seconds. Although many of the details available on the Home page are available elsewhere in ASDM, this page provides a quick view of the operational status of ASA.
ASDM provides two view tabs. By default, the Home page displays the Device Dashboard. It provides a view of important information about the ASA, such as the status of interfaces, the OS version, licensing information, and performance related information.
Clicking the Firewall Dashboard tab displays the view. It provides security-related information about the traffic that passes through the ASA, such as connection statistics, dropped packets, scan, and SYN attack detection.

Other tabs the Home page may display include:
- Intrusion prevention – Appears only if an IPS module or card is installed. The additional tab displays status information about the IPS software.
- Content security – Appears only if a Content Security and Control Security Services Module (CSC-SSM) is installed in the ASA. The Content Security tab displays status information about the CSC-SSM software. The Cisco ASDM user interface is designed to provide easy access to the many features that the ASA supports.
ASDM Page Elements
All pages include the following elements:

- Menu bar – Provides quick access to files, tools, wizards, and help.
- Toolbar – Provides easy navigation of Cisco ASDM. From the toolbar, an administrator can access the Home, Configuration, and Monitoring views as well as save, refresh, navigate between views, and access Help.
- Device list button – Opens a dockable page that lists other ASA devices. Use this page to switch to another device running the same version of ASDM. When managing only one ASA device, the Device List page is hidden and must be opened using the Device List button.
- Status bar – Displays the time, connection status, user, memory status, running configuration status, privilege level, and SSL status at the bottom of the application window.
Configuration, monitor view.
SDM Wizards
Cisco ASDM offers several wizards to help simplify the configuration of the appliance:
- Startup Wizard
- VPN Wizards
- High Availability and Scalability Wizard
- Unified Communication Wizard
- ASDM Identity Certificate Wizard
- Packet Capture Wizard
The Startup Wizard
The Startup wizard guides the administrator through the initial configuration of the ASA and helps to define basic settings. The Startup wizard can be activated by clicking Wizards > Startup Wizard. Alternatively, the Startup Wizard can be enabled by clicking Configuration > Device Setup > Startup Wizard and then clicking Launch Startup Wizard.
The actual number of steps in the wizard may vary depending on the specific ASA model, and modules installed. However, most ASA models can be configured in a nine-step process.
After the Startup wizard has been launched, follow these steps:
Step 1. The Welcome window. It provides a choice to Modify existing configuration or to Reset configuration to factory defaults. Select an option and click Next to continue.
Step 2. Basic Configuration window. It provides the basic ASA management configuration consisting of a host name, domain name, and privileged EXEC password. Optionally, this step also allows the administrator to deploy the ASA for a remote worker. Complete the options and click Next to continue.
Step 3. Interface Selection window. It provides the options to choose or create VLAN switch interfaces. This step is specific to the ASA 5505 model. Complete the options and click Next to continue.
Step 4. Switch Port Allocation window. It provides options to map the physical Layer 2 switch ports to the logically named VLANs in the previous step. By default, all switch ports are assigned to VLAN 1 (Inside). In this example, the Ethernet 0/0 port has been mapped to the outside interface. Click Next to continue.
Step 5. Interface IP Address Configuration window. It identifies the inside and outside IP addresses for the defined VLANs. Note that these addresses could also be created using DHCP or PPPoE. Complete the options and click Next to continue.
Step 6. DHCP window. It allows the administrator to enable the DHCP service for inside hosts. All DHCP related options are defined in this window. Complete the options and click Next to continue.
Step 7. Address Translation (NAT/PAT) window. It allows the administrator to enable PAT or NAT. Complete the options and click Next to continue.
Step 8. Administrative Access window. It specifies which host or hosts are allowed to access the ASA using either HTTPS/ASDM, SSH, or Telnet. Complete the options and click Next to continue.
Step 9. Startup Wizard Summary window. It enables the administrator to review the proposed configuration. Changes can be made by clicking the Back button, or saved by clicking Finish.
Different Types of VPN Wizards
The VPN wizard allows an administrator to configure basic site-to-site and remote-access VPN connections and assign either pre-shared keys or digital certificates for authentication.
To launch the VPN wizard from the menu bar, click Wizards and select VPN Wizards.
The different types of VPN wizards include:
- Site-to-site VPN Wizard
- AnyConnect VPN Wizard
- Clientless SSL VPN Wizard
- IPsec (IKEv1) Remote Access VPN Wizard
To complement the wizards, ASDM also provides the ASDM Assistant. For example, to view the remote-access ASDM Assistant, click Configurations > Remote-Access VPN > Introduction.
Other Wizards
Four other wizards are available in ASDM:
- High Availability and Scalability Wizard – Used to configure failover with high availability and VPN cluster load balancing. VPN cluster mode requires two ASA devices establishing VPN sessions to the same destination network and performing load balancing. Note that the ASA 5505 with Base license is unable to support this wizard.
- Unified Communication Wizard – Used to configure the ASA to support the Cisco Unified Communications Proxy feature. It generates configuration settings including ACLs, NAT/PAT statements, self-signed certificates, TLS proxies, and application inspection.
- ASDM Identity Certificate Wizard – When using current Java versions, the ASDM Launcher requires a trusted certificate. This wizard creates a self-signed identity certificate and configures the ASA to use it when establishing an SSL connection.
- Packet Capture Wizard – Useful to configure and run captures for troubleshooting errors including validating a NAT policy. The captures can use access lists to limit the type of traffic captured, the source and destination addresses and ports, and one or more interfaces. The wizard runs one capture on each of the ingress and egress interfaces. Captures can be saved to a host and examined in a packet analyzer.
Configuring Settings in ASDM
The ASDM Configuration view is required to configure most device settings using the following two main tabs:
- Device Setup -This tab can be used to configure the hostname, passwords, system time, interface settings, and routing.
- Device Management – This tab can be used to configure a variety of features including management access, users and AAA access, DHCP, and more. Specifically, this tab can be used to configure basic management features including legal notification and to create a master passphrase.
Configuring Basic Settings in ASDM
Basic ASA settings include a device hostname, enable password, master passphrase, and banner.
To configure the ASA hostname, domain name, and enable password, click Configuration > Device Setup > Device Name/Password.
To configure a master passphrase and encrypt all passwords, click Configuration > Device Management > Advanced > Master Passphrase. On this page, the master passphrase can be created and enabled to use AES encryption.
To configure legal notification (banner), click Configuration > Device Management > Management Access > Command Line (CLI) > Banner. On this page, various banners can be created and edited.
It is important to understand that to commit any changed settings in ASDM, click Apply at the bottom of each configuration page.
Configuring Interfaces in ASDM
To configure the Layer 3 interfaces, click Configuration > Device Setup > Interfaces . In this window, the ASA interfaces can be created, edited, or deleted.
Example:
For example, to configure interface Ethernet 0/0 to be an outside interface in VLAN 2 with IP address 209.165.200.226/29, click the Add button to open the Add Interface window. Ethernet 0/0 is highlighted by default. Add it to the Selected Switch Ports area by clicking Add >>. ASDM displays a Change Switch Port window. Click OK to continue. Assign the interface name outside with security level 0 and IP address 209.165.200.226 and subnet mask 255.255.255.248.The interface needs to be assigned to VLAN 2; therefore, click the Advanced tab. By default, ASDM wants to add the interface to VLAN 1. Change this setting to VLAN 2, then click OK. ASDM now displays an updated Interface page highlighting the newly added outside interface.Next select the Switch Ports tab and the page displays the various port settings. Notice how Ethernet 0/0 is not enabled yet. Click Edit to open the Edit Switch Port window. Then click Enable SwitchPort checkbox and click OK.
Finally, apply the configuration and ASDM displays the updated Interface page.
Configuring the System Time in ASDM
The system time is displayed in the status bar in the bottom right hand corner.
To change the system time, click Configuration > Device Setup > System Time > Clock. From this page, the time zone, date, and time can be configured manually and applied.
The date and time can also be configured dynamically using an NTP server. To configure NTP, click Configuration > Device Setup > System Time > NTP. In this page, the administrator can add, edit, or delete an NTP server. Clicking Add opens the Add NTP Server Configuration window. From here the IP address and authentication parameters can be configured. Click OK and the NTP page displays the newly added parameters.
Finally, click the enable NTP authentication checkbox and apply the configuration.
Configuring Routing in ASDM
Routing can be implemented by choosing Configuration > Device Setup > Routing. From here, an administrator can enable IPv4 and IPv6 static and dynamic routing.
In this example, a default static route to R1 located at 209.165.200.225 is configured. To configure a default route, click Configuration > Device Setup > Routing > Static Routes. Here, static and default static routes can be entered or edited.
Click Add to open the Add Static Route window. Select outside from the Interface drop-down list and complete the details. Click OK to return to the Static Routes page.
Finally, click Apply to commit the changes
Configuring Device Management Access in ASDM
To configure management access for Telnet and SSH services, open the Configuration > Device Management > Management Access > ASDM/HTTPS/Telnet/SSH page. In this window, an administrator can identify which host or networks can have access to the ASA via ASDM/HTTPS, Telnet, or SSH.
For example, to enable the 192.168.1.3 host SSH access, click Add and complete the information. Click OK to return to the main page and configure the SSH specifics.
Finally, apply the changes.
Configuring DHCP Services in ASDM
To enable DHCP server services, click Configuration > Device Management > DHCP > DHCP Server to open the DHCP Server page.
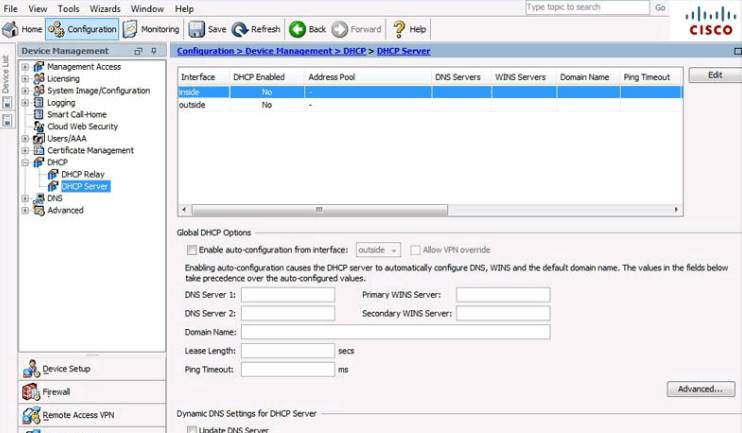
In this page, the general DHCP settings can be modified. The inside and outside DHCP settings can be edited by clicking Edit to open the Edit DHCP Server window.
In this example, the ASA will provide DHCP server services to the inside hosts by providing addresses within the 192.168.1.10 – 41 pool for 12 hours. Click OK to accept the settings and return to the DHCP Server Services page.
Finally, click Apply to commit the changes.