The Cisco IOS resilient configuration feature allows for faster recovery if someone maliciously or unintentionally reformats flash memory or erases the startup configuration file in nonvolatile random-access memory (NVRAM). The feature maintains a secure working copy of the router IOS image file and a copy of the running configuration file. These secure files cannot be removed by the user and are referred to as the primary bootset.
- The configuration file in the primary bootset is a copy of the running configuration that was in the router when the feature was first enabled.
- The feature secures the smallest working set of files to preserve persistent storage space. No extra space is required to secure the primary Cisco IOS image file.
- The feature automatically detects image or configuration version mismatch.
- Only local storage is used for securing files, eliminating scalability maintenance challenges from storing multiple images and configurations on TFTP servers.
- The feature can be disabled only through a console session.
- The feature is only available for systems that support a PCMCIA Advanced Technology Attachment (ATA) flash interface.
Enable the IOS image resilience feature
To secure the IOS image and enable Cisco IOS image resilience, use the secure boot-image global configuration mode command. When enabled for the first time, the running Cisco IOS image is secured and a log entry is generated. The Cisco IOS image resilience feature can only be disabled through a console session using the no form of the command.
This command functions properly only when the system is configured to run an image from a flash drive with an ATA interface. Additionally, the running image must be loaded from persistent storage to be secured as primary. Images that are loaded from a remote location, such as a TFTP server, cannot be secured.
To take a snapshot of the router running configuration and securely archive it in persistent storage, use the secure boot-config global configuration mode command.
The configuration archive is hidden and cannot be viewed or removed directly from the CLI prompt. You can use the secure boot-config command repeatedly to upgrade the configuration archive to a newer version after new configuration commands have been issued.
Secured files do not appear in the output of a dir command that is issued from the CLI. This is because the Cisco IOS file system prevents secure files from being listed. The running image and running configuration archives are not visible in the dir command output. Use the show secure bootset command to verify the existence of the archive.
The primary bootset image
Restore a primary bootset from a secure archive after the router has been tampered with, as shown in the figure:
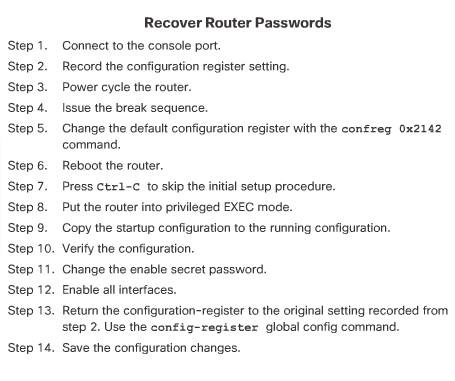
Step 1. Reload the router using the reload command. If necessary, issue the break sequence to enter ROMmon mode.
Step 2. From ROMmon mode, enter the dir command to list the contents of the device that contains the secure bootset file. eg. dir flash0:
Step 3. Boot the router with the secure bootset image using the boot command followed by the flash memory location (e.g. flash0), a colon, and the filename found in Step 2. eg. boot flash0:c1900-universalk9-mz.SPA.154-3.M2.bin
Step 4. Enter global configuration mode and restore the secure configuration to a filename of your choice using the secure boot-config restore command followed by the flash memory location (e.g. flash0), a colon, and a filename of your choice. In the figure, the filename rescue-cfg is used.
Step 5. Exit global configuration mode and issue the copy command to copy the rescued configuration file to the running configuration.
Configuring Secure Copy
The Cisco IOS Resilient feature provides a method for securing the IOS image and configuration files locally on the device. Use the Secure Copy Protocol (SCP) feature to remotely copy these files. SCP provides a secure and authenticated method for copying router configuration or router image files to a remote location. SCP relies on SSH and requires that AAA authentication and authorization be configured so that the router can determine whether the user has the correct privilege level.
Note: AAA configuration will be covered in greater detail in a later chapter.
Configure the router for server-side SCP with local AAA:
Step 1. Configure SSH, if not already configured.
Step 2. For local authentication, configure at least one user with privilege level 15.
Step 3. Enable AAA with the aaa new-model global configuration mode command.
Step 4. Use the aaa authentication login default local command to specify that the local database be used for authentication.
Step 5. Use the aaa authorization exec default local command to configure command authorization. In this example, all local users will have access to EXEC commands.
Step 6. Enable SCP server-side functionality with the ip scp server enable command.
Recovering a router password
If someone gained physical access to a router, they could potentially gain control of that device through the password recovery procedure. This procedure, if performed correctly, leaves the router configuration intact. If the attacker makes no major changes, this type of attack is difficult to detect. An attacker can use this attack method to discover the router configuration and other pertinent information about the network, such as traffic flows and access control restrictions.
An administrator can mitigate this potential security breach by using the no service password-recovery global configuration mode command. This command is a hidden Cisco IOS command and has no arguments or keywords. If a router is configured with the no service password-recovery command, all access to ROMmon mode is disabled.
When the no service password-recovery command is entered, a warning message displays and must be acknowledged before the feature is enabled
NTP
Many of the things involved in the security of a network, such as security logs, depend on an accurate date and timestamp. Seconds matter when dealing with an attack because it is important to identify the order in which a specified attack occurred. Ensure that log messages are accurately time stamped by maintaining the synchronization of clocks on hosts and network devices.
NTP Server
When determining whether to use a private clock for synchronization versus a public clock, it is necessary to weigh the risks and benefits of both.
If a private master clock is implemented, the administrator must ensure that the time source is valid and from a secure site. Vulnerabilities may be introduced if the site is not secure. For example, an attacker can launch a DoS attack by sending bogus NTP data across the Internet to the network in an attempt to change the clocks. This attack could possibly cause digital certificates to become invalid. An attacker could attempt to confuse a network administrator during an attack by disrupting the clocks on network devices. This scenario would make it difficult for the network administrator to determine the order of syslog events on multiple devices.
Getting clock time from the Internet means that unsecured packets are allowed through the firewall. Many NTP servers on the Internet do not require any authentication of peers. Therefore, the network administrator must trust that the clock itself is reliable, valid, and secure.
The communications (known as associations) between machines that run NTP are usually statically configured. Each device is given the IP address of NTP masters. Accurate time keeping is possible by exchanging NTP messages between each pair of machines with an association.
In an NTP configured network one or more routers are designated as the master clock keeper (also known as an NTP master) using the ntp master global configuration mode command.
r1(config)# ntp master [stratum]
The stratum number is the number of hops away from an authoritative source such as an atomic clock.
NTP clients either contact the master or listen for messages from the master to synchronize their clocks. Contact the master by using the ntp server ip-address command.
ntp server {ip_address | hostname} [version number] [key keyid] [source interface] [prefer]
In a LAN environment, NTP can be configured to use IP broadcast messages by using the ntp broadcast client interface configuration mode command.
Router(config-if)# ntp broadcast client
NTP authentication
NTP version 3 (NTPv3), and later, supports a cryptographic authentication mechanism between NTP peers. This authentication mechanism can be used to help mitigate an attack.
Three commands are used on the NTP master and the NTP client:
router# ntp authenticateto enable the authentication feature.
Router# ntp authentication-key key-number md5 key-valuentp trusted-key key-number
NTP server configuration steps:
Step 1. Enter the Router# ntp authentication-key key-number md5 key-value command to specify both the secret key and a key ID, which can be used to reference the secret key.
Step 2. Enter the ntp authenticate command to instruct the router to authenticate time sources.
Step 3. Enter the ntp trusted-key key-id command to indicate which previously configured key should be trusted for NTP authentication.
Step 4. (Optional) If the router is not receiving time from an external time source, enter the ntp master stratum-number command to tell a router to use its local clock as its time source and to specify the stratum level of the router.
NTP client configuration steps:
Step 1. Enter the Router# ntp authentication-key key-number md5 key-value command to specify both the secret key and a key ID, which can be used to reference the secret key.
Step 2. Enter the ntp authenticate command to instruct the router to authenticate
time sources.
Step 3. Enter the ntp trusted-key key-id command to indicate which previously configured key should be trusted for NTP authentication.
Step 4. Enter the ntp server ip-address-of-ntp-server key key-id command to tell the router to receive time from an NTP server at the specified IP address and to use the specified key ID for authentication.
Authenticates the identity of a system to which NTP will synchronize, the key-number corresponds to key-number in the second command.
Step5 (optional). ntp update-calendar periodically updates the calendar with the NTP server.
Clients configured without authentication still get the time from the server. The difference is that these clients do not authenticate the server as a secure source.
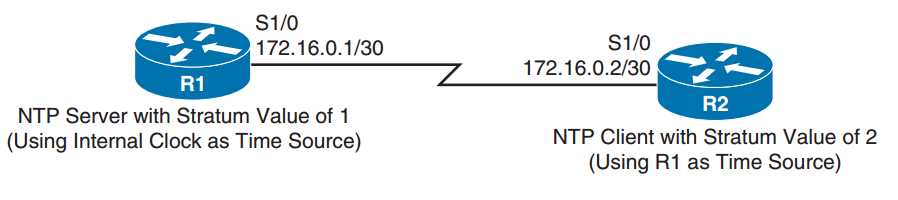
ROUTER R1 CONFIGURATION
R1# conf term
Enter configuration commands, one per line. End with CNTL/Z.
R1(config)# ntp authentication-key 1 md5 $3cretKEY
R1(config)# ntp authenticate
R1(config)# ntp trusted-key 1
R1(config)# ntp master 1
ROUTER R2 CONFIGURATION
R2# conf term
Enter configuration commands, one per line. End with CNTL/Z.
R2(config)# ntp authentication-key 1 md5 $3cretKEY
R2(config)# ntp authenticate
R2(config)# ntp trusted-key 1
R2(config)# ntp server 172.16.0.1 key 1
Use the show ntp status show ntp associations detail command to confirm that the server is an authenticated source.
Note: You can also set the key-number value as an argument in the ntp server ntp-server-address command.
Automated Security Feature (CDP and LLDP)
The Link Layer Discovery Protocol (LLDP) is an open standard that can be enabled on Cisco devices, as well as other vendor devices that support LLDP.
Enable the LLDP using the lldp run global configuration command. Both devices are running CDP by default. The output for show cdp neighbors detail and show lldp neighbors detail will reveal a device’s address, platform, and operating system details.
There are several important practices available to help ensure a device is secure:
- Disable unnecessary services and interfaces.
- Disable and restrict commonly configured management services, such as SNMP.
- Disable probes and scans, such as ICMP. Ensure terminal access security.
- Disable gratuitous and proxy Address Resolution Protocols (ARPs).
- Disable IP-directed broadcasts.