ACLs
There are many similarities between ASA ACLs and IOS ACLs. For example,
- both are made up of ACEs,
- processed sequentially from the top down,
- and there is an implicit deny any at the bottom.
- Additionally, the rule of only one ACL per interface, per protocol, per direction, still applies.
Differences:
- The ASA uses a network mask and not a wildcard mask.
- ACLs are always named instead of numbered
- By default, interface security levels apply access control without an ACL configured.
Types of ASA ACL filtering
ACLs on a security appliance can be used not only to filter packets passing through the appliance but also to filter packets destined for the appliance.
- Through-traffic filtering – Traffic that is passing through the security appliance from one interface to another interface. The configuration is completed in two steps. The first step is to set up an ACL. The second step is to apply that ACL to an interface.
- To-the-box-traffic filtering – Also known as a management access rule, to-the-box-traffic filtering applies to traffic that terminates on the ASA. Introduced in version 8.0 to filter traffic destined for the control plane of the ASA. It is completed in one step but requires an additional set of rules to implement access control.
ASA devices differ from their router counterparts because of interface security levels. By default, security levels apply access control without an ACL configured.
ASA devices differ from their router counterparts because of interface security levels. By default, security levels apply access control without an ACL configured. For instance, traffic from a more secure interface, such as security level 100, is allowed to access less secure interfaces, such as level 0. Traffic from a less secure interface is blocked from accessing more secure interfaces.
To allow connectivity between interfaces with the same security levels, the same-security-traffic permit inter-interface global configuration mode command is required. To enable traffic to enter and exit the same interface, such as when encrypted traffic enters an interface and is then routed out the same interface unencrypted, use the same-security-traffic permit intra-interface global configuration mode command.
Types of ASA ACLs
The ASA supports five types of access lists:
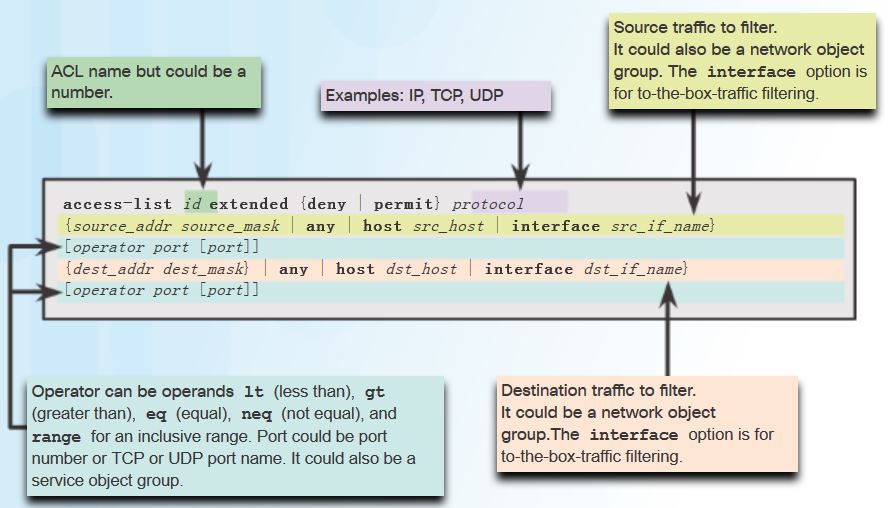
- Extended access list – The most common type of ACL. Contains one or more ACEs to specify source and destination addresses and protocol, ports (for TCP or UDP), or the ICMP type (for ICMP).
- Control network access for IP traffic: the asa does not allow any traffic from a lower security interface to a higher security interface unless it is explicitly permitted by an extended access list.
- identify traffic for AAA rules: AAA rules use access lists to identify traffic.
- Identify addresses for NAT: Policy NAT lets you identify local traffic for address translation by specifying the source and destination addresses in an extended access list.
- Establish VPN access: extended access list can be used in VPN commands.
- Identify traffic for Modular policy Framework (MPF) : access lists can be used to identify traffic in a class map, which is used for features that support MPF. Features that support MPF include TCP, general connection settings, and inspection.
- Standard access list – Unlike IOS where a standard ACL identifies the source host/network, ASA standard ACLs are used to identify the destination IP addresses. They are typically only used for OSPF routes and can be used in a route map for OSPF redistribution. Standard access lists cannot be applied to interfaces to control traffic.
- identify OSPF destination network: standard access lists include only the destination address. It can be used to control the redistribution of OSPF routes.
- EtherType access list – An EtherType ACL can be configured only if the security appliance is running in transparent mode.
- Webtype access list – Used in a configuration that supports filtering for clientless SSL VPN.
- IPv6 access list – Used to determine which IPv6 traffic to block and which traffic to forward at router interfaces.
- Control network access for IPV6: can be used to add and apply access lists to control traffic in IPV6 networks.
Configure ACL
Get more help about the ACL: help access-list
To configure Extended ACL:
Applying ACLs
After the ACL is configured, the next step is to apply the ACL to an interface in either the inbound or the outbound direction.
Command syntax and parameter description for applying the ACL to an interface using the access-group command syntax:
access-group id {in | out} interface if_name [per-user-override | control-plane]
- access-group: keyword used to apply an ACL to an interface.
- id : the name of the actual ACL to be applied to an interface.
- in : filter inbound packets.
- out: filter outbound packets.
- interface: Keyword to specify the interface to which to apply the ACL
- per-user-override: allows downloadable ACLs to override the entries on the interface ACL.
- control-plane: keyword to specify whether the applied ACL analyzes traffic destined to ASA for management purposes.
To verify ACLs, use the show access-list and show running-config access-list commands.
To erase a configured ACL, use the clear configure access-list id command.
ACL using object groups
Syntax:
access-list id extended { deny | permit} protocol object-group network-obj-grp-id object-group network-obj-grp-id object-group service-obj-grp-id
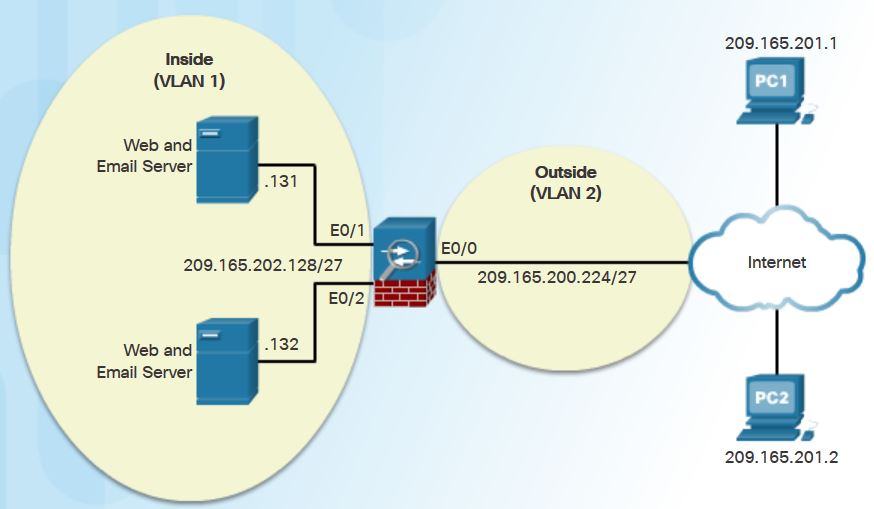
ASA (config) # object-group network NET-HOSTS
ASA (config-network-object-group)# description OG matches PC-A and PC-B
ASA (config-network-object-group)# network-object host 209.165.201.1
ASA (config-network-object-group)# network-object host 209.165.201.2
ASA (config-network-object-group)# exit
ASA (config)#
ASA (config)#object-group network SERVERS
ASA (config-network-object-group)#description OG matches Web / Email Servers
ASA (config-network-object-group)#network-object host 209.165.202.131
ASA (config-network-object-group)#network-object host 209.165.202.132
ASA (config-network-object-group)#exit
ASA (config)#
ASA (config)#object-group service HTTP-SMTP tcp
ASA (config-service-lbject-group)#description OG matches SMTP /WEB traffic
ASA (config-service-lbject-group)#port-object eq smtp
ASA (config-service-lbject-group)#port-object eq www
ASA (config-service-lbject-group)#exit
ASA (config)#
ASA (config)#access-list ACL-IN remark only permit PC-A/PC-B -> Internal Servers
ASA (config)#access-list ACL-IN extended permit tcp object-group NET-HOSTS object-group SERVERS object-group HTTP-SMTP
NAT services
NAT can be deployed using one of the methods:
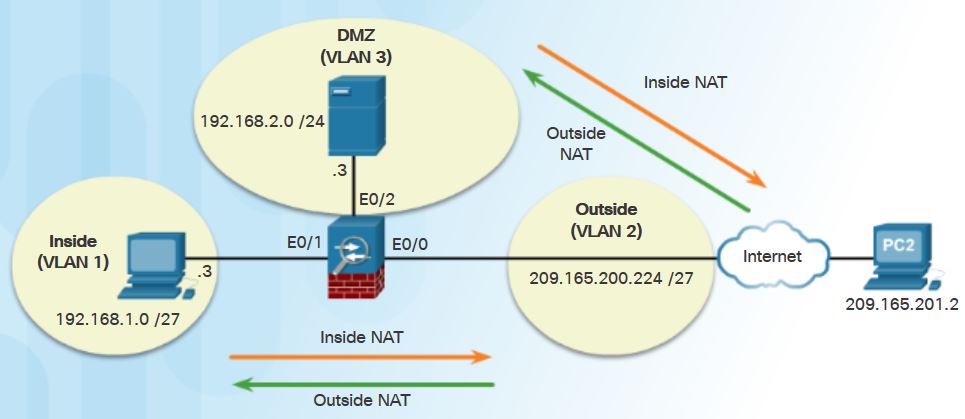
- Inside NAT: The typical NAT deployment method is when a host from a higher-security interface has traffic destined for a lower-security interface and the ASA translates the internal host address into a global address. THe ASA then restores the original inside IP address for return traffic.
- Outside NAT: this method is used when traffic from a lower-security interface that is destined for a host on a higher-security interface must be translated. This method may be useful to make an enterprise host located on the outside of the internal network appear as one from a known internal IP address.
- Bidirectional NAT: indicates that both inside NAT and outside NAT are used together.
Specifically, the Cisco ASA supports the following common types of NAT:
- Dynamic NAT – This is a many-to-many translation. Usually an inside pool of private addresses requiring public addresses from another pool.
- Dynamic PAT – This is a many-to-one translation. This is also known as NAT overloads. Usually an inside pool of private addresses overloading an outside interface or outside address.
- Static NAT – This is a one-to-one translation. Usually an outside address mapping to an internal server.
- Policy NAT – Policy-based NAT is based on a set of rules. These rules can specify that only certain source addresses intended for specific destination addresses and/or specific ports will be translated.
These three types of NAT are referred to as network object NAT because the configuration requires network objects to be configured.
Note: Another ASA NAT feature is called Twice-NAT. Twice-NAT identifies both the source and destination address in a single rule (nat command). Twice-NAT is used when configuring remote-access IPsec and SSL VPNs. Twice-NAT is beyond the scope of the chapter and is not explored further.
Configuring Dynamic NAT
To configure network object dynamic NAT, two network objects are required:
- A network object identifying the pool of public IP addresses into which internal addresses are translated. These are identified using range or subnet network object commands.
- The second network object identifies the internal addresses to be translated and then binds the two objects together. These are identified using the range or subnet network object commands. The two network objects are then bound together using the nat (real-ifc, mapped-ifc) dynamic mapped-obj network object command.
ASA(config)# object network PUBLIC
ASA(config-network-object)# range 209.165.200.240 209.165.200.248
ASA(config-network-object)#exit
ASA(config)#
ASA(config)# object network DYNAMIC-NAT
ASA(config-network-object)# subnet 192.168.1.0 255.255.255.224
ASA(config-network-object)# nat (inside,outside) dynamic PUBLIC // map the inside pool (192.168.1.0/27) to the PUBLIC pool.
Then allow return ICMP traffic from outside host.
ASA(config)# policy-map global_policy //modify the default inspection rule in the global policy
ASA(config-pmap)# class inspection_default //modify the class (named inspection_default) of the policy map
ASA(config-cmap)# access-list ICMPACL extended permit icmp any any //Create an ACL named ICMPACL permitting all ICMP traffic
ASA(config)# access-group ICMPACL in interface outside // Apply the ACL to the outside interface in an inbound direction.
pre-8.3:
ciscoasa(config-pmap)# class class-default // modify the class of the policy map.
Verify:
verify the network address translation using the show xlate command.
Additional information can be gathered using the show nat and show nat detail commands.
clear nat counters
Configuring Dynamic PAT
A variation of this configuration is called Dynamic PAT. This is when an actual external IP address is configured and overloaded instead of the ASA interface IP address.
Only one network object is required when overloading the outside interface. To enable inside hosts to overload the outside address, use the nat (real-ifc,mapped-ifc) dynamic interface command.
ASA(config)# object network INSIDE-NET
ASA(config-network-object)# subnet 192.168.1.0 255.255.255.224
ASA(config-network-object)# nat (inside,outside) dynamic interface
Configuring Static NAT
Static NAT is configured when an inside address is mapped to an outside address. For instance, static NAT can be used when a server must be accessible from the outside.
To configure static NAT, use the nat (real-ifc,mapped-ifc) static {mapped_inline_ip | mapped_obj | interface} [dns | service {tcp | udp} real_port mapped_port] network object command.
###Basic configuration for Interfaces
ASA (config)#interface VLAN3
ASA (config-if)# no forward interface Vlan1 //Turn off forwarding traffic from VLAN3 to VLAN1
ASA (config-if)#nameif dmz //Name the VLAN3 interface ‘DMZ’
ASA (config-if)#security-level 70
ASA (config-if)#ip address 192.168.2.1 255.255.255.0
ASA (config-if)#exit
ASA (config)# interface Ethernet0/2
ASA (config-if)#switchport access vlan 3
ASA (config-if)#no shut
###NAT configuration
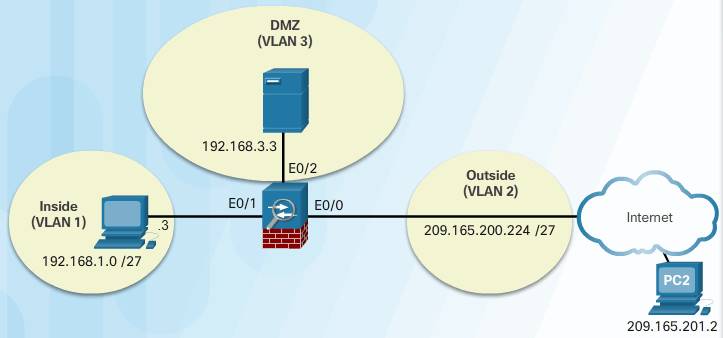
ASA (config)# object network DMZ-SERVER // Create a network object DMZ-SERVER for which you want to configure NAT, or enters object network configuration mode for an existing network object.
ASA (config-network-object)# host 192.168.3.3 // defines the real IP address(es) that you want to translate.
ASA (config-network-object)# nat (dmz,outside) static 209.165.200.227
###Configure other Security setting, e.g. permit access only to host 192.168.3.3 , permit ICMP to 192.168.3.3
ASA (config)#access-list OUTSIDE-DMZ extended permit ip any host 192.168.3.3 // Create Extended ACL to permit access from any host to host 192.168.3.3.
ASA (config)# access-group OUTSIDE-DMZ in interface outside // Apply the ACL to the interface Outside (Vlan2)
ASA (config)#policy-map global_policy
ASA (config-pmap)# class inspection_default
ASA (config-pmap-c)#access-list ICMPACL extended permit icmp any any
ASA (config)#access-group ICMPACL in interface dmz
AAA
Cisco ASA can be configured to authenticate using a local user database or an external server for authentication or both.
Local AAA uses a local database for authentication. This method stores usernames and passwords locally on the ASA, and users authenticate against the local database. Local AAA is ideal for small networks that do not need a dedicated AAA server.
Note: Unlike the ISR, ASA devices do not support local authentication without using AAA.
Use the username name password password [privilege priv-level] command to create local user accounts. To erase a user from the local database, use the clear config username [name] command. To view all user accounts, use the show running-config username command.
Server-based AAA authentication is a far more scalable method than local AAA authentication. Server-based AAA authentication uses an external database server resource leveraging RADIUS or TACACS+ protocols. If there are multiple networking devices, server-based AAA is more appropriate.
Configure TACACS+ or RADIUS server:
aaa-server server-tag protocol: create a TACACS+ or RADIUS AAA server groupaaa-server server-tag [interfacename] host { server-ip | name} [key]: COnfigure a AAA server as part of a AAA server group. Also configure AAA server parameters that are host-specific.
Configure AAA server on ASA 5505:
ASA(config)# username Admin Password class privilege 15
ASA(config)#aaa-server TACACS-SVR protocol tacacs+
ASA(config-aaa-server-group)# aaa-server TACACS-SVR (dmz) host 192.168.3.3
ASA(config)#show run username
ASA(config)#show run aaa-server
To erase all AAA server configurations, use the clear config aaa-server command.
To view all user accounts, use the show running-config aaa-server command.
AAA Configuration
To authenticate users who access the ASA CLI over a console, SSH, HTTPS (ASDM), or Telnet connection, or to authenticate users who access privileged EXEC mode using the enable command, use the aaa authentication console command in global configuration mode.
The command syntax is aaa authentication { serial | enable | telnet | ssh | http } console { LOCAL | server-group [ LOCAL ]} command.
To erase all AAA parameters, use the clear config aaa command. To view all user accounts, use the show running-config username command.
Service Policies on an ASA
Overview of MPF
A Modular Policy Framework (MPF) configuration defines a set of rules for applying firewall features, such as traffic inspection and QoS, to the traffic that traverses the ASA. MPF allows granular classification of traffic flows, to apply different advanced policies to different flows. MPF is used with hardware modules to redirect traffic granularly from the ASA to the modules that use Cisco MPF. MPF can be used for advanced Application Layer inspection of traffic by classifying at Layers 5 through 7. Rate limiting and QoS features can also be implemented using MPF.
Cisco MPF uses these three configuration objects to define modular, object-oriented, hierarchical policies.

Classify traffic:
What are we looking for?
Identify traffic on which to perform MPF.
Create Layer 3/4 class maps that can contain multiple match criteria.
class-map class-name
Define Actions:
What shall we do with it?
Define a policy for the traffic at Layers 3 to 7.
Create a policy map that can contain multiple class maps with associated actions.
policy-map policy-name
Activate Policy:
Where do we do it?
. Activate the policy map on interfaces.
. Create a service policy that applies a policy map to an interface or all interfaces.
service-policy serv-name interface intf-name
Although the MPF syntax is similar to the ISR IOS Cisco Modular QoS CLI (MQC) syntax or the Cisco Common Classification Policy Language (C3PL) syntax, the configurable parameters differ. The ASA platform provides more configurable actions as compared to an ISR for Cisco IOS ZPF. The ASA supports Layer 5 to Layer 7 inspections using a richer set of criteria for application-specific parameters. For instance, the ASA MPF feature can be used to match HTTP URLs and request methods, prevent users from surfing to specific sites during specific times, or even prevent users from downloading music (MP3) and video files via HTTP/FTP or HTTPS/SFTP.
There are four steps to configure MPF on an ASA:
Step 1. (Optional) Configure extended ACLs to identify granular traffic that can be specifically referenced in the class map. For example, ACLs can be used to match TCP traffic, UDP traffic, HTTP traffic, or all traffic to a specific server.
Step 2. Configure the class map to identify traffic.
Step 3. Configure a policy map to apply actions to those class maps.
Step 4. Configure a service policy to attach the policy map to an interface.
Now let’s have a look each step:
Configuring Class Maps
Class maps are configured to identify Layer 3/4 traffic. To create a class map and enter class-map configuration mode, use the class-map class-map-name global configuration mode command. The names “class-default” and any name that begins with “_internal” or “_default” are reserved. The class map name must be unique and can be up to 40 characters in length. The name should also be descriptive.
Note: A variation of the class-map command is used for management traffic that is destined to the ASA. In this case, use the class-map type management class-map-name command.
Description explaining the purpose of the call map should be configured using the description command.
Next, traffic to match should be identified using the match any (matches all traffic) or match access-list access-list-name to match traffic specified by an extended access list.
Note: Unless otherwise specified, only include one match command in the class map.
The example in the figure provides a sample class map configuration.
The ASA also automatically defines a default Layer 3/4 class map identified in the configuration by class-map inspection_default. Identified in this class map is the match default-inspection-traffic which matches the default ports for all inspections. When used in a policy map, this class map ensures that the correct inspection is applied to each packet, based on the destination port of the traffic.
For example, when UDP traffic for port 69 reaches the ASA, the ASA applies the TFTP inspection. In this case only, multiple inspections can be configured for the same class map. Normally, the ASA does not use the port number to determine which inspection to apply. This provides flexibility to apply inspections to non-standard ports.
To display information about the class map configuration, use the show running-config class-map command.
To remove all class maps, use the clear configure class-map command in global configuration mode.
Define and Activate a Policy
Policy maps are used to bind class maps with actions.
Use the policy-map policy-map-name global configuration mode command, to apply actions to the Layer 3 and 4 traffic. The policy map name must be unique and up to 40 characters in length. The name should also be descriptive.
In policy-map configuration mode, config-pmap, use the following commands:
- description – Add description text.
class class-map-name– Identify a specific class map on which to perform actions.
The maximum number of policy maps is 64. There can be multiple Layer 3/4 class maps in one policy map, and multiple actions can be assigned from one or more feature types to each class map.
Note: The configuration includes a default Layer 3/4 policy map that the ASA uses in the default global policy. It is called global_policy and performs an inspection on the default inspection traffic. There can only be one global policy. Therefore, to alter the global policy, either edit it or replace it.
These are the three most common commands available in policy map configuration mode:
- set connection – Sets connection values.such as timeout, maximum connection. http://www.cisco.com/c/en/us/td/docs/security/asa/asa82/configuration/guide/config/conns_connlimits.html
- inspect – Provides protocol inspection servers.
- police – Sets rate limits for traffic in this class.
police {output | input} conform-rate [conform-burst] [conform-action [drop | transmit]] [exceed-action [drop | transmit]]
hostname(config-pmap-c)# police output 56000 10500
Actions are applied to traffic bidirectionally or unidirectionally depending on the feature.
To display information about the policy map configuration, use the show running-config policy-map command.
Use the clear configure policy-map command in global configuration mode, to remove all policy maps.
Configure the Service Policy
To activate a policy map globally on all interfaces or on a targeted interface,
- use the service-policy global configuration mode command to enable a set of policies on an interface:
service-policy policy-map-name [ global | interface intf ]
- Interface service policies take precedence over the global service policy for a given feature.
- The policy-map-name is case sensitive, must exactly match the one in the policy-map command.
ASA Default Policy
The ASA default configuration includes a global policy that matches all default application inspection traffic and applies inspection to the traffic globally. Otherwise, the service policy can be applied to an interface or globally. The output in the figure displays the default service policy configuration.
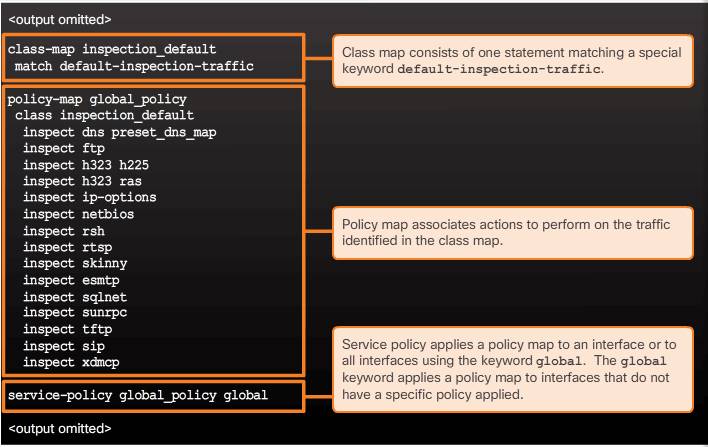
To alter the global policy, an administrator needs to either edit the default policy or disable the default policy and apply a new policy.
To display information about the service policy configuration, use the show service-policy or the show running-config service-policy command.
Use the clear configure service-policy command in global configuration mode to remove all service policies. The clear service-policy command clears the service policy statistics.