Implement IPS
Several steps are necessary to use the Cisco IOS CLI to work with IOS IPS 5.x format signatures. Cisco IOS version 12.4(10) or earlier used IPS 4.x format signatures and some IPS commands have changed.
Implement IOS IPS:
Step 1. Download the IOS IPS files.
Cisco IOS release 12.4(10)T and earlier, provided built-in signatures in the Cisco IOS software image, as well as support for imported signatures. IPS signature selection involved loading an XML file onto the router. This file, called the signature definition file (SDF), contained a detailed description of each selected signature in Cisco IPS Sensor software 4.x signature format.
With newer IOS versions, there are no built-in (hard-coded) signatures within the Cisco IOS software. Instead, all signatures are stored in a separate signature file and must be imported. The IOS release 12.4(15)T4 or later, uses the newer 5.x format signature files. These files can be downloaded from cisco.com, which requires a user account.
It is necessary to download the IOS IPS signature package files, and a public crypto key.
- IOS-Sxxx-CLI.pkg – The latest signature package.
- realm-cisco.pub.key.txt – The public crypto key used by IOS IPS.
Step 2. Create an IOS IPS configuration directory in Flash.
The mkdir privileged EXEC command creates the directory in Flash. Other useful commands include rename, which allows the name of the directory to be changed. To verify the contents of Flash, enter the dir flash:privileged EXEC mode command.
Cisco IOS IPS supports any Cisco IOS file system as the configuration location, as long as it has proper write access. A Cisco USB flash drive connected to the USB port on the router can be used as an alternative location to store the signature files and configurations. The USB flash drive must remain connected to the USB port on the router if it is used as the IOS IPS configuration directory location.
Step 3. Configure an IOS IPS crypto key.
The crypto key verifies the digital signature for the master signature file (sigdef-default.xml). The content of the file is signed by a Cisco private key to guarantee its authenticity and integrity.
Open the text file to configure the IOS IPS crypto key. Copy the contents of the file, and paste the contents to the router at the global configuration prompt. The text file issues the various commands to generate the RSA key.
At the time of signature compilation, an error message is generated if the public crypto key is invalid.
Example Error Message:
%IPS-3-INVALID_DIGITAL_SIGNATURE: Invalid Digital Signature found (key not found)
If the key is configured incorrectly, the key must be removed and then reconfigured. Use the no crypto key pubkey-chain rsa and the no named-key realm-cisco.pub signaturecommands. Then repeat the procedure in Step 3 to reconfigure the key.
Example Create a key:
The key is
30820122 300D0609 2A864886 F70D0101 01050003 82010F00 3082010A 02820101
00C19E93 A8AF124A D6CC7A24 5097A975 206BE3A2 06FBA13F 6F12CB5B 4E441F16
17E630D5 C02AC252 912BE27F 37FDD9C8 11FC7AF7 DCDD81D9 43CDABC3 6007D128
B199ABCB D34ED0F9 085FADC1 359C189E F30AF10A C0EFB624 7E0764BF 3E53053E
5B2146A9 D7A5EDE3 0298AF03 DED7A5B8 9479039D 20F30663 9AC64B93 C0112A35
FE3F0C87 89BCB7BB 994AE74C FA9E481D F65875D6 85EAF974 6D9CC8E3 F0B08B85
50437722 FFBE85B9 5E4189FF CC189CB9 69C46F9C A84DFBA5 7A0AF99E AD768C36
006CF498 079F88F8 A3B3FB1F 9FB7B3CB 5539E1D1 9693CCBB 551F78D2 892356AE
2F56D826 8918EF3C 80CA4F4D 87BFCA3B BFF668E9 689782A5 CF31CB6E B4B094D3
F3020301 0001R1(config)#
R1(config)# crypto key pubkey-chain rsa
R1(config-pubkey-chain)# named-key realm-cisco.pub signature
R1(config-pubkey-key)# key-string
Enter a public key as a hexidecimal number ….
R1(config-pubkey)#$2A864886 F70D0101 01050003 82010F00 3082010A 02820101
R1(config-pubkey)#$D6CC7A24 5097A975 206BE3A2 06FBA13F 6F12CB5B 4E441F16
R1(config-pubkey)#$912BE27F 37FDD9C8 11FC7AF7 DCDD81D9 43CDABC3 6007D128
R1(config-pubkey)#$085FADC1 359C189E F30AF10A C0EFB624 7E0764BF 3E53053E
R1(config-pubkey)#$0298AF03 DED7A5B8 9479039D 20F30663 9AC64B93 C0112A35
R1(config-pubkey)#$994AE74C FA9E481D F65875D6 85EAF974 6D9CC8E3 F0B08B85
R1(config-pubkey)#$5E4189FF CC189CB9 69C46F9C A84DFBA5 7A0AF99E AD768C36
R1(config-pubkey)#$A3B3FB1F 9FB7B3CB 5539E1D1 9693CCBB 551F78D2 892356AE
R1(config-pubkey)#$80CA4F4D 87BFCA3B BFF668E9 689782A5 CF31CB6E B4B094D3
R1(config-pubkey)# F3020301 0001
R1(config-pubkey)# quit
R1(config-pubkey-key)#
Enter the show run command to confirm that the crypto key is configured.
Step 4. Enable IOS IPS.
This process that consists of four sub-steps.
a. Identify the IPS rule name and specify the location.
Create a rule name:
router(config) # ip ips name [rule-name]
You can specify an optional extended or standard access control list (ACL) to filter the traffic that will be scanned by this rule name. All traffic permitted by the ACL is subject to inspection by the IPS. Traffic that is denied by the ACL is not inspected by the IPS.
ip ips name ips list named_or_numbered_acl
- <1-199> Numbered access list
- WORD Named access list
Configure the IPS signature storage location:
router(config) #ip ips config location flash: <directory-name>
Note: Prior to IOS 12.4(11)T, the ip ips sdf location command was used.
Example:
An IPS rule named IOSIPS is created. An optional extended or standard ACL can be configured to filter the scanned traffic. All traffic that is permitted by the ACL is subject to inspection by the IPS. Traffic that is denied by the ACL is not inspected by the IPS.
The IPS location in flash is identified as flash:IPS.

b. Enable SDEE and Syslog.
To use SDEE, the HTTP or HTTPS server must first be enabled:
router(config)# ip http server
Or
router(config)# ip https server
If the HTTP server is not enabled, the router cannot respond to the SDEE clients because it cannot see the requests.
SDEE
All stored events are lost when Cisco SDEE notification is disabled. A new buffer is allocated when the notifications are re-enabled. SDEE uses a pull mechanism. With a pull mechanism, requests come from the network management application and the IDS or IPS router responds. SDEE is the standard format for vendor devices to communicate events to a network management application.
The buffer stores up to 200 events by default. If a smaller buffer is requested, all stored events are lost. If a larger buffer is requested, all stored events are saved and additional space is allocated for entries beyond the previous buffer size. The default buffer size can be altered with the ip sdee events command. The maximum number of events is 1,000.
The clear ip ips sdee command clears SDEE events or subscriptions. The syntax for both commands is shown in the figure.
The ip ips notify command replaces the older ip audit notify command. If the ip audit notify command is part of an existing configuration, the IPS interprets it as the ip ips notify command.
SDEE notification is disabled by default and must be explicitly enabled:
Router(coifig)# ip ips notify sdee.
IOS IPS also supports logging to send event notification. SDEE and logging can be used independently or enabled at the same time. Logging notification is enabled by default. If the logging console is enabled, IPS log messages are displayed on the console.
Use the Router(coifig)# ip ips notify log command to enable logging. The IPS log messages are sent to a syslog server if one is configured.
- sdee: sends messages in SDEE format
- log: sends messages in syslog fromat. Note: if an option is not specified, alert messages are sent in syslog format.
example:

c. Configure the signature category.
All signatures are grouped into categories, and the categories are hierarchical. This helps classify signatures for easy grouping and tuning. The three most common categories are all, basic, andadvanced.
The signatures that IOS IPS uses to scan traffic can be retired or unretired. Retiring a signature means that IOS IPS does not compile that signature into memory for scanning. Un-retiring a signature instructs IOS IPS to compile the signature into memory and use it to scan traffic. When IOS IPS is first configured, all signatures in the all category should be retired. Then, selected signatures should be unretired in a less memory-intensive category.
To retire and unretire signatures, first enter IPS category mode:
router(config)# ip ips signature-category
Next use the category command to change a category:
router(config-ips-category)# category common_category.
For example, use the category all command to enter IPS category all action mode.
To secify if retire the category:
- To retire a category, use the
retired truecommand. - To unretire a category, use the
retired falsecommand.
example
In the example, the all IPS category is retired, and the basic IPS category is unretired.
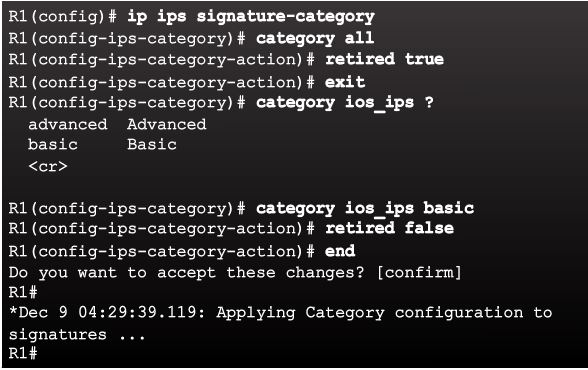
CAUTION: Do not unretire the all category. The all signature category contains all signatures in a signature release. The IOS IPS cannot compile and use all the signatures at one time because it will run out of memory.
The order in which the signature categories are configured on the router is also important. IOS IPS processes the category commands in the order listed in the configuration. Some signatures belong to multiple categories. If multiple categories are configured and a signature belongs to more than one of them, IOS IPS uses the signature’s properties in the last configured category, for example, retired, unretired, or actions.
d. Apply the IPS rule to a desired interface, and specify the direction.
Use the ip ips interface configuration command to apply the IPS rule:
router(config-if)# ip ips ips-name { in | out }
example:
 In the example in Figure 4, the IPS rule IOSIPS is applied to incoming traffic on the G0/0 interface. It is also applied to the incoming and outgoing traffic on the G0/1 interface.
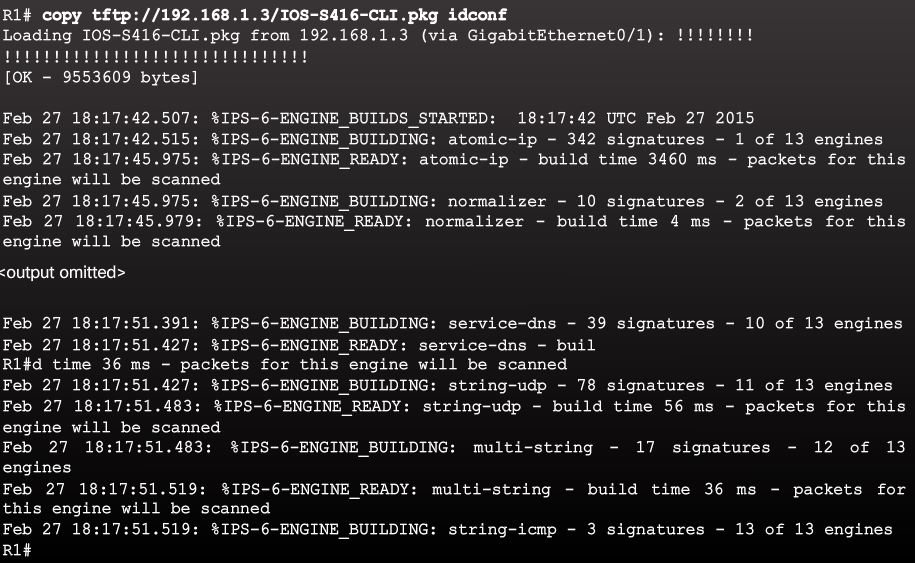
Step 5. Load the IOS IPS signature package to the router.
The last step is for the administrator to upload the signature package to the router. The most common methods are FTP or TFTP. To copy the downloaded signature package from the TFTP server to the router:
router# copy {tftp | ftp} url idconf
Example
verify the signature
To verify that the signature package is properly compiled:
router # show ip ips signature count
Modify Signature
The Cisco IOS CLI can be used to retire or unretire individual signatures or a group of signatures that belong to a signature category. When a group of signatures is retired or unretired, all signatures in that category are retired or unretired.
Some unretired signatures, either unretired as an individual signature or within an unretired category, might not compile because of insufficient memory, invalid parameters, or if the signature is obsolete.
Retiring / Unretire a specific signature.
router(config)# ip ips signature-defination
router(config-sigdef)# signature signature_name subsig_ID
router(config-sigdef-sig) # status
router(config-sigdef-sig-status)# retired true
example of specific sig (echo)
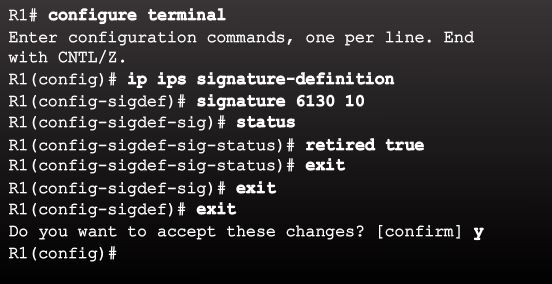
In this example, the signature 6130 with subsig ID of 10 is retired.
The following example shows how to unretire the echo request signature, enable it, change the signature action to alert, and drop and reset for signature 2004 with a subsig ID of 0.
R1(config)# ip ips signature-definition
R1(config-sigdef)# signature 2004 0
R1(config-sigdef-sig)#status
R1(config-sigdef-sig-status)# retired false
R1(config-sigdef-sig-status)# enabled true
R1(config-sigdef-sig-status)# engine
R1(config-sigdef-sig-engine)# event-action produce-alert
R1(config-sigdef-sig-engine)# event-action deny-packet-inline
R1(config-sigdef-sig-engine)# event-action reset-tcp-connection
R1(config-sigdef-sig-engine)# exit
R1(config-sigdef-sig)# exit
R1(config-sigdef)# exit
Do you want to accept these changes? [confirm] <Enter>
Change Signature Actions
You can also use the IOS CLI to change signature actions for one signature or a group of signatures based on signature categories. To change an action, the event-action command must be used in IPS Category Action mode or Signature Definition Engine mode.
router(config)# ip ips signature-defination
router(config-sigdef)# signature signature_name subsig_ID
router (config-sigdef-sig) # event-action action
- deny-attacker-inline: Terninates the current packet and future packets from this attacker address for a specified period of time.
- deny-connection-inline: terminates the current packet and future packets on this TCP flow.
- deny-packet-inline: terminate the packet.
- produce-alert: writes the event to the Event store as an alert
- reset-tcp-connection: sends TCP resets to hijack and terminate the TCP flow. Only works on TCP signatures that analyze a single connection. It does not work for sweeps or floods.

verify IOS IPS
After IPS is implemented, it is necessary to verify the configuration to ensure correct operation. There are several show commands that can be used to verify the IOS IPS configuration:
- The show ip ips privileged EXEC command can be used with other parameters to provide specific IPS information.
- The show ip ips all command displays all IPS configuration data. The output can be lengthy depending on the IPS configuration.
- The show ip ips configuration command displays additional configuration data that is not displayed with the show running-config command.
- The show ip ips interfaces command displays interface configuration data. The output shows inbound and outbound rules applied to specific interfaces.
- The show ip ips signatures command verifies the signature configuration. The command can also be used with the keyword detail to provide more explicit output.
- The show ip ips statistics command displays the number of packets audited, and the number of alarms sent. The optional reset keyword resets output to reflect the latest statistics.
Use the clear ip ips configuration command to disable IPS, remove all IPS configuration entries, and release dynamic resources. The clear ip ips statistics command resets statistics on packets analyzed, and alarms sent.