The custom admin page is a very helpful feature which allows the developer to extend admin rights with new options.
Example 1. Exchange profit margin setup
A typical idea is one customer running a currency exchange business, wants to set the profit margin from time to time, which will reflect on the buy / sell price on the website. I chose the Open currency Convertor as plugin for this. It’s not practical to let the customer change the rate in the PHP code, so a setting in the admin page will be helpful for this case.
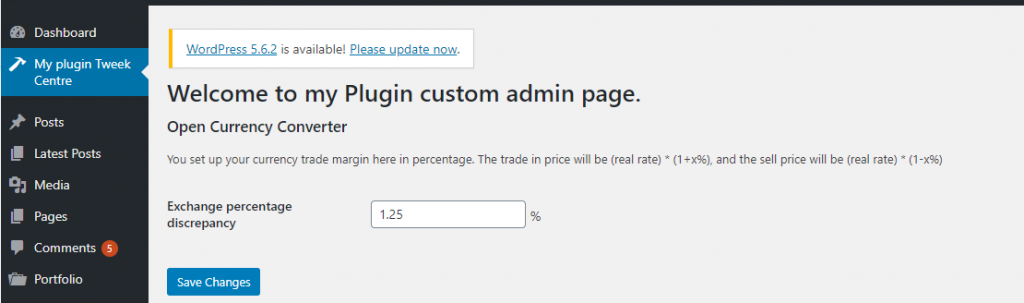
Firstly, let’s have a look at the final goal page layout:
1. Create an admin menu called My plugin tweak page
Under the theme editor, find the functions.php, we will use the function add_menu_page(),
In order to add a new admin menu item, we can use the following function:
add_menu_page( string $page_title,
string $menu_title,
string $capability,
string $menu_slug,
callable $function = '',
string $icon_url = '',
int $position = null )
There are 7 params you can set for this function, Let’s dive into each item to learn what they are.
1. $page_title The text to be displayed in the title tags of the page when the menu is selected. Choose a meaningful page title. For example, if your custom admin page is an options page for the plugin, it could be “My plugin options”. Note that it should be translatable. So use _ function like the following example: _( ‘My Plugin Options’, ‘my-plugin-textdomain‘), go here to find more about text domain.
2. $menu_title The text to be used for the menu.
3. $capability The capability required for this menu to be displayed to the user. For example, if it contains some general options for the site, manage_option could be the best choice. Just set it carefully to avoid any possible security issue.
Check out the WordPress Roles and Capabilities page and see what the proper capability is for your custom admin page.
4. $menu_slug The slug name that refers to this menu. It should be unique for this menu page and only include lowercase alphanumeric, dashes, and underscores to be compatible with sanitize_key(). This will be used as a parameter in the URL of your custom admin page as it’s shown in the picture.
5. $function The function to be called to show the output content for this page. we will create this in next section.
6. $icon_url The URL of the icon to be used for this menu. You can use an image, encoded SVG, or dash icons.
-
- In order to use an image, simply pass the URL of the image.
- If you want to have an icon like WordPress defaults, which has a different color on hover, you can pass an encoded SVG file. The http://b64.io/ can convert your SVG file to base64 encoded data. After uploading your SVG, simply copy the link that starts with data:image/svg+xml;base64, and paste it.
- You can use existing WordPress icons. Find a proper icon from WordPress Dashicons page and pass the class name like dashicons-schedule as icon URL argument.
- Also, you can use none value to leave div.wp-menu-image empty, so an icon can be added via CSS.
7. $position The position in the menu order should appear. Here is the list of numbers of default admin menus:
-
- 2 – Dashboard
- 4 – Separator
- 5 – Posts
- 10 – Media
- 15 – Links
- 20 – Pages
- 25 – Comments
- 59 – Separator
- 60 – Appearance
- 65 – Plugins
- 70 – Users
- 75 – Tools
- 80 – Settings
- 99 – Separator
So, if you want to show your menu after Dashboard, you should use 3.
So I got the below code in my example:
function my_plugin_tweek_centre() {
  add_menu_page(
    __( 'Sample page', 'my-textdomain' ),
    __( 'My plugin Tweek Centre', 'my-textdomain' ),
    'manage_options',
    'my_plugin_tweek_centre_page',
    'my_plugin_tweek_centre_contents',
    'dashicons-hammer',
    3
  );
}

add_action( 'admin_menu', 'my_plugin_tweek_centre' );
So far you should have a menu with empty content.
![]()
2. Menu page contens
Instead of hard coding the options, every plugin has custom setting pages, which allow developers to have an option page for their plugin.
In order to add new settings to WordPress, we have to use WordPress Settings API. Settings API is a core API that allows developers to add a new custom setting page in WordPress.
This includes functions to register settings, setting the section and setting fields, form rendering and error handling.
Before adding settings
For the first step, we need to make sure we have a form and that it’s set to work with options.php in wp-admin folder. In the following code that we have a call back function to generate the heading, we need to load settings for the API functions to let our custom settings work with WordPress.
function my_plugin_tweek_centre_contents() {
    ?>
    <h1> <?php esc_html_e( 'Welcome to my Plugin custom admin page.', 'my-plugin-textdomain' ); ?> </h1>
    <form method="POST" action="options.php">
    <?php
    settings_fields( 'my_plugin_tweek_centre_page' );
    do_settings_sections( 'my_plugin_tweek_centre_page' );
    submit_button();
    ?>
    </form>
    <?php
}
Settings section
we’ll go ahead and use the add_settings_section function to have a new setting section in our custom admin page which have my_plugin_tweek_centre_page as the slug.
function my_settings_init() {
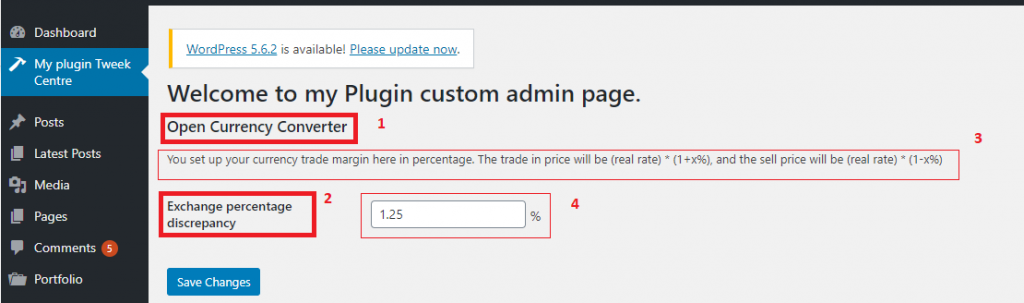
//Plugin section title, which is section 1 in the image
add_settings_section(
'sample_page_setting_section',
__( 'Open Currency Converter', 'my-textdomain' ),
'my_setting_section_callback_function',
'my_plugin_tweek_centre_page'
);
//The field to show setting parameters, which is section 2 in the image. exchange_margin is the name of option you can retrieve with get_option()
add_settings_field(
'exchange_margin',
__( 'Exchange percentage discrepancy', 'my-textdomain' ),
'my_setting_markup',
'my_plugin_tweek_centre_page',
'sample_page_setting_section'
);
register_setting( 'my_plugin_tweek_centre_page', 'exchange_margin' );
}
//The field to show description, which is section 3 in the image
function my_setting_section_callback_function() {
echo '<p>You set up your currency trade margin here in percentage. The trade in price will be (real rate) * (1+x%), and the sell price will be (real rate) * (1-x%)</p>';
}
//The field to show input box, which is section 4 in the image
function my_setting_markup() {
?>
<input type="text" id="exchange_margin" name="exchange_margin" value="<?php echo get_option( 'exchange_margin' ); ?>"> <label for="exchange_margin"><?php _e( '%', 'my-textdomain' ); ?></label>
<?php
}
Retrieve the option value
In the open currency convertor, under convert-currency.php, I get this option value by function get_option(‘exchange_margin’) and calculate the sell and buy price for the customer:
$margin = get_option( 'exchange_margin' );
$result = number_format( round( $number * ( $to * ( 1 / $from ) ) * (1 - $margin/100) + 0.005, $dp ), $dp, '.', ',' );
Example 2, Sale end date setting
With the first example, let’s look at another example. Theme with Woocommerce shop have a nice widget showing store wide sale count down time, however, the date can only be setup in the Custimizer > header notification. I want to give client an easier way to only change it in the backend.
First let’s find some keyword and search it by Agent Ransack:
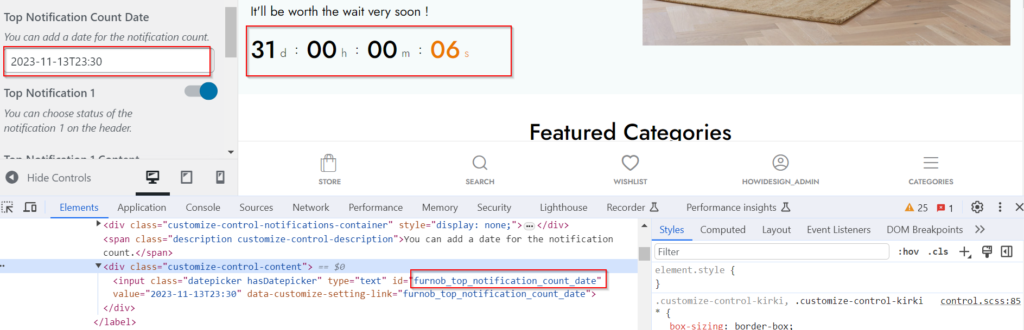
Searched furnob_top_notification_count_date

So the value is passed via theme_mod furnob_top_notification_count_date.
The idea is get the an input with type datetime-local, pass to the option, and then pass to theme_mod when click save button.
The main change here is change the input time to datetime-local.
<input type=”datetime-local” id=”sale_end_date” name=”sale_end_date” min=”2023-11-07T00:00″
max=”2058-06-14T00:00″ value=”<?php echo get_option(‘sale_end_date’); ?>”>
// Edit the admin menu, to allow user enter a global variable

// **Add a admin menu

function my_plugin_tweek_centre() {

add_menu_page(

__( 'Sample page', 'my-textdomain' ),

__( 'HowIDesign setting Centre' ),

'manage_options',

'my_plugin_tweek_centre_page',

'my_plugin_tweek_centre_contents',

'dashicons-hammer',

3

);

}


add_action( 'admin_menu', 'my_plugin_tweek_centre' );


// **Create a content page for that menu

function my_plugin_tweek_centre_contents() {

    ?>

    <form method="POST" action="options.php">

    <?php

    settings_fields( 'my_plugin_tweek_centre_page' );

    do_settings_sections( 'my_plugin_tweek_centre_page' );

    submit_button();

    set_theme_mod( 'furnob_top_notification_count_date',get_option('sale_end_date'));

    ?>

    </form>
    <?php

}

//**setting section

//add_action( 'admin_init', 'my_settings_init' );


function my_settings_init() {

//Plugin section title

    add_settings_section(

        'my_plugin_tweek_centre_page_setting_section',

        __( 'Sales end date', 'my-textdomain' ),

        'my_setting_section_callback_function',

        'my_plugin_tweek_centre_page'

    );

//The field to show setting title.

add_settings_field(

   'sale_end_date',

   __( 'Select the due date', 'my-textdomain' ),

   'my_setting_markup',

   'my_plugin_tweek_centre_page',

   'my_plugin_tweek_centre_page_setting_section'

);


register_setting( 'my_plugin_tweek_centre_page', 'sale_end_date' );

}


function my_setting_section_callback_function() {

    echo '<h2>You can set up your sale end date here:</h2>';

}


function my_setting_markup() {

    ?>


    <input type="datetime-local" id="sale_end_date" name="sale_end_date" min="2023-11-07T00:00"

  max="2058-06-14T00:00" value="<?php echo get_option('sale_end_date'); ?>">


    <?php

}

//**tell the wordpress to load the settings.

add_action( 'admin_init', 'my_settings_init' );
Reference
Icon: