Configuring NPS Policies
NPS policies define who can connect, when they can connect, and how they can connect to the network. Three policy types are available:
• Connection request policies—Specify which RADIUS servers handle connection requests from RADIUS clients.
• Network policies—Specify which users and groups have access, the times they can access the network, and any conditions that apply.
• Health policies—Used with Network Access Protection, these policies create System Health Validators (SHVs) that define client computer configuration requirements. NAP-capable computers that attempt to connect must comply with these policies, or they can’t connect.
Configuring Connection Request Policies
Connection request policies are used to specify which RADIUS servers perform authentication and authorization of RADIUS clients’ connection requests. These policies can also specify which servers RADIUS accounting requests are sent to. They’re applied to NPS servers configured as RADIUS servers or RADIUS proxies. Requests are authenticated and authorized by NPS acting as a RADIUS server or forwarded by NPS acting as a RADIUS proxy for authentication and authorization by another RADIUS server only if settings in the Access-Request message match at least one of the connection request policies that have been configured.
Let’s say you are managing multiple domains abc.com, microsoft.com, you want to forward the request to different NPS server in related domain. You have three Policies,
- Wireless Connection-abc.com : Processing Order 1.
- Wireless connection-microsoft.com: processing order 2
- Wireless connection-others: Processing order 3
When a request come in, NPS will check the first policy Wireless Connection-abc.com first, see if the connection machine any conditions, if yes, forward it to NPS in domain abc.com. If not, process with the second, then last. If no matching, request will be discarded.
The best practice is put the more specific conditions in the policy which will be processed first, the more general conditions in the policy which will be processed later.
You can define connection request policies for the following NAS types:
• Unspecified—Process or forward connection requests from any type of NAS, depending on whether the server receiving the message is configured as a RADIUS server or RADIUS proxy.
• Remote Desktop Gateway—Process or forward connection requests from an NAS that’s managing connections from Remote Desktop clients.
• Remote access server (VPN-dial up)—Process or forward requests from an NAS that’s managing dial-up and VPN connections.
• DHCP server—Process or forward requests from an NAS that’s giving network IP addresses to access clients.
• Health Registration Authority (HRA) server—Process or forward requests from an NAS that supplies a certificate for the access client to use when connecting to the network, based on the client’s health status. (Client health is covered in more detail in “Configuring Network Access Protection.”)
• Host Credential Authorization Protocol (HCAP) server—Works with Cisco Network Admission Control to provide interoperability between Cisco network access servers and NAP.
• Vendor specific—Process or forward requests from an NAS with proprietary RADIUS attributes not included in RFC 2865 and 2866, which list the standard RADIUS attributes.
When a RADIUS server receives a RADIUS Access-Request message from a RADIUS client, the client’s attributes are checked against the connection request policy’s conditions. The attributes in the Access-Request message must match at all of the conditions you specified in the policy before the NPS server acts as a RADIUS server (authenticating and authorizing the connection request) or a RADIUS proxy (passing the request on to a RADIUS server for authentication and authorization). So try to add least condition which can pin point your traffic for easy troubleshooting.
Groups of condition attributes can be used in a connection request policy to compare with the attributes of the RADIUS Access-Request message:
• Day and time restrictions—Restrict access to specific days and times.
• User Name—Mostly used, Restrict access to certain usernames, which can be partial names or a pattern to match. When you configure NPS as a RADIUS proxy, you can add the domain name here to forward the authentication to related servers.
• Machine identity—Specify the method to identify clients in the policy.
• Connection properties—Restrict access to certain connection types, such as Point-to-Point Tunneling Protocol (PPTP) or Layer Two Tunneling Protocol (L2TP) for clients connecting by creating a tunnel.
• Gateway properties—Specify where a client is connecting from, such as the NAS phone number (if the client is dialing in), IP address, or port type (for example, analog phone lines, ISDN, or wireless).
• RADIUS client properties—Specify information about the RADIUS client, such as phone number, IP address, RADIUS client computer name, and RADIUS client vendor name.
Configuring Network Policies
After you have configured RADIUS servers and clients defined in connection request policies, you need to specify who can connect to the network and under what conditions. To do this, you create network policies.
Connection request policies are specific to an NAS type, but network polices affect all clients who are trying to connect.
As with connection request policies, there are groups of conditions for determining access, each with attributes to compare
the incoming request with:
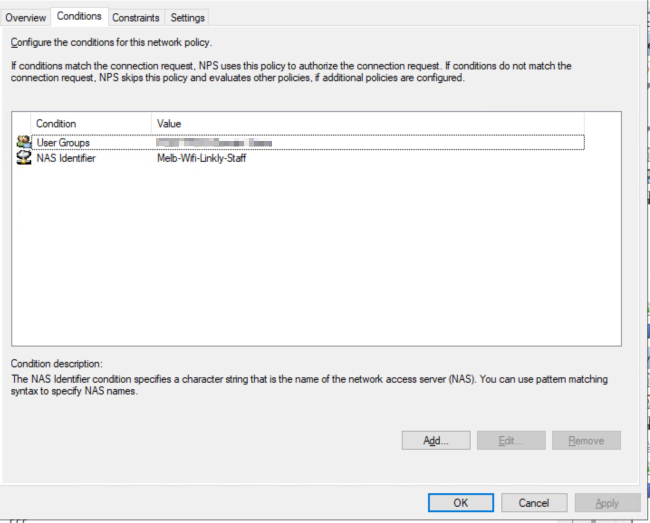
• Groups—Specify user or computer groups created in Active Directory Domain Services that the client must be a member of to match the policy. Using this condition, you can restrict access to users or computers belonging to a particular Windows group, computers belong- ing to a particular machine group, or users who are members of a particular user group.
• Day and time restrictions—Specify days and times clients can or can’t access the network.
• RADIUS client—Specify RADIUS attributes the client must have to match the policy. For example, you could restrict access to RADIUS clients that have a certain IP address or fall in a specified range of addresses.
A RADIUS client’s IP address isn’t the same as an access client’s IP address. This condition applies to all access clients connecting via a particular NAS type, such as a VPN server.
• Connection—Specify attributes for how the access client is connecting to the network. This condition compares attributes such as the access client’s (not the RADIUS client’s) IP address, the authentication method being used, the framing protocol (for example, PPP), the service being used (such as Telnet or PPTP), and the tunnel type (PPTP or L2TP). This condition could be used to restrict access for clients with a particular IP address yet allow access for other clients using the same NAS.
• Gateway—Specify NAS attributes, such as the phone number, name, IP address, and port type. For example, this condition can limit access to connection requests from an NAS with a particular IP address or clients requesting access via a wireless connection.
• Network Access Protection—Specify attributes related to NAP, such as whether the client has met the health policy criteria or whether the computer is NAP capable. For example, this condition can require an access client to have health checks performed, such as verification that a firewall is running, to match the policy.
• HCAP—Specify attributes related to Host Credential Authorization Protocol, which allows integrating Microsoft Network Access Protection with Cisco Network Admission Control. This condition requires using both NAP and Cisco Network Admission Control. For example, this condition can require the access client to be a member of a specific HCAP location group or user group to match the policy.
Network policy constraints.
Constraints are similar to conditions, with one major difference. If a condition in a policy isn’t met, NPS continues trying to find a match in the remaining conditions. If a constraint doesn’t match the connection request, however, no further policies are checked, the request is rejected, and access to the network is denied. You can configure the following constraints, found in the Constraints tab of a network policy’s Properties dialog box:
• Authentication method—The authentication method used when requesting access
• Idle timeout—The maximum number of minutes an NAS can be idle before dropping the connection
• Session timeout—The maximum number of minutes a user can remain connected to the network
• Called station ID—The phone number of the dial-up server (NAS) that access clients use
• Day and time restrictions—The schedule of days and times access is allowed
• NAS port type—The allowed access client’s media type (such as phone lines or VPNs). One of the most popular use is authenticate the wireless users. Select the “Wireless – IEEE 802.11” under Common 802.1x connection tunnel types.
Configuring Network Policies for Virtual Private Networks
VPNs are common methods of accessing networks remotely and securely. Because VPNs access a network remotely, using a network policy to control how they can access your network is a natural choice. The authentication type for a VPN can be password based or certificate based. Certificate-based methods are more secure, but you must have a valid CA certificate installed on every computer connecting via the VPN and client certificates installed on each computer. Some of the settings made in the Routing and Remote Access console when you configure a network policy are particularly applicable to VPNs:
• Multilink and Bandwidth Allocation Protocol (BAP)—Handle connection types that include multiple channels (for example, ISDN). You can adjust how multilink connections are handled and modify BAP parameters to specify when to drop the extra connections.
• IP filters—Filter access based on the client computer’s IP address. You can permit or disallow packets from a particular address or network and restrict access to certain ports and protocols.
• Encryption settings—Specify which encryption strengths you allow. The choices are Basic, Strong, Strongest, and No encryption (not recommended). All are supported by Routing and Remote Access Service, but some third-party clients might not support them. The connection tries the strongest type first, and then moves to the weaker choices, if needed.
• IP settings—Adjust how IP addresses are assigned to the access client. The choices are Server must supply an IP address, Client may request an IP address, Server settings determine IP address assignment (the default), and Assign a static IPv4 address.
NAS ID
Network access server identifier (NAS-ID) is used to notify the source of a RADIUS access request, which enables the RADIUS server to choose a policy for that request. You can configure a on each WLAN profile,
VLAN interface, or access point group. The NAS-ID is sent to the RADIUS server by the controller through an authentication request to classify users to different groups. This enables the RADIUS server to send a
customised authentication response.
RADIUS Filter-ID
Filter-ID is arguably one of the most pragmatic, useful attributes in the RADIUS specification. Filter-ID is based upon the common practice of packet filtering, the use of which is most often found in firewalls and intrusion detection systems. The premise behind packet filtering is to inspect each and every packet in a transaction or data stream in order to determine, based on rules that an administrator configures, whether those packets should be allowed to pass through.
In RADIUS, however, that use is not as distinct. The most parallel example of packet inspection as a security device is when you view the RADIUS client gear as a gateway. Indeed, the RADIUS client is the first hop on the packet’s destination to the Internet, and the client can filter based on rules to conclude whether to allow the packet to pass. But in RADIUS, packet filtering examines rules that an administrator configures, known as “filter profiles,” which act as guides to what packets can do what actions on what network.
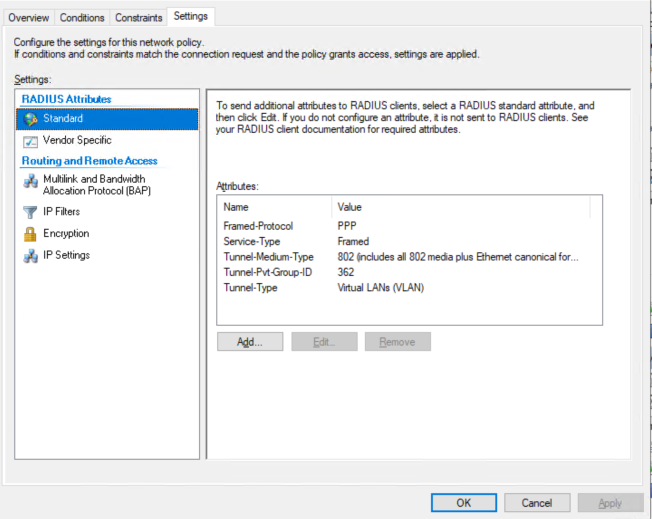
VLAN Attributes:
If you want to assign devices a vlan according to user group, then you should look into the RADIUS element called: ‘Tunnel-PVT-Group-ID’.
This is a RADIUS attribute that may be passed back to the authenticator (i.e. the WLC or AP) by the authentication server (i.e.NPS) when a successful authentication has been achieved. There are a few other elements which need to accompany it, but this is the key element, as it specifies the VLAN number that the user should be assigned to.
- Service-Type: Framed
- Tunnel-Type: VLAN
- Tunnel-Medium-Type: 802
- Tunnel-PVT-Group-ID: <VLAN Number>
Below example will put the device into vlan 362, if the login user is group of xxxx.
ref: https://www.oreilly.com/library/view/radius/0596003226/re12.html
Managing NPS Templates
Templates can reduce the amount of work and minimize the chance of error, especially when many RADIUS servers and clients need to be configured. You can use NPS or RADIUS templates to reuse settings on the local server or export settings to other NPS servers.
Templates are in the Network Policy Server console under the Templates Management node. There are six template types:
• Shared Secrets—Specify a reusable password for validating a connection between RADIUS servers and proxies and NAS servers.
• Remote RADIUS Servers—Specify reusable RADIUS server settings.
• RADIUS Clients—Specify reusable RADIUS client settings.
• IP Filters—Specify reusable lists of the IPv4 and IPv6 addresses of allowed destinations.
• Remediation Server Groups—Specify reusable settings for remediation server groups.
• Health Policies—Specify reusable health policy settings.
Exporting and Importing Templates
NPS can export templates to an XML file that can then be imported to another NPS server, which is particularly useful when you’re setting up multiple NPS servers that should be configured the same way (for example, a server group). To export a template, open the Network Policy Server console. Right-click Templates Management and click Export Templates to a File. Select a location for the file, enter a name, and click Save.
To import a template, open the Network Policy Server console. Right-click Templates Management and click Import Templates from a File. Navigate to and select the XML file, and click Open.
Importing and Exporting NPS Policies
After configuring policies and templates, you can back up the entire NPS configuration by exporting it to an XML file. You can keep it to restore the configuration, if needed, or use it to configure other NPS servers in your network.
To export an NPS backup file, follow these steps in the Network Policy Server console:
1. In the left pane, right-click the NPS (Local) node and click Export Configuration. In the message box about exporting shared secrets, click the “I am aware that I am exporting all shared secrets” check box, and then click OK.
2. Choose a name and location to save the XML file, and click Save.
3. To restore the configuration, right-click the NPS (Local) node and click Import Configuration. Navigate to the XML file, and click Open.
To perform this same task from the command line, follow these steps:
1. Open a command prompt window. Type netsh and press Enter. At the netsh prompt, type nps and press Enter.
2. Type export filename=path\NPSconfig.xml exportPSK=YES , replacing path with the location you specified and NPSconfig.xml with a name of your choosing, and press Enter.
3. To import the file on this server or another server, type netsh and press Enter.
4. Type nps and press Enter, and then type import filename=”path\filename.xml” and press Enter.
5. You get a message stating that the import was successful. Close the command prompt window.