Implement Site-to-Site IPsec VPN
IPsec Negotiation
IPsec negotiation to establish a VPN involves five steps, which include IKE Phase 1 and Phase 2:
Step 1. An ISAKMP tunnel is initiated when host A sends “interesting” traffic to host B. Traffic is considered interesting when it travels between the peers and meets the criteria that are defined in an ACL.
Step 2. IKE Phase 1 begins. The peers negotiate the ISAKMP SA policy. When the peers agree on the policy and are authenticated, a secure tunnel is created .
Step 3. IKE Phase 2 begins. The IPsec peers use the authenticated secure tunnel to negotiate the IPsec SA policy. The negotiation of the shared policy determines how the IPsec tunnel is established.
Step 4. The IPsec tunnel is created, and data is transferred between the IPsec peers based on the IPsec SAs.
Step 5. The IPsec tunnel terminates when the IPsec SAs are manually deleted, or when their lifetime expires.
Configure tasks:
Task 1: Configure the ISAKMP policy for IKE Phase 1
Task 2: Configure the IPsec Policy for IKE Phase 2
Task 3: Configure a Crypto Map for the IPsec Policy
Task 4: Apply the IPsec Policy
Task 5: Verify the IPsec Tunnel is Operational
Preparation:
Enable the security technology package:
R1(config)# license boot module c1900 technology-package securityk9
Then save running-configure, reload the router.
Configure ACL:
Permit ISAKMP traffic:
access-list acl_number permit udp source_ip wildcard destination_ip wildcard eq isakmp
Permit ESP traffic:
access-list acl_number permit esp source_ip wildcard destination_ip wildcard eq isakmp
Permit AH traffic:
access-list acl_number permit ahp source_ip wildcard destination_ip wildcard eq isakmp
Handling Broadcast and multicast traffic
But what if XYZCORP decided to implement EIGRP or OSPF? These routing protocols use multicast addresses to exchange routing information with neighbors. IPsec only supports unicast traffic. To enable routing protocol traffic, the peers in a site-to-site IPsec VPN implementation would need to be configured with a Generic Routing Encapsulation (GRE) tunnel for the multicast traffic.
GRE supports multiprotocol tunneling, as shown in the figure. It can encapsulate multiple OSI Layer 3 protocol packet types inside an IP tunnel. Adding an additional GRE header between the payload and the tunneling IP header provides the multiprotocol functionality. GRE also supports IP multicast tunneling. Routing protocols that are used across the tunnel enable dynamic exchange of routing information in the virtual network. GRE does not provide encryption.
Configure ISAKMP policy
The first task is to configure the ISAKMP policy for IKE Phase 1. The ISAKMP policy lists the SAs that the router is willing to use to establish the IKE Phase 1 tunnel. The Cisco IOS comes with default ISAKMP policies already in place. To view the default policies, enter the show crypto isakmp default policy command.
1. Syntax to Configure a New ISAKMP Policy
Verify that IKE is enabled:
R1(config)# crypto isakmp enable
To configure a new ISAKMP policy, use the crypto isakmp policy policy_numbercommand, as shown in the figure. The only argument for the command is to set a priority for the policy (from 1 to 10000). Peers will attempt to negotiate using the policy with the lowest number (highest priority). Peers do not require matching priority numbers.
When in ISAKMP policy configuration mode, the SAs for the IKE Phase 1 tunnel can be configured. Use the mnemonic HAGLE to remember the five SAs to configure:
- Hash
- Authentication
- Group
- Lifetime
- Encryption
Router(config-isakmp)# hash sha
Router(config-isakmp)# authentication pre-share
Router(config-isakmp)# group 14                // at least 14 in the production environment.
Router(config-isakmp)# lifetime 3600           //3600 seconds, 1 hour
Router(config-isakmp)# encryption aes 256
2. Configure a Preshared Key
The administrator can either specify a host name or an IP address for the peer.
router(config)# crypto isakmp key keystring {address | hostname} {other_end_peer_address | other_end_peer_hostname}
3. Define the interesting traffic
Interesting traffic (or the encryption domain) is that traffic which should be encrypted over a VPN connection. Rest of the traffic goes unencrypted.
Define interesting traffic, configure each router with an extended ACL to permit traffic from the local LAN to the remote LAN. The ACL will be used in the crypto map configuration to specify what traffic will trigger the start of IKE Phase 1.
Router(config)# access-list 10 permit ip source_ip wildcard destination_ip wildcard
4. Configure a transform set
Trasform set is all about how to secure the data.
Configure a transform set using the crypto ipsec transform-set tag encryption_method authentication_methodcommand:
- esp-des
- esp-3des (default)
- esp-aes (128-bit encryption)
- esp-aes-192
- esp-aes-256
- esp-null
- esp-gcm
- esp-gmac
- esp-md5-hmac
- esp-null
- esp-seal
- esp-sha-hmac (default)
- esp-sha256-hmac
- esp-sha384-hmac
- esp-sha512-hmac
E.g.router(config)# crypto ipsec transform-set FirstSet esp-3des esp-md5-hmac
5. Configure a crypto map
Now that the interesting traffic is defined, and an IPsec transform set is configured, it is time to bind those configurations with the rest of the IPsec policy in a crypto map.
crypto map map_name seq_number {ipsec-isakmp | ipsec-manual}
- ipsec-isakmp : indicate that the IKE will be used to establish the IPSec to protect the traffic.
- ipsec-manual: IKE will not be used.
In the Crypto Map Configuration:
Add a description for the map : router(config-crypto-map)# description words
Step 1. Bind the ACL and the transform set to the map.
router(config-crypto-map)# match address acl_number
router(config-crypto-map)# set transform-set tag
Step 2. Specify the peer’s IP address.
router(config-crypto-map)#set peer other_end_peer_address
Step 3. Configure the DH group.
router(config-crypto-map)#set pfs group-number
PFS (perfect forward security) ensures that the same key will not be generated again, so forces a new diffie-hellman key exchange. This would ensure if a hacker\criminal wants to compromise a private key, he would be able to access data in transit which protected by that key and not any future data, as future data will not be associated with that compromised key.
Both sides of VPN should support PFS in order for PFS to work.Therefore using PFS provides a more secure VPN connection.
For more: read here: https://en.wikipedia.org/wiki/Forward_secrecy
Step 4. Configure the IPsec tunnel lifetime.
router(config-crypto-map)#set security-association life-time seconds number
Verify the crypto map configuration:
show crypto map
6. Apply the crypto map
To apply the crypto map, enter interface configuration mode for the outbound interface and configure the crypto map map-name command.
Note, you need to configure from 1 to 6 on both gateway router.
7. Test the IPsec
Ping from both host machine to, the first ping failed because it takes a few milliseconds to establish the ISAKMP and IPsec tunnels.
show crypto ipsec sa
show crypto isakmp sa
show crypto ipsec transform-set
show crypto map
Notice that the number of packets encapsulated, encrypted, decapsulated, and decrypted.
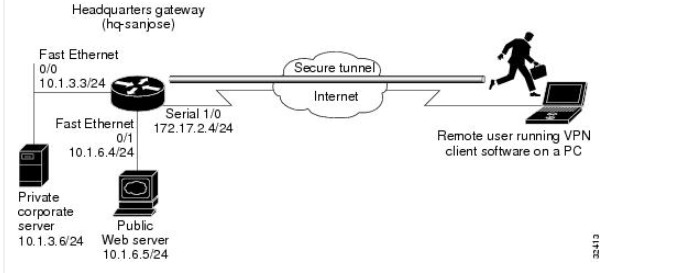
Remote Access VPN
Below picture shows a headquarters network providing a remote user access to the corporate intranet. In this scenario, the headquarters and remote user are connected through a secure tunnel that is established over an IP infrastructure (the Internet). The remote user is able to access internal, private web pages and perform various IP-based network tasks.

aaa new-model
!
!
aaa authentication login default local
aaa authentication login vpn_xauth_ml_1 local
aaa authentication login sslvpn local
aaa authorization network vpn_group_ml_1 local
!
!
!
!
!
aaa session-id common
!
ip source-route
no ip icmp rate-limit unreachable
ip cef
!
!
!
!
!
no ip domain lookup
no ipv6 cef
!
multilink bundle-name authenticated
!
!
!
!
!
!
!
crypto pki token default removal timeout 0
!
!
username frank privilege 15 secret 5 $1$CqbR$XOCGzis20zhFDAWKQfrCg/
!
redundancy
!
!
ip tcp synwait-time 5
!
!
crypto isakmp policy 1
encr 3des
hash md5
authentication pre-share
group 2
crypto isakmp key test12345 address 172.17.2.4
crypto isakmp keepalive 12
!
crypto isakmp client configuration group CCLIENT-VPN
key test12345
dns 8.8.8.8
pool VPN-Pool
max-users 5
crypto isakmp profile vpn-ike-profile-1
match identity group CCLIENT-VPN
client authentication list vpn_xauth_ml_1
isakmp authorization list vpn_group_ml_1
client configuration address respond
virtual-template 2
!
!
crypto ipsec transform-set proposal4 ah-sha-hmac esp-des
crypto ipsec transform-set encrypt-method-1 esp-3des esp-sha-hmac
!
crypto ipsec profile VPN-Profile-1
set transform-set encrypt-method-1
!
!
!
!
!
!
!
interface FastEthernet0/0
ip address 172.17.2.4 255.255.255.0
duplex auto
speed auto
!
interface FastEthernet0/1
ip address 10.1.3.3 255.255.255.0
duplex auto
speed auto
! ‘ip unnumbered‘ interface on our router’s LAN interface.
interface Virtual-Template2 type tunnel
ip unnumbered FastEthernet0/1
tunnel mode ipsec ipv4
tunnel protection ipsec profile VPN-Profile-1
!
ip local pool VPN-Pool 10.1.3.10 10.1.3.20
ip forward-protocol nd
no ip http server
no ip http secure-server
!
!
!
logging esm config
access-list 120 remark ===[Cisco VPN allow list]===
access-list 120 permit ip any any
http://www.firewall.cx/cisco-technical-knowledgebase/cisco-routers/809-cisco-router-vpn-client.html
Related lab: