Setup the SCEP profile with Onsite CA is a complex job and can be daunting.
How it works
I will borrow the flow from Microsoft to show how this process works:
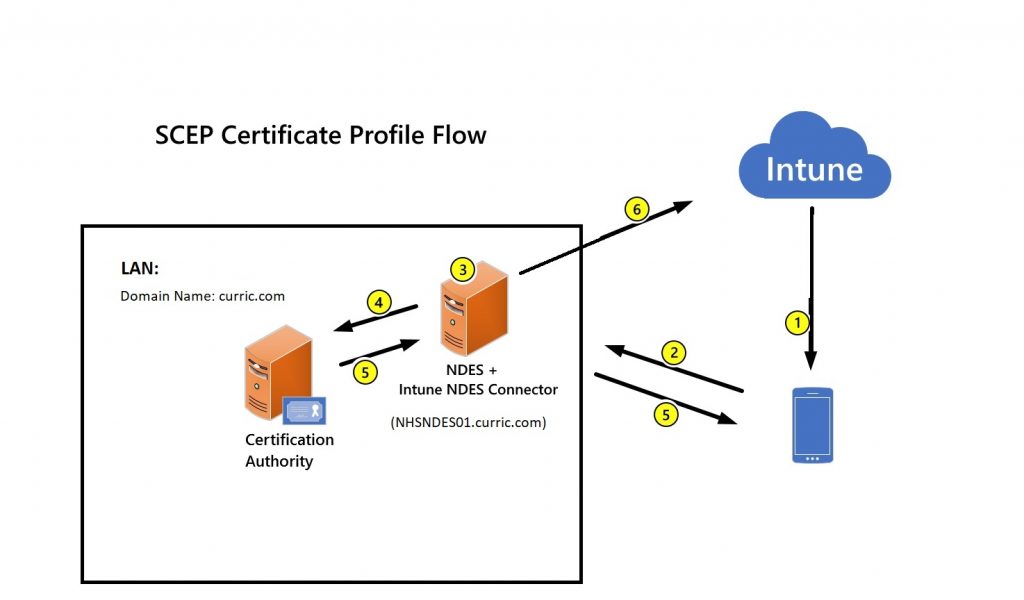
- Deploy a SCEP certificate profile. Intune generates a challenge string, which requires a specific user, certificate purpose, and certificate type.
- Device to NDES server communication. The device uses the URI for NDES from the profile to contact the NDES server, which is only process that the device initiate communication to the LAN, so it can present a challenge.
- NDES to policy module communication. NDES forwards the challenge to the Intune Certificate Connector policy module on the server, which validates the request.
- NDES to certification authority. NDES passes valid requests to issue a certificate to the Certification Authority (CA).
- Certificate delivery to the device. The certificate is delivered to the device.
- Reporting of deployment to Intune. The Intune Certificate Connector reports the certificate issuance event to Intune.
A bit about my environment:
In my scenario, the NDES server NHSNDES01.curric.com is not accessible from the internet, so an Azure AD application proxy will be used. If you have the Azure AD application proxy installed on another domain joined machine, you can use that for this project as well.
Prerequisite
- Internal PKI
- An internal PKI (Public Key Infrastructure) is required for issuing the certificates consisting of an Enterprise Certification Authority (CA) that runs on an Enterprise edition of Windows Server 2008 R2 or later.
- The key pair is created by the device (or its TPM) and the private key never leaves the device (or the TPM). So if your laptop motherboard gets replaced after the enrollment, you will need to disconnect and rejoin the Asure AD.
- Security of the enrollment process depends on the security of the server hosting the Connector and the NDES Role Service.
- Network Device Enrollment Service (NDES) server
- A domain joined member server running on Windows Server 2012 R2 or later on the same domain as the internal PKI
- You can’t use NDES that’s installed on the server that hosts the Enterprise CA. It’s recommended to setup a dedicated server for the NDES server, install an windows server 2012R2 or newer. In my case it is NHSNDES01.
- You’ll install the Microsoft Intune Certificate connector on the same server that hosts NDES with below requirements
- The connector has the same network requirements as managed devices.
- The connector must run on the same server as the NDES server role, a server that runs Windows Server 2012 R2 or later.
- The .NET 4.5 Framework is required by the connector and is automatically included with Windows Server 2012 R2.
- Internet Explorer Enhanced Security Configuration must be disabled on the server that hosts NDES and the Microsoft Intune Certificate Connector.
- Create an Active Directory service account for NDES service (mine is simply NDES).
- This account must have the following rights on the server that hosts NDES:
- Logon Locally
- Logon as a Service
- Logon as a batch job
- Add the NDES service account to the local IIS_IUSERS group.
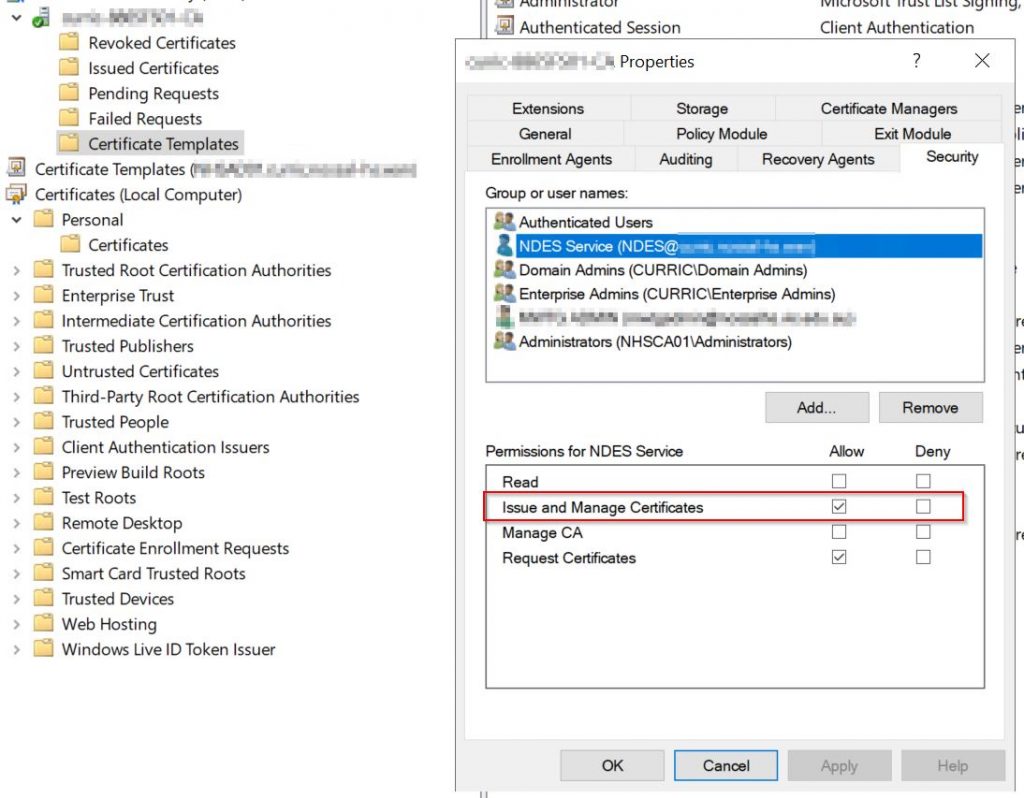
- Configure the NDES service account with request permission and revoke permission on the CA :
- On your Certificate Authority console, Right-click the CA name and select Properties.
- In Security tab, click Add.
- Grant Issue and Manage Certificates permission to the NDES service account you created.
- This account must have the following rights on the server that hosts NDES:
- Create an Active Directory group named e.g. NDES Servers cluster (optional). So if you have multiple NDES servers for fault tolerance, you can put them in this group.
-
Modify the validity period of the certificate template
It’s optional to modify the validity period of the certificate template.
After you create the SCEP certificate template, you can edit the template to review the Validity period on the General tab.
By default, Intune uses the value configured in the template. However, you can configure the CA to allow the requester to enter a different value (only less than the validity period), and that value can be set from within the Intune console.
Important ! For iOS/iPadOS and macOS, always use a value set in the template.
To configure a value that can be set from within the Intune console. On the CA, run the following commands(note there is a space before the sign +, and no space after it):
certutil -setreg Policy\EditFlags +EDITF_ATTRIBUTEENDDATE
Then restart the service:
net stop certsvc
net start certsvc
- Find the ValidityPeriod for the CA, which will should be more than the validity set in Intune SCEP profile: On the CA server.
certutil -getreg ca\validityPeriod

HKEY_LOCAL_MACHINE\SYSTEM\CurrentControlSet\Services\CertSvc\Configuration\curric-8865FS01-CA\ValidityPeriod:

ValidityPeriod REG_SZ = Years


certutil -getreg ca\validityPeriodUnits

HKEY_LOCAL_MACHINE\SYSTEM\CurrentControlSet\Services\CertSvc\Configuration\curric-8865FS01-CA\ValidityPeriodUnits:

ValidityPeriodUnits REG_DWORD = 2