Step 1. Setup the Certificate template
In this step, we will need 3 cert templates: SCEP Certificate template for mobile devices, Client authentication certificate for NDES server, Server authentication certificate for NDES server.
The SCEP cerficate template for mobile devices is easy to under stand, which is used to authenticate either the user or mobile devices. Client authentication certificate is used for
- SCEP Certificate Template: Template you’ll configure on your issuing CA used to fullfil the devices SCEP requests, which can be either a user certificate or computer certificate. I will need the pre-login to happen, so a computer certificate will be ideal.
- Client authentication certificate: Requested from your issuing CA or public CA.
You install this certificate on the computer that hosts the NDES service and it’s used by the Intune Certificate Connector .
If the certificate has the client and server authentication key usages set (Enhanced Key Usages) on the CA template that you use to issue this certificate. You can then use the same certificate for server and client authentication. - Server authentication certificate: Web Server certificate requested from your issuing CA or public CA.
You install and bind this SSL certificate in IIS on the computer that hosts NDES.
If the certificate has the client and server authentication key usages set (Enhanced Key Usages) on the CA template that you use to issue this certificate. You can then use the same certificate for server and client authentication.
Now let’s go through the details of each template:
SCEP Certificate Template:
Before we configure this template, we need to know the remaining validity period of the CA, as the maximum validity period for this template has to be less than the remaining validity period of the CA certificate. You can use below command to check the maximum validity period, but you also need to check the remaining period by logging on the CA and check from certmgr.msc.
PS C:\Windows\system32> certutil -getreg ca\validityPeriod
HKEY_LOCAL_MACHINE\SYSTEM\CurrentControlSet\Services\CertSvc\Configuration\curric-8865FS01-CA\ValidityPeriod:

ValidityPeriod REG_SZ = Years
CertUtil: -getreg command completed successfully.

PS C:\Windows\system32> certutil -getreg ca\validityPeriodUnits
HKEY_LOCAL_MACHINE\SYSTEM\CurrentControlSet\Services\CertSvc\Configuration\curric-8865FS01-CA\ValidityPeriodUnits:

ValidityPeriodUnits REG_DWORD = 2
CertUtil: -getreg command completed successfully.
Right click the Computer certificate, click Duplicate Template.
- make sure it is a v2 Certificate Template (with Windows 2003 compatibility):
- Configure the following settings on the specified tabs of the template:
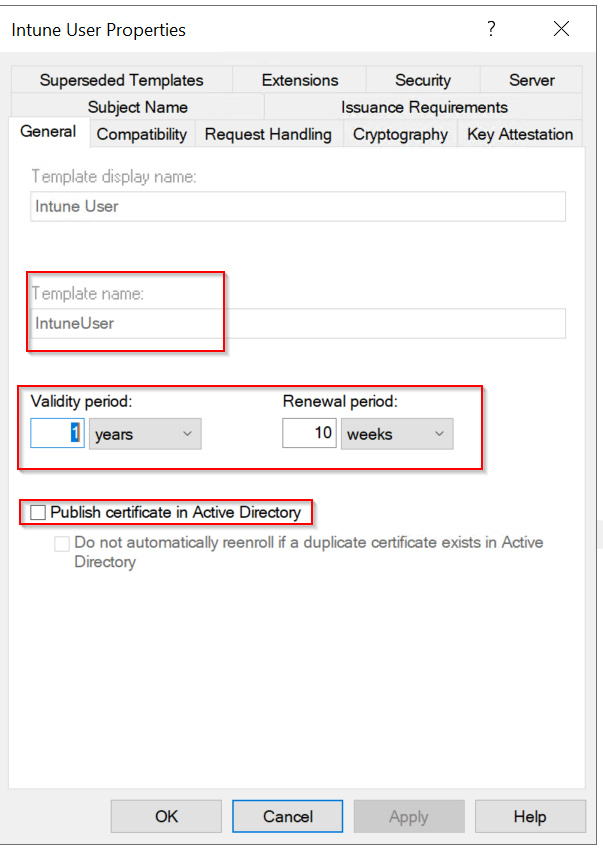
- General:
- Uncheck Publish certificate in Active Directory.
- Specify a friendly Template display name so you can identify this template later and use in the NDES server registry setting. Mine is IntuneUser .
- Make sure the Validity period is equal or less than the remaining CA validity period.
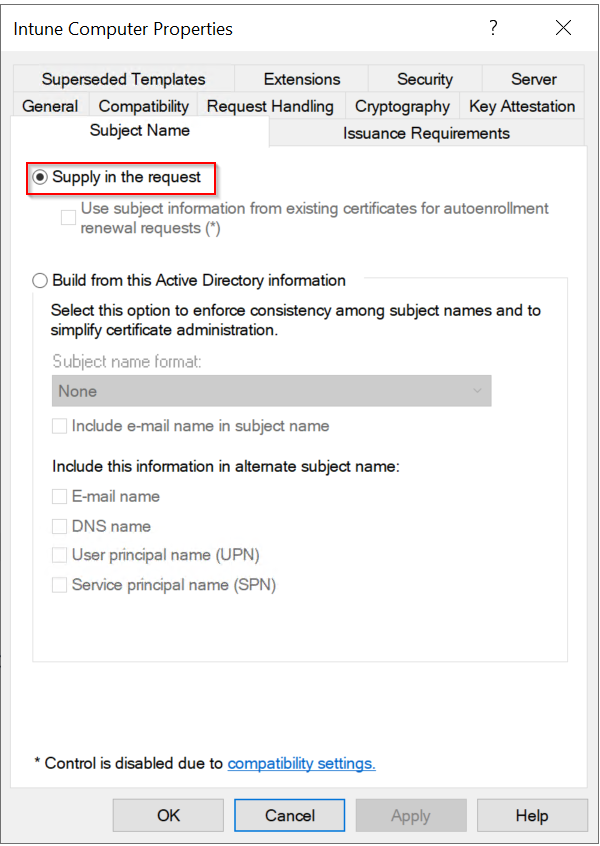
- Subject Name:
- General:
Select Supply in the request. Security is enforced by the Intune policy module for NDES.
-
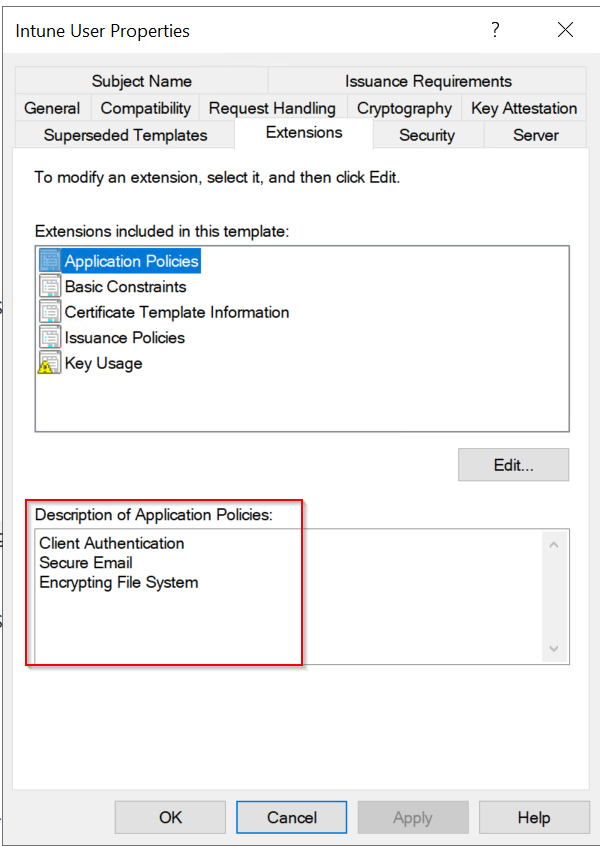
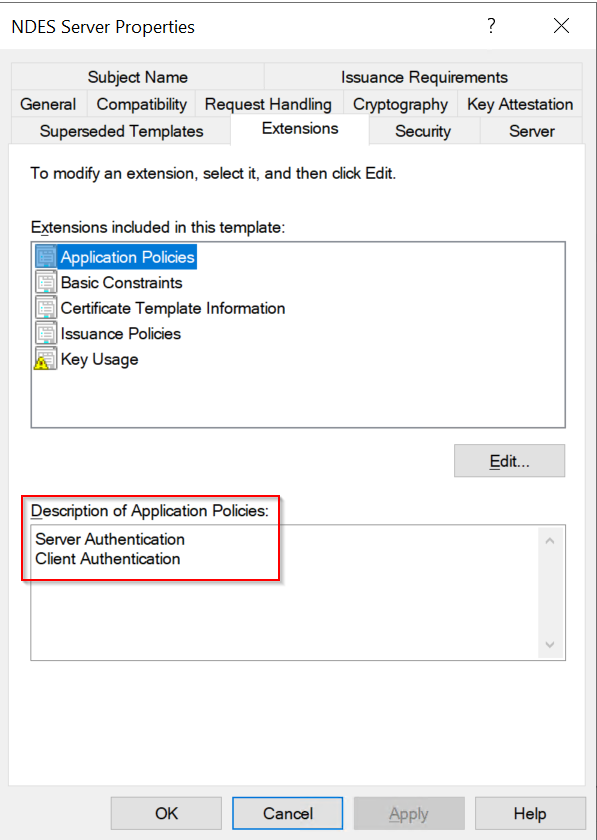
- Extensions:
- Ensure that Description of Application Policies includes Client Authentication, Secure Email, Encrypting File System.
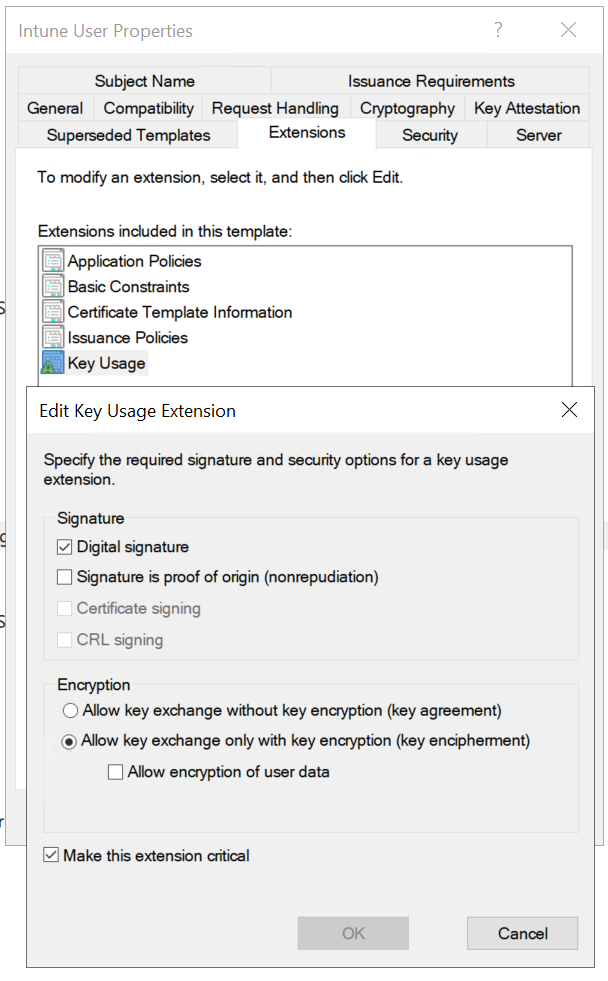
- For iOS/iPadOS and macOS certificate templates, also edit Key Usage and make sure Signature is proof of origin isn’t selected.
- Ensure that Description of Application Policies includes Client Authentication, Secure Email, Encrypting File System.
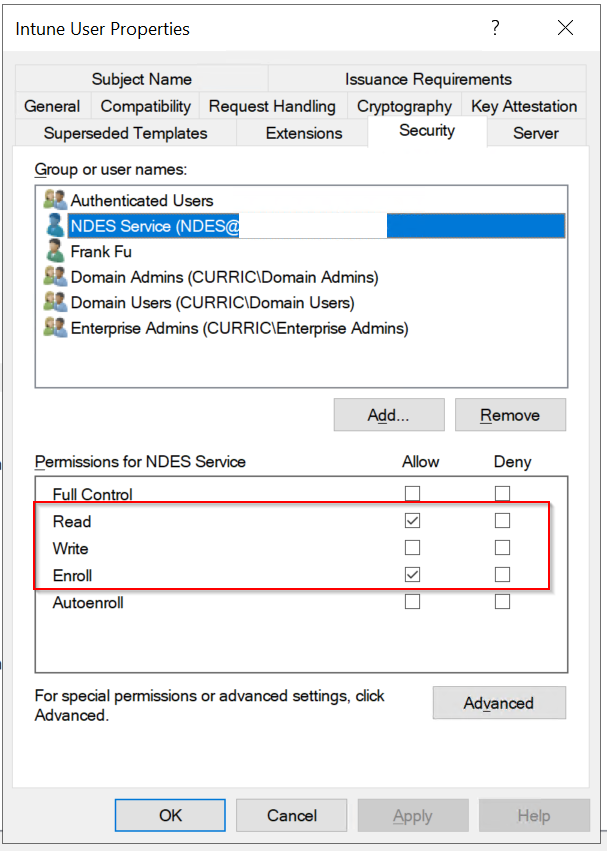
- Security:
- Add the NDES service account. This account requires Read and Enroll permissions to this template
.
- Add the NDES service account. This account requires Read and Enroll permissions to this template
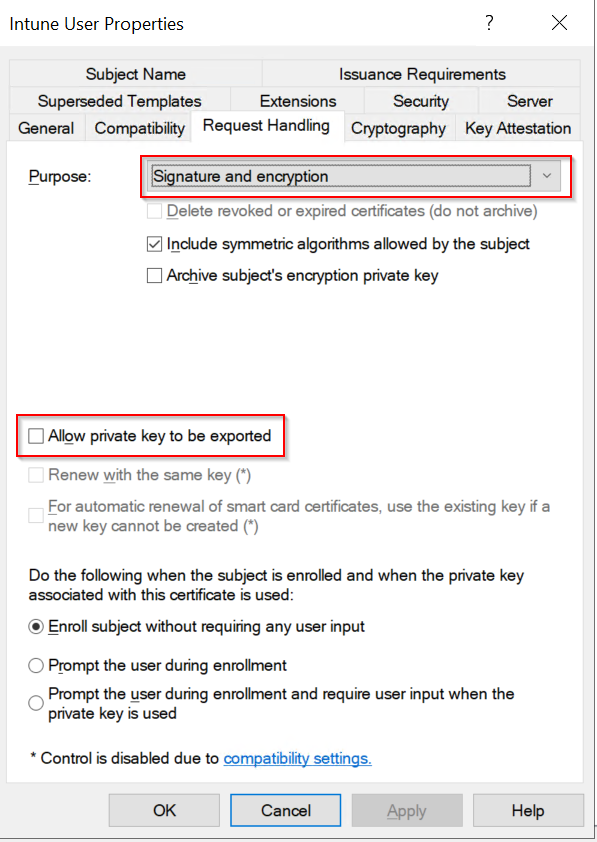
- Request Handling:
- Purpose: Signature and encryption
- Uncheck “Allow private key to be exported”, which is required by SCEP
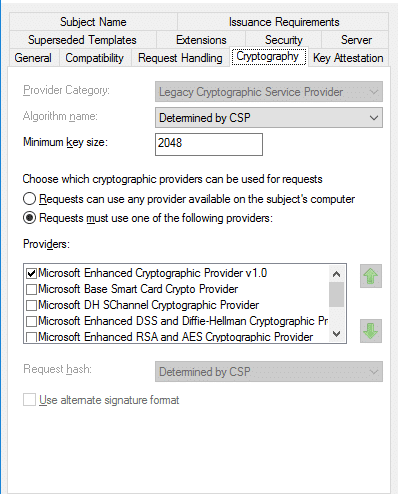
- Cryptography
- Extensions:
Client authentication certificate and Server authentication certificate
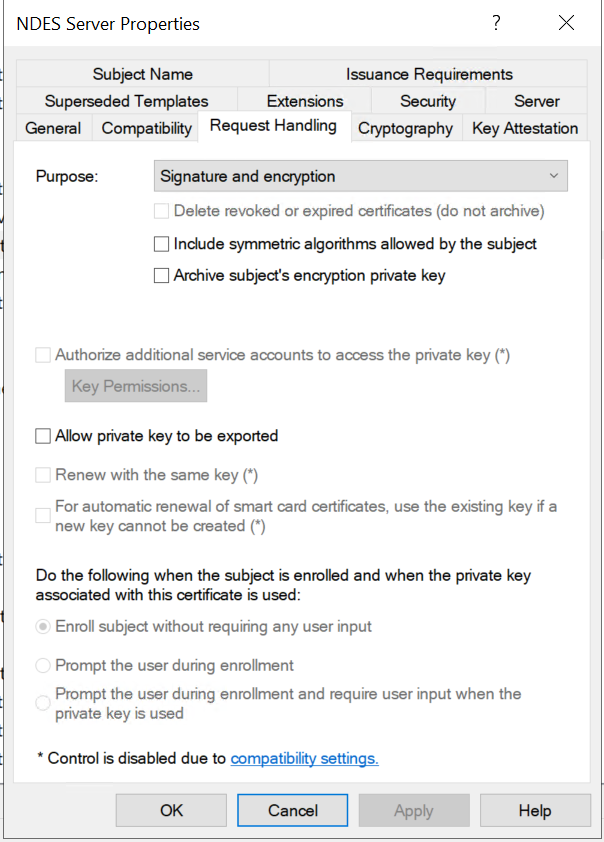
We will create a template for both of these certificates on NDES server. Mine is called NDES Server. This template share most of the same info except 4 parts:
- Untick Include symmetric algorithms allowed by the subject.
- Ensure Server Authentication is in Application Policies under the Extension tab.
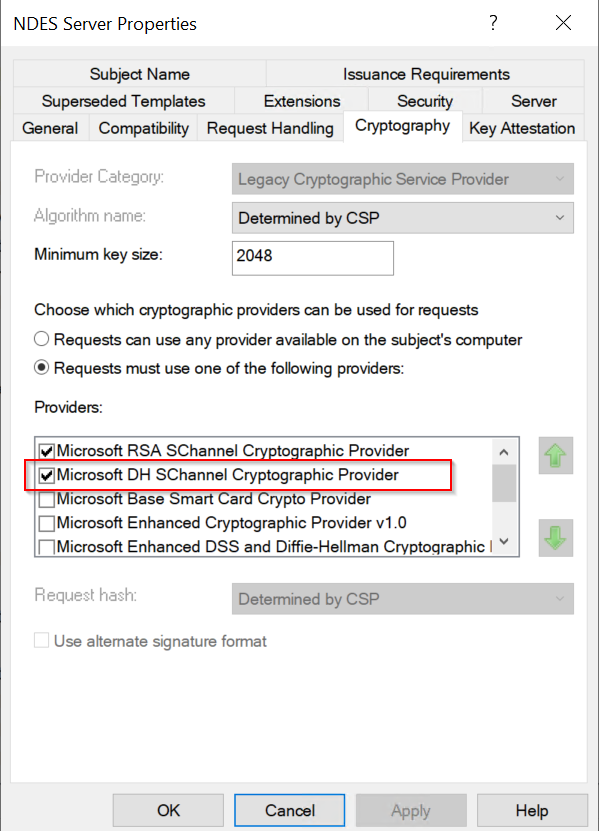
- Cryptography: tick Microsoft DH SChannel Cryptographic Provider
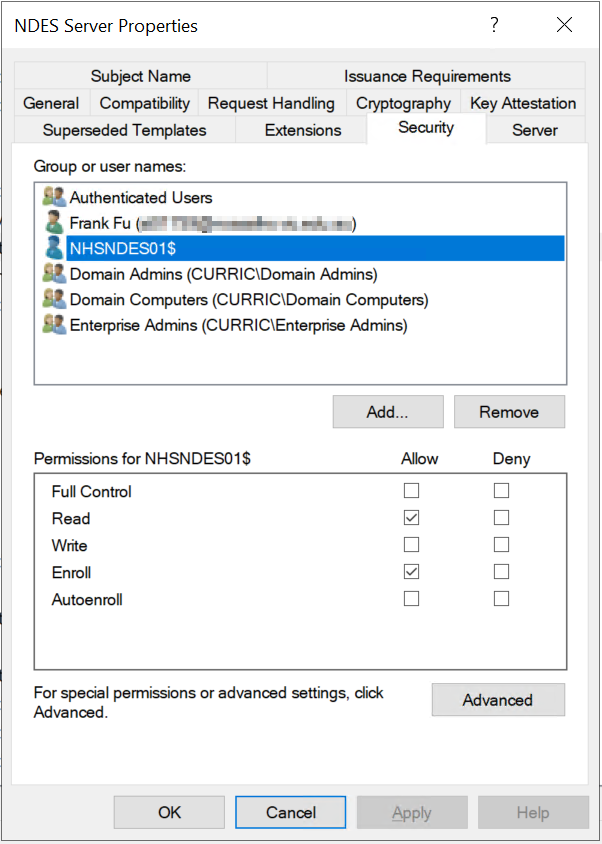
- Security, allow the computer account to enroll, not the service account NDES. If you have a NDES server group, this will be the computer group name.
Publish the two certificate template you created.
In the Certificate Authority management console, right-click on Certificate Templates, select New and then Certificate Template to Issue. Find the two template you created above and publish both.
Step 2. Setup a NDES Service
Install the NDES service ( make sure you installed all the service roles listed below)
-
- On the server that will host your NDES service, sign in as an Enterprise Administrator, and then use the Add Roles and Features Wizard to install NDES:
- In the Wizard, select Active Directory Certificate Services to gain access to the AD CS Role Services. Select Network Device Enrollment Service, uncheck Certification Authority, and then complete the wizard.
Tip:In Installation progress, don’t select Close. Instead, select the Configure Active Directory Certificate Services on the destination server link. The AD CS Configuration wizard opens, which you use for the next procedure in this article, Configure the NDES service. After AD CS Configuration opens, you can close the Add Roles and Features wizard.
- When NDES is added to the server, the wizard also installs IIS. Confirm that IIS has the following configurations:
- Web Server > Security > Request Filtering
- Web Server > Application Development > ASP.NET 3.5Installing ASP.NET 3.5 installs .NET Framework 3.5. When installing .NET Framework 3.5, install both the core .NET Framework 3.5 feature and HTTP Activation.
- Web Server > Application Development > ASP.NET 4.5Installing ASP.NET 4.5 installs .NET Framework 4.5. When installing .NET Framework 4.5, install the core .NET Framework 4.5 feature, ASP.NET 4.5, and the WCF Services > HTTP Activation feature.
- Management Tools > IIS 6 Management Compatibility > IIS 6 Metabase Compatibility
- Management Tools > IIS 6 Management Compatibility > IIS 6 WMI Compatibility
- On the server, add the NDES service account as a member of the local IIS_IUSR group.
- In the Wizard, select Active Directory Certificate Services to gain access to the AD CS Role Services. Select Network Device Enrollment Service, uncheck Certification Authority, and then complete the wizard.
- On the server that will host your NDES service, sign in as an Enterprise Administrator, and then use the Add Roles and Features Wizard to install NDES:
On the computer that hosts the NDES service, run the following command in an elevated command prompt. The following command sets the SPN of the NDES Service account:
- Setup SPN
In a privileged Powershell console ( NOT CMD,which does not interpret the environmental variables $ServerFQDN and $env:computername below, change domain\ndes_service_account into your NDES service account), issue two command:
setspn.exe -s HTTP/$($ServerFQDN) domain\ndes_service_account

setspn.exe -s HTTP/$($env:computername) domain\ndes_service_account
Configure the NDES service
- On the computer that hosts the NDES service, open the AD CS Configuration wizard, and then make the following updates:
Tip
If you’re continuing on from the last procedure and clicked the Configure Active Directory Certificate Services on the destination server link, this wizard should already be open. Otherwise, open Server Manager to access the post-deployment configuration for Active Directory Certificate Services.
- In Role Services, select the Network Device Enrollment Service.
- In Service Account for NDES, specify the NDES Service Account.
- In CA for NDES, click Select, and then select the issuing CA where you configured the certificate template.
- In Cryptography for NDES, set the key length to meet your company requirements.
- In Confirmation, select Configure to complete the wizard.
- You will configure the RA certificate info in this wizard, so at the last step, export the configuration and save it for RA cert renew in two years. See here for how to renew the RA cert: https://msendpointmgr.com/2020/06/15/how-to-renew-ndes-service-certificates-for-usage-with-microsoft-intune/
After the wizard completes, update the following registry key on the computer that hosts the NDES service: HKEY_LOCAL_MACHINE\SOFTWARE\Microsoft\Cryptography\MSCEP\To update this key, identify the certificate templates’ Purpose (found on its Request Handling tab). Then, update the corresponding registry entry by replacing the existing data with the name of the certificate template (not the display name of the template) that you specified when you created the certificate template in step 1, mine is IntuneUser.The following table maps the certificate template purpose to the values in the registry:
| Certificate template Purpose (On the Request Handling tab) | Name of the Registry to edit(don’t change the name) | Value seen in the Intune admin console for the SCEP profile |
|---|---|---|
| Signature | SignatureTemplate | Digital Signature |
| Encryption | EncryptionTemplate | Key Encipherment |
| Signature and encryption | GeneralPurposeTemplate | Key Encipherment, Digital Signature |
For example, if the Purpose of your certificate template is Encryption, then edit the EncryptionTemplate value to be the name of your certificate template.

- Configure IIS request filtering to add support in IIS for the long URLs (queries) that the NDES service receives.
- In IIS manager, select Default Web Site > Request Filtering > Edit Feature Setting to open the Edit Request Filtering Settings page.
- Configure the following settings:
- Maximum URL length (Bytes) = 65534
- Maximum query string (Bytes) = 65534
- Select OK to save this configuration and close IIS manager.
- Validate this configuration by viewing the following registry key to confirm it has the indicated values:
HKEY_LOCAL_MACHINE\SYSTEM\CurrentControlSet\Services\HTTP\ParametersThe following values are set as DWORD entries ( if Not there, create them yourself):- Name: MaxFieldLength, with a decimal value of 65534
- Name: MaxRequestBytes, with a decimal value of 65534
- Restart the server that hosts the NDES service. Don’t use iisreset; iireset doesn’t complete the required changes.
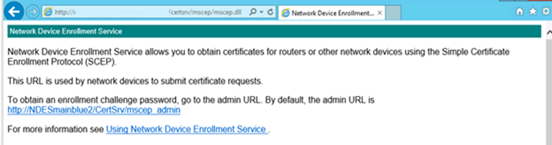
- Browse to http://Server_FQDN/certsrv/mscep/mscep.dll. You should see an NDES page similar to the following image
Open Certmgr.msc on NDES, request for a computer Cert with Client Authentication and Server Authentication.
CN must match FQDN, if you deploy via Azure APP proxy, It will be something like intunendes.msappproxy.net, so CN = intunendes.msappproxy.net
In the IIS, add the Cert to SSL certificate.
Select default site, click bindings… > click https: click Edit…, bottom select SSL certificate. Click select and OK.
Configure Default Web Site authentication
Fire up powershell to configure the IIS security feature:
# Enable anonymous authentication
Set-WebConfiguration -Location "Default Web Site" -Filter "/system.webServer/security/authentication/anonymousAuthentication/@Enabled" -Value "True" -ErrorAction Stop
# Disable windows authentication
Set-WebConfiguration -Location "Default Web Site" -Filter "/system.webServer/security/authentication/windowsAuthentication/@Enabled" -Value "False" -ErrorAction Stop
# Disable IE Enhanced Security Configuration for administrators
Go to the Server Manager > In the Left pane, select Local Server , in the right pane, find IE Enhanced Security Configuration, click On, select Off for Administrators.